Pre-production Pipeline
Even during pre-production, a project can rapidly become a mess if you are not careful. In this phase, the assets to manage are:
- script (for us, a Celtx project)
- breakdown ( a document with shot by shot list for the movie)
- storyboard images – one per shot, in our case typically done in Gimp
- animatic – usually generated from modified storyboard images, but sometimes from .blend or other files, the animatic is a draft of the movie with minimal animation (camera anim, few in-betweens per shot, etc).
moving into production, we also need to manage:
- shot file or files
- production reference library
- production edit
Adding a shot can be an ad-hoc process: assign it a name and number in the breakdown, make a storyboard image, then work on any number of source gimp and blender files to generate some .pngs or .avis that are finally referenced in the sequencer. Rinse and repeat, and you end up with hundreds of disorganized files, touching any of which will break the animatic edit–a situation far from ideal.
Organization
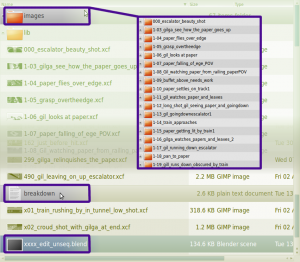
If you look at Jarred’s earlier post , you can see the beginnings of the solution. We had some issues from using a patched Blender and were still looking at a lot of manual work to add a shot into the production. Most of these problems we solved with a slight re-organization of the preproduction directory:

As you can see, the main folder contains source files (which should eventually be moved to their own subfolder), the breakdown and the edit. The source files generate the shots: all their filenames begin with xxx_yyyyyy, where xxx is the shot number, and yyyyyy is the short description from the breakdown. These are all checked into SVN. A subfolder called images/ contains various subfolders, one per shot, with the name xxx_yyyyyy. These contain every image, image sequence, movie or other file that is referenced by the edit.
Now we no longer need a modified Blender, since we don’t need to edit the names of the image files, just their paths.
Introducing Geppetto
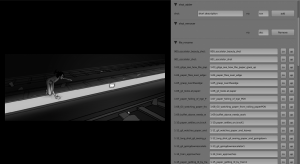
The next step towards improving anything is coming up with a cool name. To wit, ‘sequence_add_and_rename_shots.py — our former Python script for resequencing shots — becomes Geppetto, for the puppet master himself.

Ordering the Edit
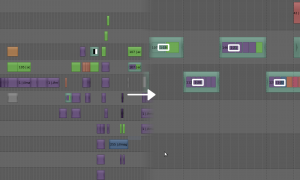
 Now our directories were organized, but the edit looked a mess! it would be nice to have each shot as a strip, not a collection of strips and effects. So we used Blender’s metastrip feature, which basically allows you to encapsulate any collection of related strips in the sequencer (strips in Blender are like clips in other editors) with one ‘metastrip’ – kinda like a strip folder. We gave each of these the name xxx (the shot number)- now when you look at the edit from the top view, all you see is shots, not the layering of all the background, foreground, etc. elements coupled with effects and transforms to make them move.
Hooking it into Geppetto
All this organization makes things easy to automate. Geppetto currently provides an:
- ‘Add Shot’ Button which lets you type in the shot number and name and then does the following:

- Adds the shot to the breakdown (you no longer edit the breakdown by hand, but use Geppetto instead)
- Creates a source .xcf file with the name xxx_yyyyy.xcf , adds, and commits to svn
- Creates a folder of the name xxx_yyyyy in images/ and makes a .png single frame in it
- Links the image into the sequence editor as a strip at the current frame position
- Encapsulates the image into a meta strip with the name xxx
- ‘Remove Shot’ Button: basically lets you type in which shot to remove , and takes it out of svn, the edit, the breakdown, everywhere. The files go to a junk folder so you don’t lose it for good.

- Shot List, with each shot getting:

- A text field you can edit to change the shot number
- A commit button to push your change to svn and the edit – basically this is for the editor/director to resequence a shot, or (not implemented yet) change the shot description refer to Jarred’s post for details
- An update button to update Svn and get new shot images in. Basically, if you or someone else changed the source .xcf for a shot, this gets those changes in automatically – details upcoming in part 2!
And finally, Jarred has made a prototype of the next feature, not yet rolled into the main code (drumroll, please): stay tuned for the ‘Make Movie’ Button in part 3! 🙂


