Protected armature layers

Protected layers are a rig features I had only a vague understanding for a while. Thanks to a bug, and a fix from Ton (and his explanation) I have a somewhat better understanding, I’ll put down here, mainly so I don’t forget. First of all, this is what they look like in 2.5x (left) and […]

Protected layers are a rig features I had only a vague understanding for a while. Thanks to a bug, and a fix from Ton (and his explanation) I have a somewhat better understanding, I’ll put down here, mainly so I don’t forget. First of all, this is what they look like in 2.5x (left) and 2.4x (right):

So far so good. But clicking these won’t actually change anything in the file you’re working in. Once you link he rig as a group and create a proxy*, things will become more clear.
With a proxy, you have a linked group with a localish rig proxy you can pose. Protected layers control what happen to the local proxy on file load:

  • Unprotected layers are local. The bones here are now out-of-sync with the rig file, you can add bones, delete them, add constraints, remove them, etc. If you change the rig file on these layers, nothing happens to your scene file
  • Protected layers get synced with the rig. any changes to the rig (new bones, constraints, etc.) will propagate to the scene file everytime you load the file. You won’t be able to add bones, delete them, or delete constraints in the scene file
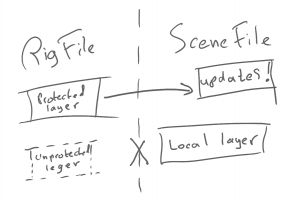

The design allows users to pose bones in protected layers, since ‘pose’ is actually a separate data structure that lives ‘on top’ of ‘bone’ data. Interestingly enough you can even add new constraints (part of the pose) but cannot delete original ones. The only catch is, that any un-keyed poses get wiped out when the rig is synced on file load- so you *must* key every bone you want to keep the pose on.

In Blender 2.58 there’s a bug that prevents posing bones in protected layers. This has been fixed for 2.59, coming soon. This bug is actually the reason I had to find out about all of this, since it cost me many hours, as my rig changes wouldn’t propagate to scene files, meaning I had to delete and then manual spend time fixing constraints, converting curves, keying channels, re-adding missing stuff, every time I updated the rig. Basically < record (constraints/parenting/anything unexpected) , protect, save, load, save, unprotect, re-add the recorded, save> cycle to do on each scene file everytime I wanted to push a rig update. To make things worse, most of our animators are overseas, and many of them don’t use SVN, so the process has been quite painful. I’ll continue to do this until all animators are using the new version, after which I can protect the layers and fix everything up.

Note: if you add a constraint to a bone in an unprotected layer, and later on protect that layer, you will lose that constraint!! since the bone is unprotected, it is local, and once the layer has been protected, gets wiped out by the (identical) protected bone. After this, of course, you can readd the constraint to the protected bone and it will ‘stick’.
* making a proxy:

  • In the rig file, create a group that contains the mesh, armature and all other components of your character, optionally only including layers that contain renderable items in the group Dupli layers.
  • save the rig file and open a new one
  • file->link->browse to the rig file and then link the group
  • ctrl-alt-p and select the armature from your rig to create a posing proxy

Blender Digital Artistry session at Siggraph 2011

Hey folks, for the first time, the Digital Artistry Workshops at Siggraph will feature a blender session, on Sunday, August 7th at 2:30, some info can be found on the siggraph page, and more details are available here. I’m quite excited to be teaching this course, an 1+1/2 session intended to introduce people from other […]

Hey folks, for the first time, the Digital Artistry Workshops at Siggraph will feature a blender session, on Sunday, August 7th at 2:30, some info can be found on the siggraph page, and more details are available here. I’m quite excited to be teaching this course, an 1+1/2 session intended to introduce people from other software to Blender, focusing primarily in my strengths (rigging). I hope it’ll be fun, we’ll try to do fun setups for atypical (and some typical) animation needs. The other sessions look quite interesting too.

What other passengers might look like

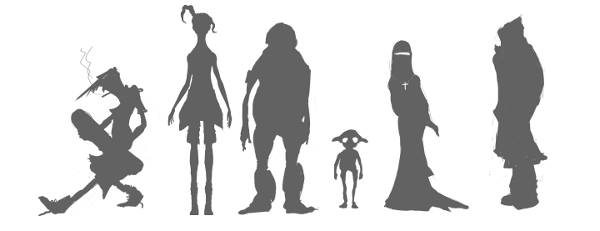
There’s a remote, but non zero chance, that we’ll be able to pull off other denizens of the subway for certain shots in the movie. Thinking about design got me wanting *not* to have other characters with ‘gilgaportions’ but maybe populating the world with stylised characters that have their own uniqueness and could fit into […]

There’s a remote, but non zero chance, that we’ll be able to pull off other denizens of the subway for certain shots in the movie. Thinking about design got me wanting *not* to have other characters with ‘gilgaportions’ but maybe populating the world with stylised characters that have their own uniqueness and could fit into her world. My first little attempt is drawing some basic silhouettes next to hers:

до свидания, Dimetrii !

Sad day on Friday saying goodbye to Dimetrii, who just finished his 3 month internship and is returning home- but not leaving the project, as he will stay on through the animation and lighting/compositing phases. Dimetrii took some modelling by Jonathan and Kursad and myself as concept art, and then created amazing sculpted iterations and […]

Sad day on Friday saying goodbye to Dimetrii, who just finished his 3 month internship and is returning home- but not leaving the project, as he will stay on through the animation and lighting/compositing phases.

Dimetrii took some modelling by Jonathan and Kursad and myself as concept art, and then created amazing sculpted iterations and then the final meshes for the film. He did this for Gilgamesh and two of the cockroaches, then did the necessary R+D to build Gilgamesh’s hairstyle with Blender’s sometimes stubborn particle hair. He did render-tests in Blender Internal and cycles, some of which have been posted on this log. He’s an amazing modeller, probably the best or among the best that I’ve known. Happily he’ll continue to work on the project from home, and we can have a reunion at the blender conference.

Introducing the Gilgamesh Keying Set

Hello folks Tube currently has 6 animators working on shots, with a few more to join if my blackmaiconvincing tactics work ;). Some of these talented folks are new to blender, some have even written books on the subject. To ease the pain of transition, I’ve been recording little video tutorials to help them get […]

Hello folks
Tube currently has 6 animators working on shots, with a few more to join if my blackmaiconvincing tactics work ;). Some of these talented folks are new to blender, some have even written books on the subject. To ease the pain of transition, I’ve been recording little video tutorials to help them get into the gilga rig as quickly as possible. I don’t see a reason to keep this stuff private, so I’m going to be publishing them on the blog for all to see. When the project is finished they might become part of the official documentation.

So now: Keying sets. Blender has this concept since 2.5, and the definitive explanation is found in joshua’s blog, here (btw his blog is a must-read for any blender animator). The general idea is that when you hit the keyframe insertion hotkey, or you have autokeying on, keys are adding into a ‘keying set’. the builtin ones work on selection, adding location/rotation/many more things in as desired (and you can add user defined builtins via python) while the user defined keying sets work on specific objects.

The cool thing is, with keying sets you can key things if you don’t even have them selected! this is awesome during the blocking of the anim, where you want to key everything. Helpfully, Blender provides a “Whole character” keying set, that keys everything on your entire character. Great, right? WRONG!!!!

It turns out this is a disaster. the whole character keying set has no idea how your rig is setup. It keys every transform and every property on every bone in the active armature. Meaning, bones that riggers never intended animators to touch, now have keys on them. In the best of cases messy, in the worst:as I said, a disaster.

So to save animator’s the hassle, I added the ‘gilgamesh’ keying set, with it’s own UI panel to add parts of the rig to the keying set or to remove them. How does it work? well, a day’s worth of python coding ;). So without further ado (I’m longwinded today) here’s the tutorial video on how to use them (btw, if you full screen these, you’ll get better quality):

©URCHIN 2015