Introduction:
Bart from Blendernation is collecting information for ‘Redcurrant’ – a project about doing pipeline and asset management for Gooseberry. He asked me about the approach we’ve taken in the production of Tube/Wires for Empathy. I have also had a similar way-overdue request from Dylan of the OpenDam project, so I thought to make it a public post since it might be useful information to other people.
Breaking up the Pipeline into Chunks:
We often use the word ‘pipeline’ pretty loosely in the context of what we do to make an animated film. It is a fairly linear way of describing a problem set that has non-linearities and interdependencies. I’m going to use it here in a very ‘common knowledge’ sense, but chomp it up into fairly standard bits that can be easier to define. In practice, everything has to fit together, and the same piece of software might manage more than one thing:
- Assets and Task Management – Top level but detailed description of the project as a bunch of assets and tasks.
- Production Pipeline – I’ll place file management/versioning/sharing here-Â but this is what people are usually thinking of when they think of pipeline- though I’m half thinking of breaking it out into it’s own category.
- Feedback Pipeline – Tools for reviewing, commenting and finalling (and un-finalling) assets and tasks
Some more detailed descriptions follow:
Asset and Task Management:
This is something of a top-level thing: If you combine this with resource management (people, computers, renderfarms) you could get some top level gantt business going, and really plan your project. At this level everything we deal with is going to be an abstraction or database entry for real stuff.
Assets and Tasks are a handy way to think of what a project is; loosely you need elements, i.e. assets- often breaking into things like shots, models, etc. and tasks, things to be done on any asset to make it complete. Assets are nouns, Tasks are verbs, so a shot (an asset) needs:
layouting, animating, shading, rendering, compositing to be completed; and each step potentially needing review by the director or pipeline lead.
Assets are interdependent: A shot asset may need several models – themselves assets with their own set of tasks – to be completed. One might further claim that models shaders and rigs are their own sub assets, or simply consider them as tasks. The nature of reuse plays a role in deciding here.
Tasks are interdependent: For instance, animation cannot begin without rigs! Shading cannot begin without modeling! Further, tasks on one asset are dependent on tasks in another: you cannot animate shot NN without rigging character model X…
An Asset/ Task manager in the abstract can be considered to be a combination of an asset database and a dependency graph. That graph can be designed as task-based, or it can include asset-to-asset dependencies. I’m a bit more in favor of the former, as it allows for more flexibility but seems to be still ‘doable’ in the abstract. It might be necessary to simplify this when dealing with actual files.
Production Pipeline:
Assets and Tasks are abstractions. What happens above is independent of any actual work; you could do ‘fantasy filmmaking’ where you build a film entirely without any real production. Of course the final result will not be a film but merely a plan for one!
Making a film is a big task- it is more feasible to work on smaller chunks, and then be able to put those together. Our loose definition of the pipeline is whatever enables us to figure out what and how to work on those chunks, and to ensure they fit together to make a film. The Feedback cycle is mostly about aesthetic fit, production is about doing the actual work.
So we need to get software and resources to people, allow them to work on them, and pass that work through a pipeline. These resources (typically files, though you could argue more abstractly, data) are the ‘physical’ embodiment of the assets. The production files / data have their own set of dependencies, that may/may not mimic the dependency graph of the global project – one key to successful production is to balance organization with ad-hoc solutions- too much organization might limit artists, but too many hacks may be impossible to manage in the end.
Production pipeline can be considered to be an amalgam of
- Production Software; i.e. what you use to make stuff, which spills into file formats and capabilities, can also include automation / project specific software that depends on project practices.
- Standards and Best practices: naming conventions, project file organization, dos and don’ts, limits on poly count, image size, etc.
- Pipeline software: any software or scripts that automate the pipline, project on a metalevel, or enforce the best practices, or better, allow only those best practices to be used (i.e. instead of using append/link, use the project approved asset manager, which only links in predictable ways)
From an artist’s perspective, this implies the following needs:
- An artist has to be able to get any initial data/files they need to start. For example: an animator needs a shot with layout, a texture artist needs models and perhaps photo texture library access, etc.
- SVN is not a solution for this on a big project. GIT is even *worse* – at least if you use them simplistically. Project size could be expected to grow into very large sizes: Gigabytes for a Blender short, Terrabytes for a typical short* , Petabytes for a feature.
- An artist needs the software to work on the files.
- This should be as much as possible idiot proof- so we need to help maintain naming conventions, ‘what goes where’ and how the files link to each other.
- Finally, artists needs to fit work back into the project.
Feedback Pipeline:
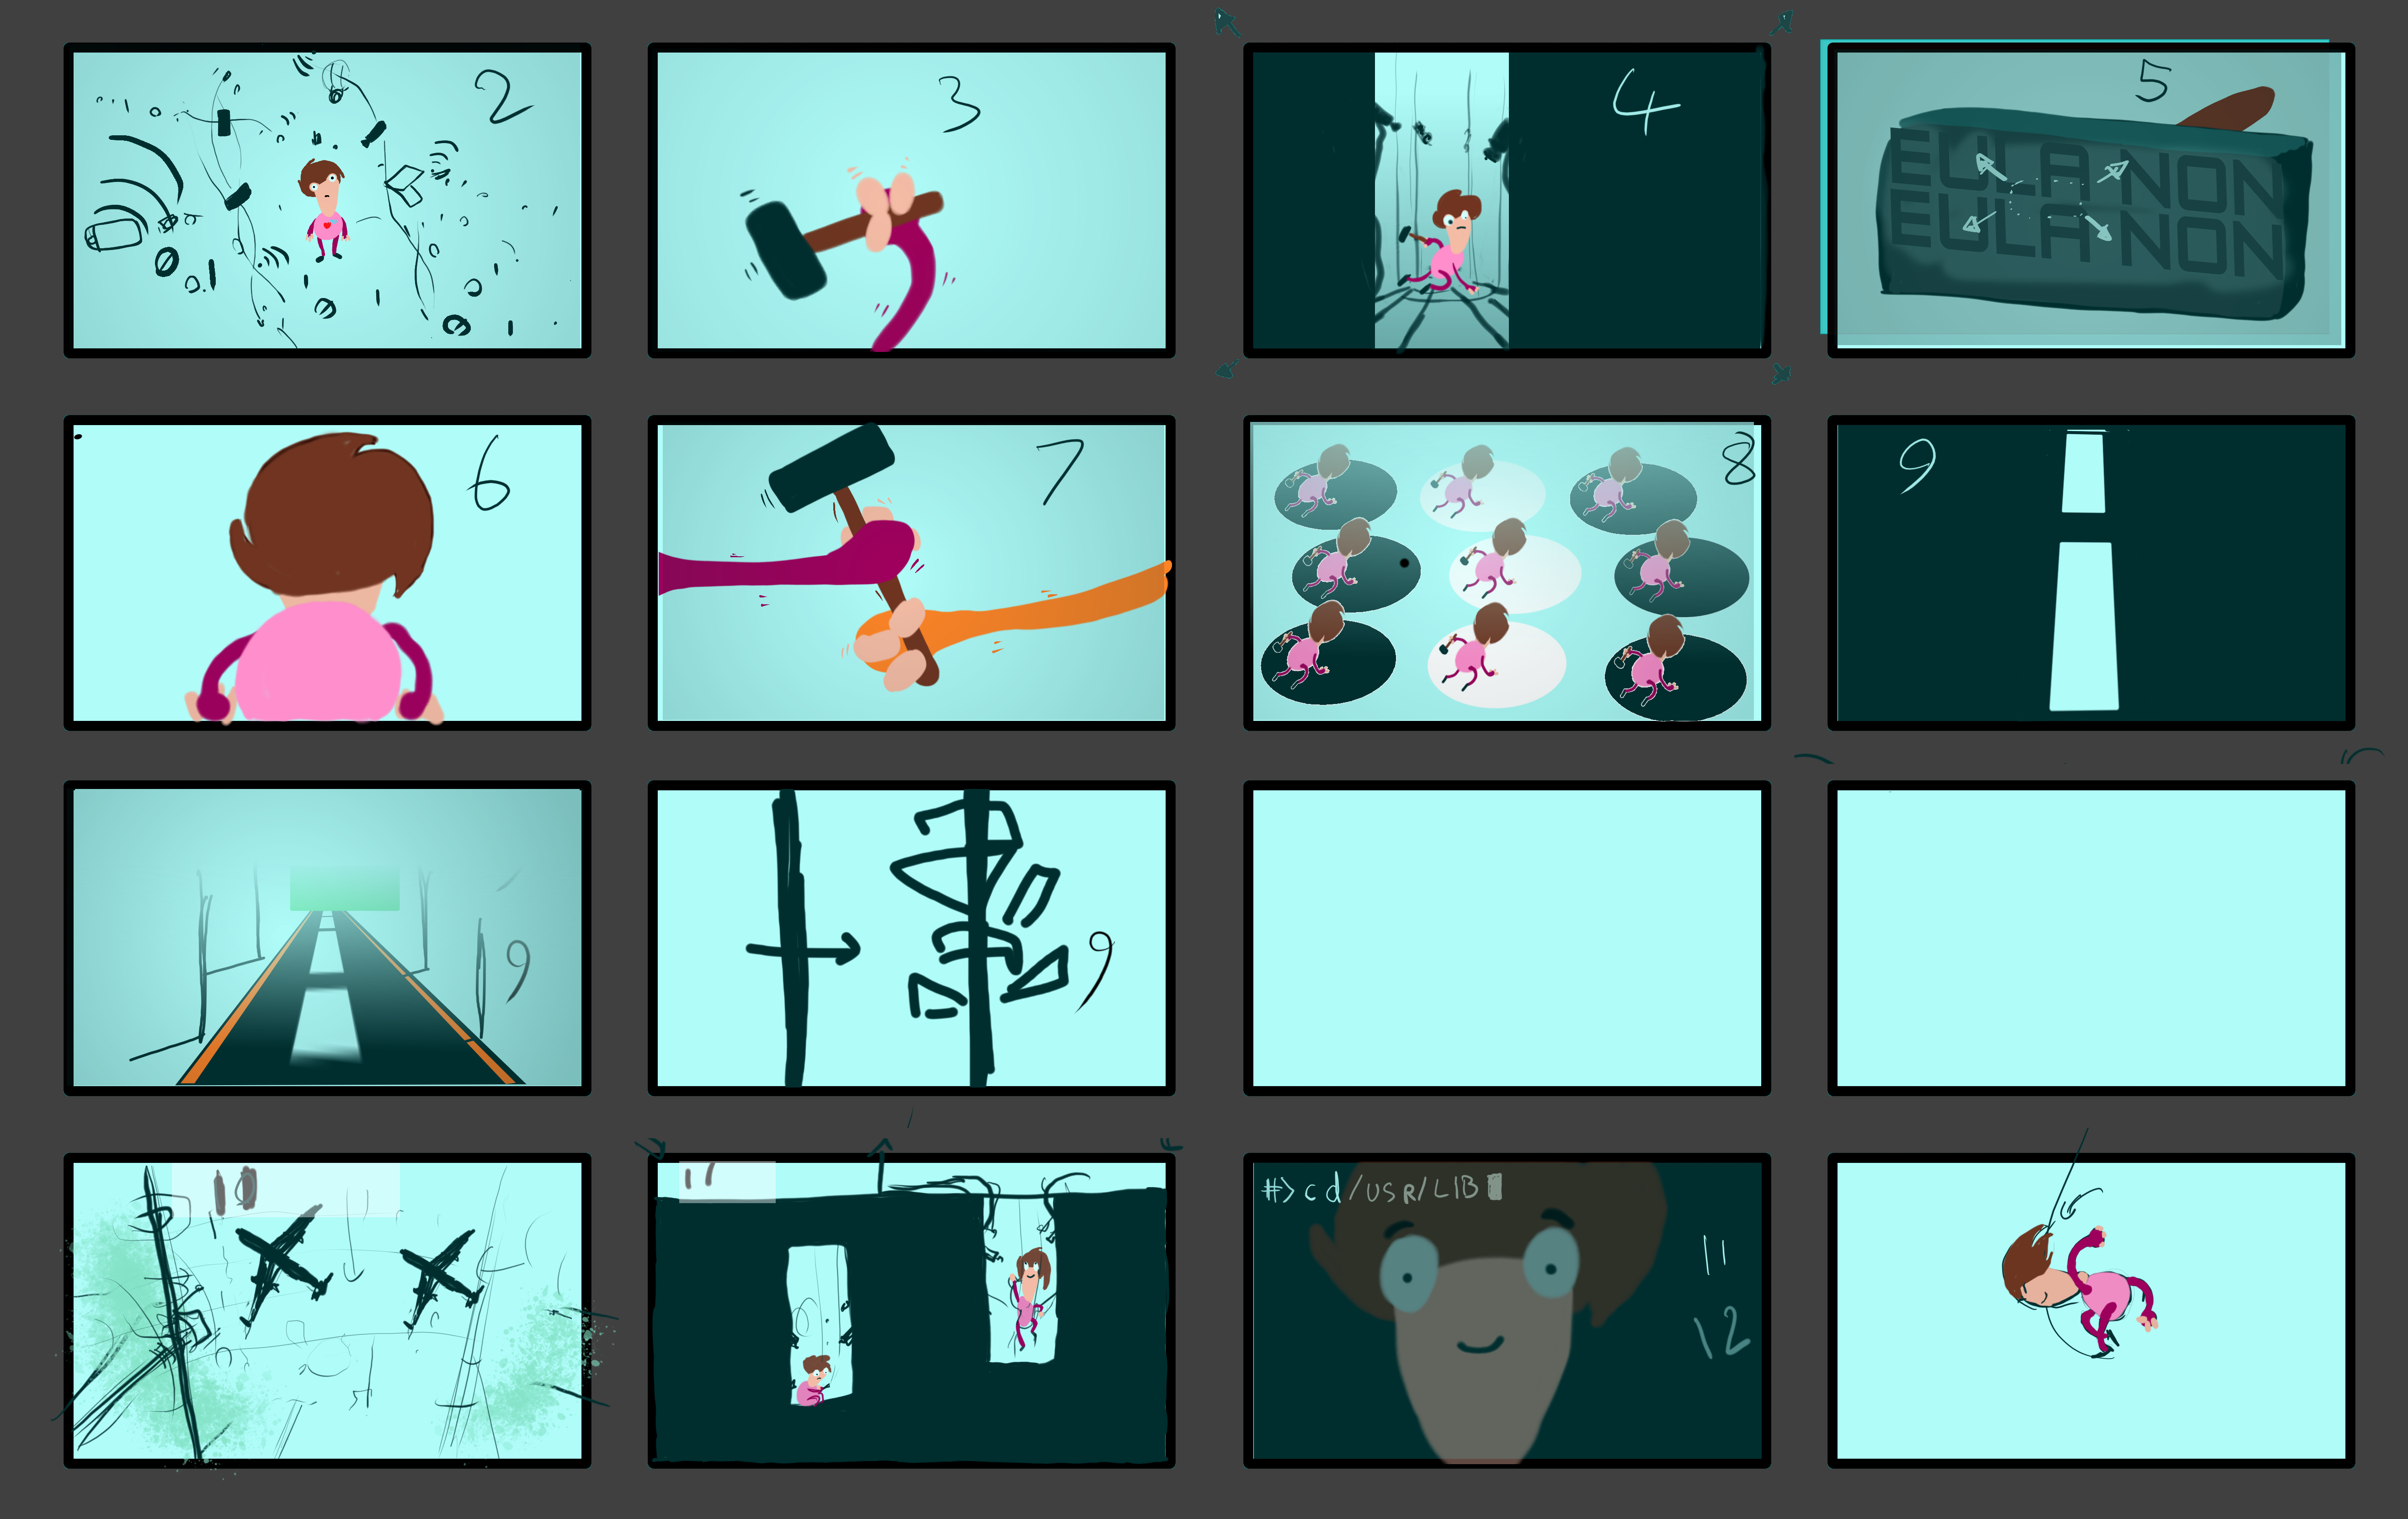
Project Directors and Concept Crew generate verbal/text description, concept art, story boards and animation reference.
- Artists use this material to start work
- Frequent (daily or weekly feedback sessions)
- Artists can post work (somewhere) to get feedback in form of comments, draw-overs, grease pencil lines on animation.
- Artists refine until task is complete (agreed by artist and supervisor or director to be final)
- Sometime you need to un-final things. The system has to be flexible enough to allow this.
Existing Tools
These warrant looking at either for inspiration or use – I’m only listing Free Software ones, but I’ll mention shotgun and alienbrainz as two commercial ones to look at.
- Helga: Helga was created as a student project at Hampshire College/Bit Films, where we are visiting artists. It is largely stagnant, though in heavy use at Hampshire. It handles mostly the feedback pipeline (fairly well) and the asset/task list in a so-so way. It also has some nifty features like the ability to start a render right from Helga, and to update shot folder SVN. Helga is basically a bunch of TCL scripts, a database and a web front end. It is very hackable, provided you speak TCL. It is reportedly rather difficult to install, and no public repo is currently available.
- Attract: Attract resembles Helga, but is a PHP web application. It handles mostly the same parts of the production Helga does. It was developed for Tears of Steel by Francesco Siddi, also a Tube artist, and he has added some useful additional features at our request 🙂
- Tactic: Recently open sourced, something I have been really wanting to evaluate but so far haven’t had the time.
- OpenDAM: An open source asset management project with what seems to be a very dedicated crew. I just found out about this recently!
- OPAM: Created initially at SparkDE, this has been used on productions; could be likened to Helga and Attract in scope and function.
- Damn: I just found out about this one, apparently written in Python and has a Blender Logo on the front page! Promising!
- Subversion: Despite this not beeing ‘cool’ anymore, it is an *extremely* robust and functional software VCS, and though not designed for animation project, does the best job of the shelf that I have seen of managing the project Repository.
- Git: Git is a distributed version control tool. The idea is that every ‘checkout’ is actually a repository, and users can branch and merge and then merge or share their branches. It is very technical and- as is- not too friendly for animation projects, were it not for:
- Sparkleshare: The cute name might fool you, but this is a damn good effort of putting Drop-box like functionality on top of Git. I wouldn’t use this for the entire project, but for sharing individual ‘bits’ with artists, it is invaluable. Think of Sparkleshare/Git projects as mini-staging projects an artist can work in, before pushing the work back into the main repository.
- Renderfarm software: quite a few to talk about, commercial renderfarms, Brender, etc. One really nice thing is to integrate the renderfarm into the rest of your software, for instance, Hampshire uses Tractor (a commercial one from Pixar) but hooks it into Helga: this makes managing rendered frames a breeze, highly recommended to have a setup like this. I’ll try to expound later. But using Attract as a front end for Brender could be a killer combo too. Another very interesting thing would be to provide an API (from Helga or Attract) for commercial renderfarm integration- this could be *awesome* for both users and for the companies’ businesses.
- Production specific libraries: There are some open source tools out there for simulation and crowd animation that could be quite interesting to integrate into a production pipeline. There are a lot more that I’m probably forgetting. Doing research here can help a lot, for instance, had I known about Smartbody I probably would not have developed our own crowd script, but integrated that instead (Really look at Smartbody and possibly Sybren‘s work for crowd stuff – ours should be nice enough but limited to simple walking, not crowd behavior)
- F/LOSS graphics software of course: Blender, Krita, Mypaint, Gimp, Inkspace, Ardour, Audacity, Synfig, Pitivi, Kdenlive… etc. There is a huge amount of libre graphics software out there, many at or approaching ‘pro’ quality. Many also have really approachable development teams, very open to fixing bugs, and helping with workflow or features. In a sense, they are like a combo of software and extra TDs (technical directors) for your project. Using them is a no-brainer, but getting in touch with the developers is easy and can be great for both the production and the software.
- IRC : a nice low key place to be able to stay in touch, and also happens that almost every free software project has an IRC channel 🙂
- Python deserves its own entry (though any scripting language could be used), since it is quite popular in this industry, is supported by many applications, and is very friendly to use.
- From the comments (Thanks Nelson!): stalker , oyProjectManager , Rules which are project managers that escaped my attention, and owncloud which might have use for animation projects. stalker and oyProject manager are both python/ support applications with python api. Rules looks very interesting and feature-ful too, especially for scrubbing/previewing stuff.
Tube Production Specifics
To achieve the pipeline specified above, Tube uses Helga, Git, Sparkleshare, SVN and custom Python tools developed to meet the various needs of a complex distributed production. In addition, we are evaluating Attract on the side thanks to Francesco Siddi. We look forward to exploring more of the applications out there, but we are limited by production constraints to use what is already working, even if it is not always ideal, and is sometimes too rigid and fragile.
Tube Asset/Project Management:
We are happy to have been invited to field-test Helga’s web-based asset management, though it is not yet ideal; Assets are Shots and Models only, entering new assets is cumbersome, deleting (or just cutting from the show) is also a bit tricky. Task trees are rigidly defined (you cannot define custom tasks). Entering all the data on the web interface is time consuming and often replicates data already known in other places (violating the ‘define once’ principle). It lacks a function outside of email notifications to help the director or project leads organize items for review. A database expert could get around all this… but, the reason to use this stuff is *not* to force everybody to be an SQL wizard :). So we end up entering data multiple times:
Helga:
So Helga covers the basics: you have shots, models, and users (people) and a project hierarchy (Helga supports multiple simultaneous projects). Each Asset (Shots and Models) can have a Task tree- a branching hierarchy of tasks on the asset. Further, each task can be assigned to a user, and the asset itself has a comment-preview page that I’ll go over in the feedback part.
Tasks can be assigned and reassigned to users with drag and drop, and given status ‘not started’ ‘in progress’ and ‘final’
Task types are hard coded: you cannot add a new kind of task, you have to pick from a (quite big) list. This is similar to assets being hard coded as shots and models. It leads sometimes to ‘fudging’ i.e. putting a script in models, or to having tasks and assets not represented on Helga. Also there is not yet a full Python API (though it is in development). It would be great to integrate e.g. Helga and Blender, the specifics of which would merit an entire post of its own.
Attract:
Attract is really similar to Helga in practical use – however the internals differ a lot. Both are ‘database-y’ but Attract is a PHP web application, while Helga is TCL scripts running on a server in addition to the web application. There are some plans to rewrite Helga in Python, which would change things further. Since neither application is mature yet (and maybe even in the case that they are), hackability is of primary concern. Helga is handy here since Chris Perry and myself can add extra functionality when needed, and Attract could be cool if Francesco is on the team as a pipeline TD since he is the person most familiar with it.
Personally I would highly recommend a Python application: most TDs know Python (it is the most ‘standard’ language used by CG productions) and it is more prone to being readable, hackable code.
Both Attract and Helga offer Statistics pages to give overviews of the project. In their current incarnation, I think this should continue to evolve further to be really useful. Another really handy thing would be export/import functionality, to allow generating stats from the data in a spreadsheet (without tedious data reentry).
Blender/Geppetto:
Geppetto is the first complex addon I wrote for blender 2.5, and reflects my inexperience at the time. It kept in sync a text-only breakdown file that listed the shots in the project with the edit – in other words, it added extractable metadata to each shot in the edit. In addition it kept track of any resources (storyboard images and animatic .blends) used to construct a shot and could be used like a ‘make’ command to rebuild if someone e.g. painted on an .xcf file. We haven’t used it since the storyboarding phase. Ideally an asset manager should have a Blender addon / Python API to integrate into things such as Geppetto and, as we shall see, Reference Desk. So just to be clear what Gepetto does:
- Maintains a list of shots in the film: each shot is associated with a number/name, a description, and a metastrip in the edit
- Saves the shot metadata into a shot breakdown file- ideally this would actually sync to helga/attract
- For each metastrip, there is an image subfolder for the shot in svn, and verious blend/.xcf files that generate/use the images
- SVN integration for the above to force an update/refresh
- Gimp integration to re-output the images from a gimp file
Final note: Geppetto is pretty hackish code, was written for the 2.5 API (it most likely still works, but might need some small api fixes) and was pretty hard-coded to work specifically for Tube. A more general tool/addon would be great, something I plan to do in the future. But this type of effort is ultimately sterile if it does not integrate into the bigger picture. So stay tuned for Geppetto 2 😉
Spreadsheets:
Various google docs and ods spreadsheets can be handy. In the future, attract or helga should be able to export .csv files for this purpose. Currently we have had 5 or 6 of these active on different times of the project, and it takes a day or two to get data synced (sometimes much less) because we don’t have an automated way to do it.
Reference Desk:
Reference Desk is our asset manager inside Blender. It doesn’t track shots but linkable assets, and is comprised of two parts: a Blender addon and a .json library file (you can have many of the latter). for each asset the library file holds information about:
- groups to link and instance
- groups to link and not instance
- python scripts to link and execute
- python scripts to link but not execute
In practice reference desk should also have hooks to non blender stuff, including helga/attract alikes. It could be extended further:
- support directly other datablocks than texts and groups
- support appending as well as linking
- record in a third file a project wide dependency graph (including noting SVN versions of appended files)
- integration with web based/top level asset manager, reference desk becomes a component in a larger system. We could maybe then instead of using the .json format file, just add reference desk data into the one and only project database- or maybe we use flat json files *as* the database? this is for the really smart people to figure out, not me 🙂
Tube Production Pipeline:
(I’ve separated file management into it’s own subcategory.)
Reference Desk (again):
In addition to being part of the asset side, Reference Desk is mostly about production, specifically:
- It stores file locations of assets in .json form so users don’t have to know it. An asset can be spread among multiple files.
- It automates asset insertion into files using post install scripts. Insuring correct layer placement, instancing proxies, instancing groups in specific locations (some sets are built from many sub-assets as one thing, even hundreds) and linking in functionality scripts (like rig uis)
- By automation it insures best practices. Things that use reference desk are consistent across the entire project.
In practice Reference Desk is used by artists/ TDs to add assets into the asset list, and by layout artists, who now have one-click asset importing capability, making building layouts much easier and less error prone – rather than document where an asset lives and how to link it, just hook it up into reference desk and you have both documentation and automation done.
Blendflakes:
Blendflakes checks blend files – specifically asset files – for ‘Errors’. These errors are not typical blender errors, instead, they enforce best practices such as naming objects, putting them in groups, documenting what the groups are for, which objects/groups are on which layer, etc. It tries to ensure that when an artist opens a file they don’t have to question what an empty on layer 7 is doing and if it should be removed.
I wrote Blendflakes after having wasted a lot of time debuging really huge and complicated blend files that had broken or needed to be extended, confronted with default names, objects on haphazard layers, and minimal docs. It’s one thing to have a naming convention, but another to have a tool to actual check and enforce it.
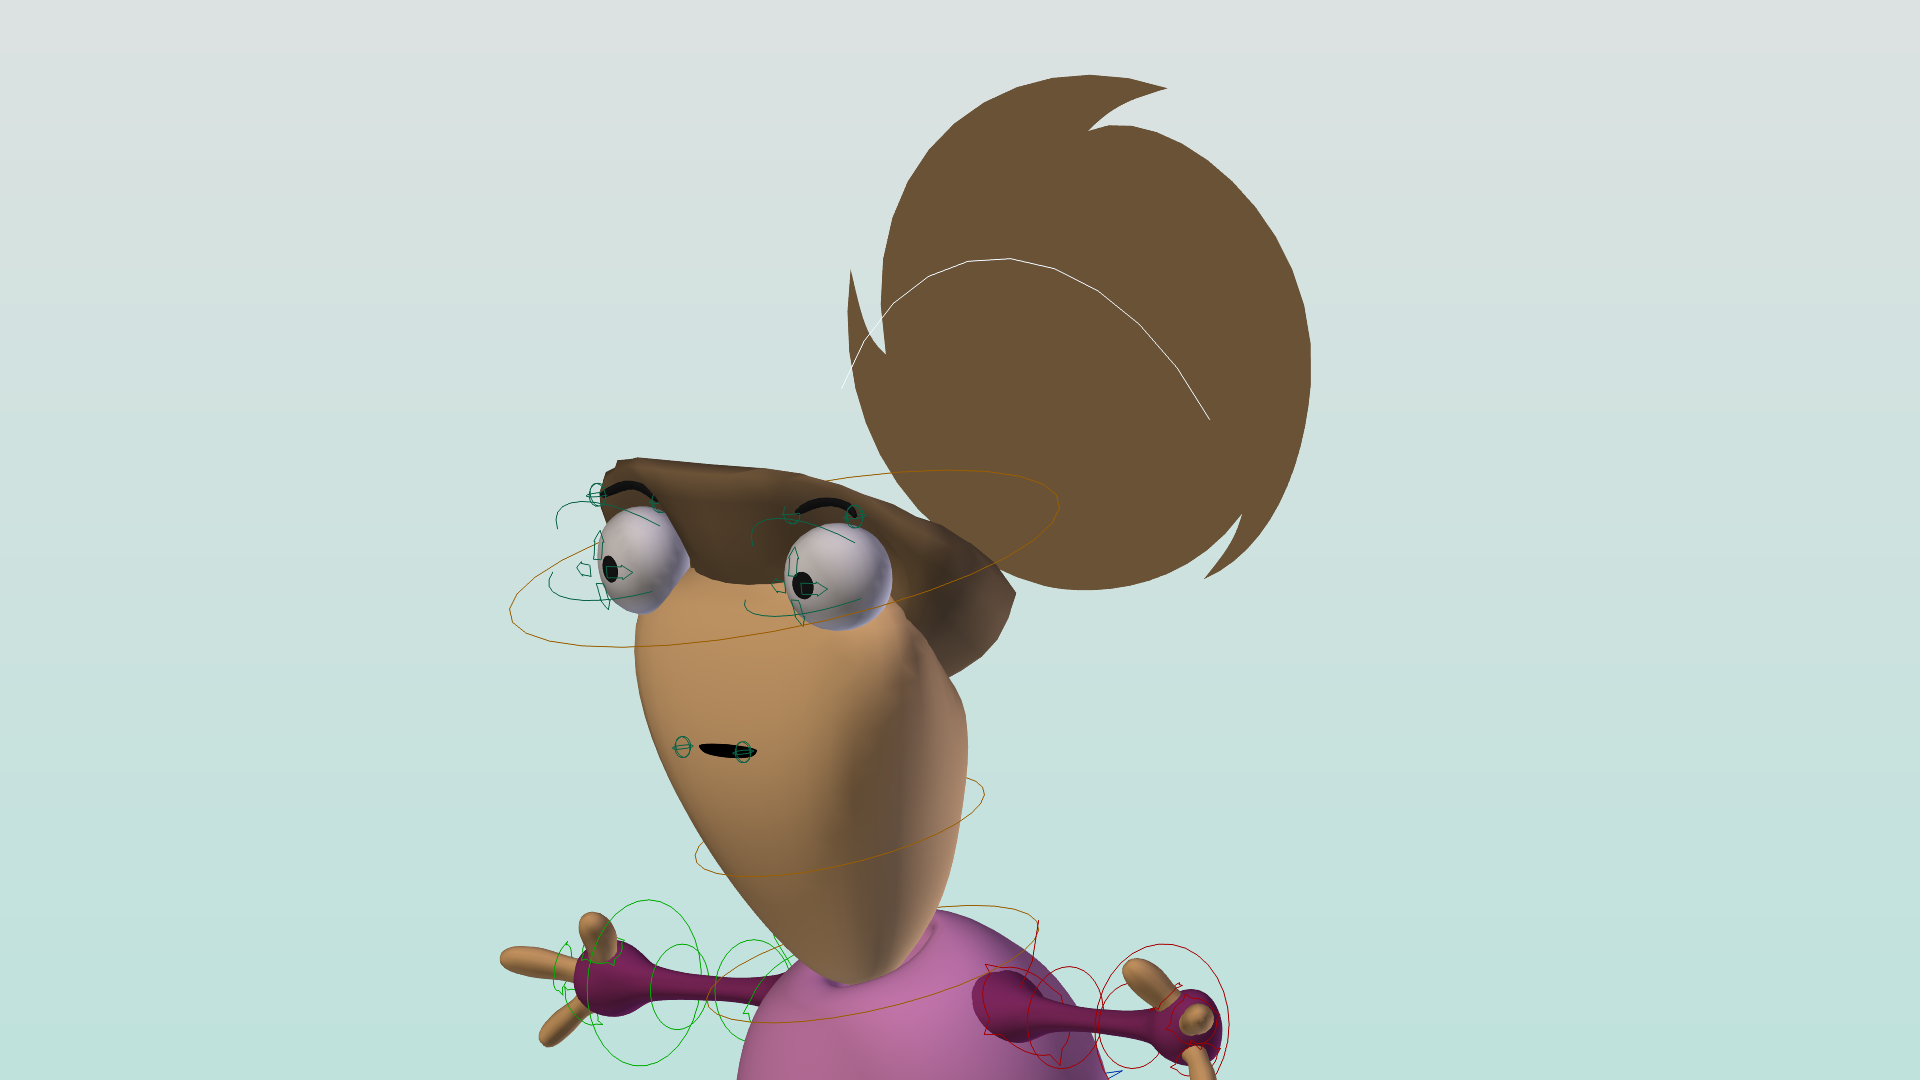
Layernames:
Before Layernames we had a standard layer convention- a bit rigid, especially for lighters who might need to do tricks to get the renderlayers they need. So we needed a way to use non standard layers but still know where stuff lives- our layer manager is not the only one written for blender but it is pretty damn good 😉
Layernames is our layer manager. It works for armature and scene layers:
- Associate each layer with a human readable name
- Give the layer a ‘type’ useful info
- 3D view interface and Properties editor Panel
- Scene layers are integrated with Render Layers
- ‘Render State’ is information about which layers are on, and which scene is active. This is integrated into the Helga/renderfarm scripts to avoid accidentally rendering black frames/ frames without the character, etc.
Zippo:
Lighting was taking too long: when you went into rendered view it took minutes to load all the images and create shaders, and then very slow progressive rendering. We discussed several ways to make this faster (while not compromising final renders) and came up with Zippo. As I started implementing some of our ideas, I stopped as just the first one (Scene simplify combined with smaller textures) made things much more interactive. Without more ado:
Zippo is a simple lighting tool and a small command line python script.
- The command line script creates quarter resolution copies of all the images in the maps/ folder.
- The addon allows switching (temporary) image paths to this low rez folder (trivial in this case since all our images are in one folder)
- The addon also reproduces the scene simplify option
- The addon could be extended to use ‘proxy’ node paths in the cycles materials
Zippo makes interactive lighting with cycles practical again: with these settings, lighters can get feedback in seconds rather than minutes, even on relatively standard hardware. This allows us to experiment, and to be more artistic.
Wiki Documentation:
Tube’s Wiki has a wealth of infomation/ guidelines on how to use the scripts, how to create and link files to each other, how to layout and light etc. Initial pipeline design was targetted almost fanatically towards animation, and needed massive rearchitecture when we came to lighting. It is really only now that we are making lighting as practical as animation, but we have a bit more to go before that finally clicks. One of our issues was switching render engines (we started on BI but ended on Cycles) and we still actually use BI for specific things.
SFX and Production Scripts:
In addition to pipeline oriented scripts, we create tools to automate or enable production. These are actually far more numerous than the pipeline scripts, but we are pretty bad at documenting all of them. Some of the ones that have docs for your perusal: Mushroomer, Auto Walker, Particle Baker, Multi Verts, etc. Our rigs in themselves involve a lot of scripting, for instance Rigamarule (something similar to Rigify) and rig scripts. One of our finalizing goals is to document each and every production and pipeline script – I’m hoping our wiki will be complete before the project release.
Tube File Management (really part of production pipeline):
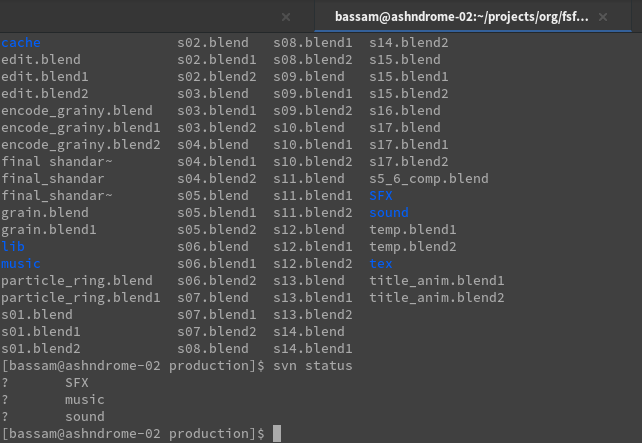
Subversion:
Ok, this is not too bad, you get version control, it handles binary diffs really well, repo size is quite small. In practice, however, there are issues:
- Partial checkouts are tricky: you can check out a directory by itself, but not ‘a file here/a file there’ depending on dependency.
- Checkout size can grow a lot: Subversion, in an effort to save network trips, saves a lot of temporary data with no way to purge it. As you work with a repo, you waste more than the checkout size in these temporary files… quite inconvenient.
- Subversion is actually too technical for some artists: not every talented (and I mean talented!!) artist is capable of using it. you put a barrier in front of contributions.
- network bandwidth to checkout the entire project (or even a few folders) to work with one file is just too expensive.
- Not all files are practical to store in Subversion: for instance, renders are too expensive to store (or any generated stuff like caches). We should probably version metadata (i.e. what subversion render provided the render)
One big thing to consider as you layout your tree: Keep your image maps from poluting the entire tree . Doing this allows:
- Quicker checkouts and updates for those who don’t need maps
- Quick scripts can do resolution tricks for closeups with simple path changes (maps/ maps_hi/ maps_low/) etc.
Another concern is Rendered frames and Sim results. Currently we do not commit either into Subversion (it is too big and prone to churn) Helga organizes render in a tree as follows:
Renders->Act Name/Sequence Name->Shot/Scene Name->Resolutions->Renderlayers->Renderlayer->Actual image files
In addition we have for caches the following structure:
Non-SVN->Act Name/Asset subfolder (mimics SVN tree)->Shot/Scene Name->Cache Folder->Cache Files
Note that blender has some caches that need to be in a sub folder of the same one the file is in.
Possibible improvements:
- Commit metadata for the rendered frames or caches including originating file and SVN revision of said file, and a timestamp
- Script regenerating stale bakes/ check for bakes before render.
Git:
Ok, so what about Git? as far as I can see, Git, and other dvcs’s solve some Subversion problems. Unfortunately, they solve absolutely no problem that we encounter in an animation project, while introducing worse ones. For instance, now a ‘checkout’ is also a ‘repo’ requiring either near prescient subdivision of the project into multiple modules (hint: you do not want this headache) or that everybody has to checkout the entire project, making it even harder to work with. Technical difficulty is even harder than Subversion, and binary/large size support is rumored to be bad/memory hungry, a problem Subversion does not have.
Sparkleshare + Git + Sparkleshareit.py + Subversion + Helga:
- Helga manages Rendered frames as we saw.
- We store on our server further non-svn stuff (caches).
- Subversion stores are main central repo: some artists (mainly local ones and a few of the remotes) work of this. We religiously keep textures in a maps/ subfolder to ease the pain on animators who do not need to load images.
- sparkleshareit.py is a very simple bpy script that runs inside a .blend file. It finds all dependencies of the file (in term of library .blends and images) and gives options to copy one or both to a brand new directory tree. It then commits this to Git…
- Git on the server is used to store many ad-hoc ‘mini projects’ for animators
- Sparkleshare is a user friendly front end to Git that enables animators to work not-too-technically.
- Rig updates and shot updates can be copied manually (usually by me) to and from Git and Subversion.
Tube Feedback Pipeline
Helga
So Helga in addition to top level asset management has pages for shots and models, in the form of list view or thumbnail views. Each one, when clicked, opens it’s own page that allows the following actions:
- Seeing a preview of the shot/asset
- A view of the current status in the task tree of that asset
- Assign people to a ‘watch list’ to recieve email updates on any activity in the asset, such as:
- Getting updates of the artist work on the asset (can include image, movie, or file previews)
- Someone else in the project giving feedback on that work (can also include image, movie, or file attachements)
- In the case of a shot: starting a render, or collating rendered frames into a movie
- Viewing the rendered frames or movie
- Specify render settings (size, frames, which file from svn to render, etc.)
Hangouts/Weeklies/Skype/email/etc
We meet twice a week: a shading weekly and animation weekly. ‘In person’ reviews are often more efficient, getting more eyes is also useful.
Future plans
One Application to rule them all, and in the interweb, bind them:
From an artist perspective we should have a single webapp (or desktop app with internet capabilities) one place where:
- You can see your assignment/s
- You can follow your comments/todos
- You can click in one place to get your files (maybe even automatically open them in the right application?)
- You have either automatic up-loads or you get to click (again one button) to send your work.
- Plugins for Blender, Gimp, Krita/ any applicable creation tools where needed.
This can be refined further but simplicity is key.
From a producer/supervisor perspective you should have:
- Easy and fast data entry for new shots/assets etc.
- Link the data everywhere, all production scripts should talk to that same asset database
- Good tracking/setup of dependencies/etc
- Good overview of project
- Easy .csv export for spreadsheeting
Federation/ Mediagoblin Integration:
Consider that the feedback part of the project already looks like a typical media sharing site (Mediagoblin, Youtube, Flickr): Ya posts yer media and ya gets yer comments. Some sites already have some implementation of ratings/etc to ‘gamify’ the process a bit.. and support remixing etc. If we could manage to integrate a management app with Mediagoblin (which is Python based, and has a plugin infrastucture) we would get the following amazing scenario:
- Distribution Platform is the same as the Making Platform
- Optional Federation
- A lot more that is out of scope for the current topic, and requires its own post. Fateh has some very interesting ideas about this, from a big picture perspective.


 Hi folks; a mini update in form of a tutorial!
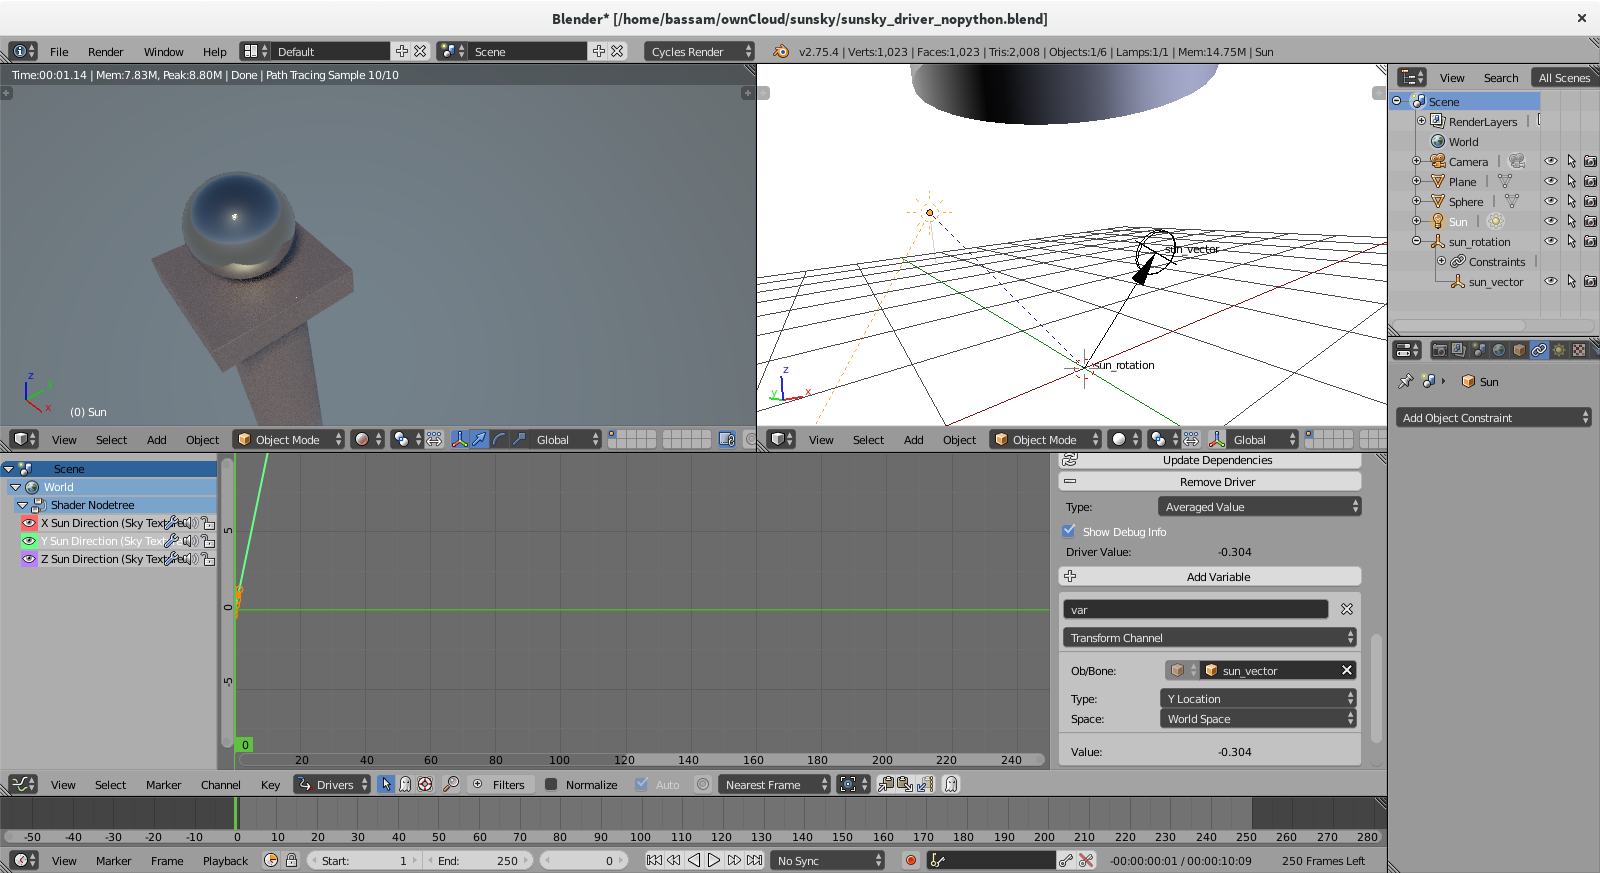
 As an update handler: We can have this running every frame change, on file load, and before rendering. This is a pretty immediate way to get our code working in the file, but it does have a few downsides: It requires Python scripts to run in the file, which might not work if you have that setting disabled, and it only updates on a frame change – so if you rotate the sun, you’ll need to change frames to see the result, a bit clunky. We can fix some of this…
 expression. This will now update ‘live’ even during rendering. But it still requires that you have Python scripts autorunning, and there’s a slight chance that scripted expression Python drivers will cause crashes with multithreading. In addition, we now have the inconvenience of both writing Python and doing a fair amount of clicking and setup for this to work.
 There are some problems to our Python solutions, they might not work on some people’s Blenders, crash, not update, and they require some coding knowledge.