how to use the camera scripts

In a comment on the animatics blog post, I was asked how the camera switcher scripts are supposed to work. I promised a detailed answer, so here’s the skinny: Preperation: Well, first you have to download them, and unpack them from here. You will get two python scripts add_shot.py and camswitch.py. To work in the […]

In a comment on the animatics blog post, I was asked how the camera switcher scripts are supposed to work. I promised a detailed answer, so here’s the skinny:

  • Preperation:
  1. Well, first you have to download them, and unpack them from here. You will get two python scripts add_shot.py and camswitch.py.
  2. layout.png
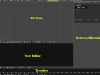
To work in the way intended by the scripts, make sure that your layout/screen includes a 3D view to work in, a buttons window, a timeline, and text editor.

  3. open_new.png
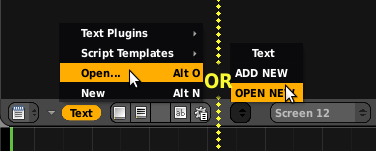
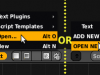
In the text editor, do “Text->Open” or on the datablock do “Open New” and browse first to camswitch.py and open it.
  4. Again in the text editor, do “Text->Open”, and browse to where you extracted add_shot.py and open it.
  5. scriptlink for camera changer
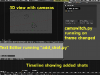
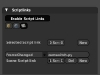
In the Buttons window, switch to “Script” buttons, make sure “Enable Script Links” is on, and then press New, select camswitch.py from the list and make it work on “FrameChanged”.. the panel should looks something like the screenshot here.
  6. add shot buttonNow Go back to the text editor where Add_shot.py is , and press alt-P or Text->Run Python Script from the menu. You should get a single text button.
  • Usage:
  1. Now you are ready to start really working! Scrub in your timeline to a frame where you want to make cut.
  2. In the 3D view, adjust the viewport framing to roughly the right framing for the shot (don’t worry, you can tweak all the cameras later, even animate them if you want).
  3. working with the scripts
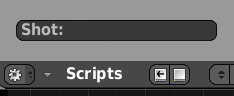
In the text editor (where add_shot is running), type the name or number of your shot in the text button and hit enter. The script will create a camera, with the same name, and a marker with the same name (and the prefix: cam_) As you scrub over this, it will make that camera the active scene camera.
  4. Now just keep on adding shots by repeating steps 1 through 3! you will have multiple cameras, and as the frame changes, those cameras will be active, making cuts. This is perfect for a small project, but it is also good for do simple visualization/shot blocking for a bigger project such as this one.

Hope that helped!

Layouts ( a bit early )

Before going into animation, shots need to be layed out- cameras, set, props, positioning of characters and vehicles, etc. before we are ready to animate. Typically I will want to pose the character in the basic position for the shot, just to give an idea for the animator to start. Of course, we are currently […]

layoutBefore going into animation, shots need to be layed out- cameras, set, props, positioning of characters and vehicles, etc. before we are ready to animate. Typically I will want to pose the character in the basic position for the shot, just to give an idea for the animator to start.

Of course, we are currently not ready for animation- we are missing too many models, and even don’t have a final blessed character concept- nonetheless, I decided to take an aproach that would not ‘block’ too much at these details, and to do basic layouts with a generic character, to be replaced with ‘the real’ rig once we have it done.

I started with Nathan’s excellent generic biped rig, and modified a little bit to make it roughly the right length (170cm by the scale of the project, instead of the default 2 meter giant 🙂 ) and also to suggest that the character is a female. If you want, here is the biped rig with our modifications, to use with the same terms Nathan has for his Biped rig.

second animatic and previs

3D animatics are very good for roughing out camera angles and motion, whereas 2D animatics help bring the focus back to the character (eyelines, facial expressions, emotion, interaction) much better. To get back to the feeling of the movie, I wanted to do 2D animatics and focus on what the character was doing, but still […]

3D animatics are very good for roughing out camera angles and motion, whereas 2D animatics help bring the focus back to the character (eyelines, facial expressions, emotion, interaction) much better. To get back to the feeling of the movie, I wanted to do 2D animatics and focus on what the character was doing, but still have a way of roughing out and testing shots.

Editing shots in the sequence Each shot was done as one or many drawings either on paper/tracing paper or in gimp, with the backgrounds seperated into layers, allowing for limited animation in the sequencer. For tricky shots I resorted to UV projection of sketches onto blocky objects in seperate blend files. Then I edited everything together in the sequence editor. For speed, I kept a bunch of the old 3D animatic shots around, since they didn’t have to be redone.
Adding shots in the 3D mockupTo rough out the shots in 3D I built a ‘blueprint set’- a sort of 3D proxy in blender, and a simple 3D block character. Then I linked these into a blend file with one scene and 2 screens: sequencer and 3D view. ctrl-arrowing allowed me to tab back and forth.

scriptlink for camera changerI wanted to place a new camera at each shot and use a camera changer script. Unfortunately, the existing camera switcher from project orange no longer worked, and I wrote a new one- at first it had very bad performance, until I realized that blender often skips frames while scrubbing: you can’t just look for a marker at the current frame, you have to look for the most recent marker before and up to the present. This worked really well, so I added a button in python that added a camera at the current viewport with the typed name and a marker at the current time. this allowed me to go back and forth quickly from set to storyboard, adding cameras for each shot.

In case you’d like them, here are the scripts: add_shot.py and camswitch.py

More shots from the storyboard/animatic have been added to the media gallery.

first animatic

Tube had one false start before the team effort. Based on an early script I decided to go it alone, and started work on preproduction. For the animatic I used blender, mainly because I wanted to plan the shots in 3D. Some of those shots are still there in the current animatic, though the overall […]

files.pngTube had one false start before the team effort. Based on an early script I decided to go it alone, and started work on preproduction. For the animatic I used blender, mainly because I wanted to plan the shots in 3D. Some of those shots are still there in the current animatic, though the overall structure of the movie has mutated considerably. As you can see, the animatic was structured as a ‘typical’ blender project, with a lib folder containing linkable groups (in this case set/character/other simple proxies) and textures. All the shots were in one sequence directory with blends numbered for shots (the ‘crap’ in the blend title stands for ‘crapimatic’- a reminder to myself not to do something too polished at this early stage.

hello planets

(If you’re not reading on planetblender or graphicsplanet, you can safely ignore this post.) Welcome to the tube feed* ! This is the production log for an animated movie project tube, made in Blender and other free software. We’ll be sharing experiences and information, pictures and previews about making (animated) films with free software. I […]

(If you’re not reading on planetblender or graphicsplanet, you can safely ignore this post.)

Welcome to the tube feed* ! This is the production log for an animated movie project tube, made in Blender and other free software. We’ll be sharing experiences and information, pictures and previews about making (animated) films with free software. I highly recommend you read our introductory post, and check out the about/team and media pages, for some more background on the project.

* The internet is made out of that stuff, dontcha know?

©URCHIN 2015