while the cat is away…

So Bassam’s been away in Bulgaria for a couple of weeks and Henri and I mostly had the studio to ourselves.  I’ve been working on a mushroom generator for a couple of timelapses – not that tube will be filled with glowing mushrooms, more that we wanted something half way between the ivy generator and […]

So Bassam’s been away in Bulgaria for a couple of weeks and Henri and I mostly had the studio to ourselves.  I’ve been working on a mushroom generator for a couple of timelapses – not that tube will be filled with glowing mushrooms, more that we wanted something half way between the ivy generator and a fully fledged particle system.  Henri modeled some funky mushrooms and together we spun together a quick demo video just to show off some of the effects that are possible, and to exercise our fetish for indirect lighting and luminous pink.

Mushroom Generator Blender 2.5 from Henri Hebeisen and Josh Wedlake on Vimeo.

The script is still heavily in development but if you like alpha stuff and you’re happy to do your own debugging, then feel free to download and run.

UPDATE: Find the latest build here.
UPDATE: release 4 is fixed for r31856 [Fri Sep 10 16:54:53 CEST 2010]… don’t expect it to last long though!

Essentially you need to model a couple of mushrooms (just a generic term – you can model flowers or trees or robotic arms) with some shapes for their animation which will be blended sequentially, some shapes for random variation, some shapes in which they bend up the y axis, a painted vertex group for shrinkwrapping the base of the mushroom, all scaling and rotation applied and the origin at the base of the mesh.

above: creating the shapes for auto animation

above: adding manual animation to a mushroom

You also need a target mesh which has nice topo (ideally no elongated tris or nasty convex quads), optionally painted vertex groups named OBmymushroomname… and MAmymushroommaterial… to control the distribution of your various materials and different object types, optionally a limit vertex group (ie only faces within this will receive mushrooms), and a lot of patience.  Select the mushrooms then make the target active and tab into edit mode, select the start face(s) then hit spacebar>Mushroomer (remembered to run the script first).

above: mission control, godspeed

Adjust the settings and hit go.  I suggest you run blender from the terminal so you can watch for progress and any hangups.  You might well want to abort if it starts slowing right down from too many mushrooms.

above: when its done

Development on this script has been a bit of a nightmare.  Currently it is not possible to create multiple linked objects and have different shape key and material animation blocks on them without having to duplicate the mesh and/or material blocks (thus unnecessarily eating up huge amount of memory and removing the possibility to edit the mesh for one mushroom and have all of the update).  This is in the blender bug tracker as #23546 and #23547.  If they get fixed you can uncomment the deep data path keyframe adding and enable all the code for migrating actions to object level.  Another limitation which slowed development is that it is currently not possible to merge two actions into one.  This is necessary if you are moving mesh level and material level animation data back to object level.  Essentially you need to combine two actions into one.  Not only is this not possible, but its also not possible to copy an fcurve in its entirity, but rather python has to iterate through very slowly copying every handle one by one, and even this is susceptible to some bugs (not yet reported).  This is because the collection of fcurves is read only even though each fcurve itself if read/write.  I was also held up by bug #23532 which prevented me from doing the action block combining in the NLA editor, and for a short while by bug #23548 which caused blender to crash when creating new fcurves.  Finally the script can’t currently support animation data on the mushrooms’ materials due to bugs #23593 and #23594 [UPDATE Campbell fixed these, great news! Material & texture animations are now supported!] – I’ve chosen to block this feature rather than risk an inescapable hang and data loss – uncomment those lines at your own risk!  Fingers crossed the devs will iron these out sooner or later and the mushroom generator will be running faster, with lower memory requirements, smaller file sizes and more stability!

Its also been a sad day today as we waved goodbye to Henri who is on his way back to France as I write.  Its been great fun working together for the last 2 months.  Luckily we’ll only be a stones throw apart when we’re back at our separate homes in Toulouse and London.  If all goes well we’ll be at the Blender conference this October as well.  Rest assured, the world hasn’t seen the end of the glowing mushrooms saga – I’m hope we’ll have another chance to work together soon!

Making a ‘Make Movie’ Button, Part 1

Pre-production Pipeline Even during pre-production, a project can rapidly become a mess if you are not careful. In this phase, the assets to manage are: script (for us, a Celtx project) breakdown ( a document with shot by shot list for the movie) storyboard images – one per shot, in our case typically done in […]

Pre-production Pipeline

Even during pre-production, a project can rapidly become a mess if you are not careful. In this phase, the assets to manage are:

  • script (for us, a Celtx project)
  • breakdown ( a document with shot by shot list for the movie)
  • storyboard images – one per shot, in our case typically done in Gimp
  • animatic – usually generated from modified storyboard images, but sometimes from .blend or other files, the animatic is a draft of the movie with minimal animation (camera anim, few in-betweens per shot, etc).

moving into production, we also need to manage:

  • shot file or files
  • production reference library
  • production edit

Adding a shot can be an ad-hoc process: assign it a name and number in the breakdown, make a storyboard image, then work on any number of source gimp and blender files to generate some .pngs or .avis that are finally referenced in the sequencer. Rinse and repeat, and you end up with hundreds of disorganized files, touching any of which will break the animatic edit–a situation far from ideal.

Organization

If you look at Jarred’s earlier post , you can see the beginnings of the solution. We had some issues from using a patched Blender and were still looking at a lot of manual work to add a shot into the production. Most of these problems we solved with a slight re-organization of the preproduction directory:


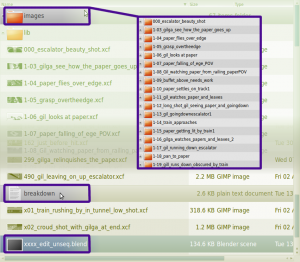
As you can see, the main folder contains source files (which should eventually be moved to their own subfolder), the breakdown and the edit. The source files generate the shots: all their filenames begin with xxx_yyyyyy, where xxx is the shot number, and yyyyyy is the short description from the breakdown. These are all checked into SVN. A subfolder called images/ contains various subfolders, one per shot, with the name xxx_yyyyyy. These contain every image, image sequence, movie or other file that is referenced by the edit.

Now we no longer need a modified Blender, since we don’t need to edit the names of the image files, just their paths.

Introducing Geppetto

The next step towards improving anything is coming up with a cool name. To wit, ‘sequence_add_and_rename_shots.py — our former Python script for resequencing shots — becomes Geppetto, for the puppet master himself.

Ordering the Edit

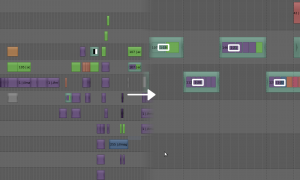
Now our directories were organized, but the edit looked a mess! it would be nice to have each shot as a strip, not a collection of strips and effects. So we used Blender’s metastrip feature, which basically allows you to encapsulate any collection of related strips in the sequencer (strips in Blender are like clips in other editors) with one ‘metastrip’ – kinda like a strip folder. We gave each of these the name xxx (the shot number)- now when you look at the edit from the top view, all you see is shots, not the layering of all the background, foreground, etc. elements coupled with effects and transforms to make them move.

Hooking it into Geppetto

All this organization makes things easy to automate. Geppetto currently provides an:

  • ‘Add Shot’ Button which lets you type in the shot number and name and then does the following:
    1. Adds the shot to the breakdown (you no longer edit the breakdown by hand, but use Geppetto instead)
    2. Creates a source .xcf file with the name xxx_yyyyy.xcf , adds, and commits to svn
    3. Creates a folder of the name xxx_yyyyy in images/ and makes a .png single frame in it
    4. Links the image into the sequence editor as a strip at the current frame position
    5. Encapsulates the image into a meta strip with the name xxx
  • ‘Remove Shot’ Button: basically lets you type in which shot to remove , and takes it out of svn, the edit, the breakdown, everywhere. The files go to a junk folder so you don’t lose it for good.
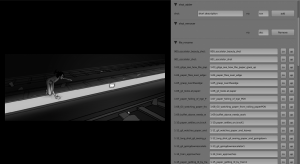
  • Shot List, with each shot getting:
    1. A text field you can edit to change the shot number
    2. A commit button to push your change to svn and the edit – basically this is for the editor/director to resequence a shot, or (not implemented yet) change the shot description refer to Jarred’s post for details
    3. An update button to update Svn and get new shot images in. Basically, if you or someone else changed the source .xcf for a shot, this gets those changes in automatically – details upcoming in part 2!

And finally, Jarred has made a prototype of the next feature, not yet rolled into the main code (drumroll, please): stay tuned for the ‘Make Movie’ Button in part 3! 🙂

©URCHIN 2015