Propoganda timelapse dev continues

Greetings comrades! So as promised, here’s a more in-depth update, about poster timelapse . In our (hopefully just in the movie, but you never know…) dystopian future, the subway walls need to get peppered with images of successive ruthless dictators, bent on making us love them through propaganda. This effect is sometimes very close to […]

Greetings comrades!

So as promised, here’s a more in-depth update, about poster timelapse . In our (hopefully just in the movie, but you never know…) dystopian future, the subway walls need to get peppered with images of successive ruthless dictators, bent on making us love them through propaganda. This effect is sometimes very close to the camera, and sometimes in the background, throughout many shots.

Posters need to be added to the walls over time, then removed, and perhaps just have other posters put on top of them, with attention to the images (which image in the succession) overlaps (they need to be on top, rather than intersecting each other) and order of removal (posters under other posters can’t go first). In addition, the materials of the poster need to age, and posters under other posters can’t e.g. accumulate dirt, and could get ripped when the top poster gets removed… and .. and…. and…..

*deep breath*

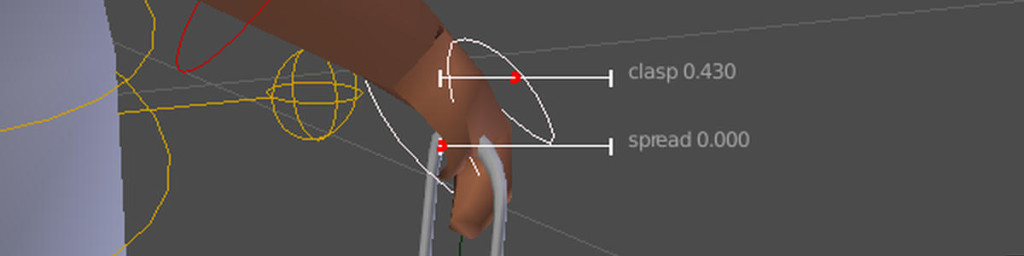
So I’m building a poster control ‘machine’ using a brilliant blender addon called animationnodes – that also allows mixing nodes and python via script nodes. This is what my code and nodes look like right now:

Python Script NodesAll the animation node trees

And this is what they do:

There’s a lot of hidden stuff there too: they make oclusion masks using vertex colors and vertex groups so the posters “know” when they are under or over each other. This will allow me to combine it with…..

….my poster material nodes! :

Cycles poster material nodes

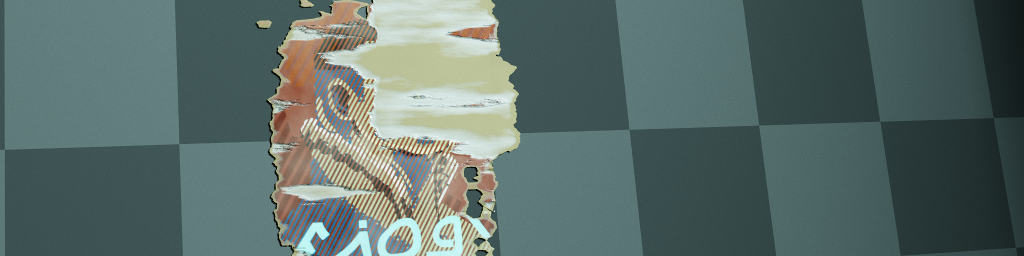
Lets see what those look like in animation:

Phew! pretty cool – still missing a few details and tweaks, but that’s the basic idea. the strange purple rectangle represents an occluding poster. the image is tweaked from a beautiful poster made by Michael Kalinin for the movie, and is just a ‘test image’. The text is using our custom made font “soomerian modern” which all the text in the movie is written in.

So what’s left? well, combining the animation nodes for the posters with the poster materials.

In addition I have similar systems (not shown here) for the wall itself, that have to interact with the posters, so for instance, the posters change the dirtiness levels of the walls, and falling tiles rip out the posters.

Hope you enjoyed this mini update!

Python Tutorial: Mesh Addon in Blender

This year at Libreplanet I gave a small talk about Python in Blender. My primary goal behind was to talk about the ways that Blender, by exposing its Python API directly in the interface, there for users to discover, gives a new meaning to ‘free software’ not just in licensing or community (though these things […]

Me Presenting at Libreplanet

This year at Libreplanet I gave a small talk about Python in Blender. My primary goal behind was to talk about the ways that Blender, by exposing its Python API directly in the interface, there for users to discover, gives a new meaning to ‘free software’ not just in licensing or community (though these things are important) but also in the design of the program itself. How many programs do you know that have an ‘edit source’ button for each interface element?

One of the elements of the talk was a tutorial on how to use Blender’s Python API, and add a new primitive type into the Add Mesh menu. This is made very easy thanks to the template scripts included in Blender, that allow you to create your own with just a few edits, and by the fact that you can grab data from Blender, and pipe it into your script directly.

I’m not sure if the video from the conference will be available from the FSF; they are slowly putting talks up on the FSF mediagoblin site – I’ll post something if it does. In the meantime, I recorded a Python tutorial for just this part:

Going back and recording the tutorial actually made it better than what I presented at the conference. I used the Addon template, instead of the Operator template, which makes it even easier to share the code. Interestingly, during the presentation, I found a bug in the operator template, which I fixed after it was over. The fix is now in Blender 2.77, a nice way in which a presentation about a free software project leads directly to a contribution 😉

Finally, here are my files, slides, etc. for you to follow along:
The Gnu Mesh in .blend format
The finished “add_gnu.py” addon from the tutorial
Slides from LibrePlanet

Something Old

I was rifling some old shelves and came across an ancient notebook, filled with storyboards! Some of them were for stuff I never ended up making (though perhaps I will revisit them someday in a different form), but some of those boards were for an early animation I did in Blender, “Chicken Chair” which was […]

I was rifling some old shelves and came across an ancient notebook, filled with storyboards! Some of them were for stuff I never ended up making (though perhaps I will revisit them someday in a different form), but some of those boards were for an early animation I did in Blender, “Chicken Chair” which was itself just an animation test for an impossibly more ambitious project. In any case, it was a fun project, and relatively meticulous for me at the time. You can see the resulting animation here – not the antique four by three aspect ratio! a classic!

This was the first or second ‘serious’ project I made in blender and it was a somewhat insane undertaking. I used the NLA (it existed!) do do the walk cycle on a path (this feature doesn’t actually exist anymore in blender), but couldn’t find a way to blend the animations between the cycle and other bits of the movie. I ended up using multiple rigs, and using animated constraints to switch between them. I’m pretty sure the entire animation (all of the shots) is in one file.

The motion blur in the video is I believe the old multisampled motion blur- rendering several subframes and blurring in between them (very nice results but slow to render). All the postproduction, such as it is, is done in Gimp and Blender’s sequence editor – Gimp for painting the glow in the eyes ‘streaking’ over fast frames and for the lightening effects, Blender for everything else.

I actually don’t remember making storyboards for the project, but I must have, because here they are:
CC_page_1
CC_page_2
CC_page_3
CC_page_4
CC_page_5
CC_page_6
CC_page_7

What I do remember is that I made most of the film in Rao’s coffee in Amherst, and that it took me almost a month to UV Unwrap and texture the chair. The second hardest bit was animating the damn wire (using a super long IK chain that was impossible to control)

Well, that’s it! Feel free to share any of your own early animation projects in the comments 🙂

Addons for Empathy 2: Proxies and a bonus!

Hi Folks! We’ll try to do a bi-weekly installement of Addons for Empathy (until we run out of addons). This one is a two-parter: Our main installment is about working with proxies in Blender, the second is about a bold new experiment in Rig UI. Proxy Workflow and Transparent Proxies Addons: Get the files from […]

Hi Folks!
We’ll try to do a bi-weekly installement of Addons for Empathy (until we run out of addons). This one is a two-parter: Our main installment is about working with proxies in Blender, the second is about a bold new experiment in Rig UI.

Proxy Workflow and Transparent Proxies Addons:

Get the files from my gitorious

The video is about two addons, both making proxy editing in the sequencer more friendly to our project. A quick explanation:

Blender’s Video Sequence Editor or VSE for short has a feature called proxies. This basically allows an in-place replacement of strips by 25%, 50%, 75% or 100% versions, in a fast format (.jpg or motion jpg) This is especially useful when:

  1. Editing Large format files that are too slow to be realtime – either in resolution (2K or 4K) or in type (.EXR!!!)
  2. Editing over the network, especially files of the previous types
  3. Working with complex and multiple effects that could be benefit from being cached

So Proxies in Blender work a bit like a combination of proxies and caches. I prefer them as the former, since it skips having to recalculate every single you change some timing – instead they only need to be recalculated when the sources change.

However, working with proxies in Blender can be painful by default, and this is where Proxy Workflow Addon comes in:

  1. Editing Proxy settings must be done strip by strip: Proxy Workflow lets you set them for all selected strips at once
  2. Default location is in the same folder as the originals, which is bad in the case of network shares; Proxy Workflow automatically sets them to a local directory “TProxy” that contains all the proxies for the edit, and can be moved around like a scratch disk
  3. Sometimes Blender tries looking for the original files even when it is using proxies. If you are trying to use proxies to avoid using the network/internet, this becomes a problem. Proxy workflow allows ‘Offlining’ strips, and then ‘Onlining’ them again when you can reconnect to the network
  4. Blender doesn’t know when the source files are ‘stale’ and need to be re-proxied – for instance if you rerender. Proxy workflow timestamps as it makes proxies, allowing you to select a bunch of strips and re-proxify only the changed ones.
  5. Proxy workflow is designed to work with movies and image strips only for now, as I’m interested in true proxies, not caching effects.

A seperate addon is called ‘Transparent Proxies’ and does what it says on the tin (and no more): It allows making proxies of image sequences that preserve the alpha channel for alpha over effects. It does this by cheating: It uses Imagemagick on the commandline to make a .tga proxy, and just renames to .jpg to satisfy Blender. You need to install imagemagick first for it to work.

 Bonus: Rig UI Experiment:

Code is at gitorious
This brings us to the bonus round- the Rig Selection UI. I’m continuing my round of experimentation with BGL and modal addons, to make the kind of ‘typical’ rig ui where animators can select or act on a rig by clicking on an image. This ui is using an SVG file to define the hotspots, and a PNG to actually draw the image. It already works, though I’m still going to refine it and add more options/ easier rig customizability. The end goal is to be able to do Rig UIs without writing code, simply by drawing them in Inkscape and pressing a few buttons in Blender. Stay tuned!!!


Addons For Empathy – Floating Sliders

Hello all, long time no post! As we’re getting closer and closer to releasing our files, I’m noticing that we have a huge (and I mean huge) trove of Python code that is largely undocumented. Some of it is pretty specific to this project, And other bits are useful in general. Even the specific stuff […]

Hello all, long time no post!
As we’re getting closer and closer to releasing our files, I’m noticing that we have a huge (and I mean huge) trove of Python code that is largely undocumented. Some of it is pretty specific to this project, And other bits are useful in general. Even the specific stuff could be adapted, so it’s worth going over.

To address this we’ve thought of doing an ‘Addons for Empathy’ video series, quickly explaining what some of the addons do, in addition to more traditional docs. The first I’ll do in this way is the Floating Sliders Addon: In short, this pops up small, keyframable Open GL sliders for any Floating point Pose-bone properties. The code is on gitorious, and following is a simple video explanation of what it does and how to use it:

As always, the video is licensed CC-BY, while the addon itself is GPL.
You can also download this video as a high resolution .webm or .mp4 file, or watch it on youtube

The screencast itself was edited in Pitivi, with Inkscape titles. Video was captured via the Gnome screencast feature, and audio with Audacity

Big thanks to Campbell Barton for help getting min/max of custom properties, and explaining some of the finer points of keymaps, and to Dalai Felinto for showing a possible hack to make a popup menu (I ended up using a slightly different way)

©URCHIN 2015