
 Hi folks; a mini update in form of a tutorial!
Two of our timelapse shots have the outdoor sky above; one just for the lighting and reflections, and the other – which is now scattered across half a dozen blendfiles – actually has some honest-to-goodness sky and clouds visible. There’s a bunch of interesting stuff going on in these shots, but for now, I’ll focus on the humble World background.
The World background in blender is like an infinite sphere around your scene; you can put an HDR image and light your scene (we use HDRs frequently for our interior shots- generating them from equirectangular renders of our sets) or you can use Blender’s Sky Texture node that simulates a cloudless sky with a sun positioned in it:
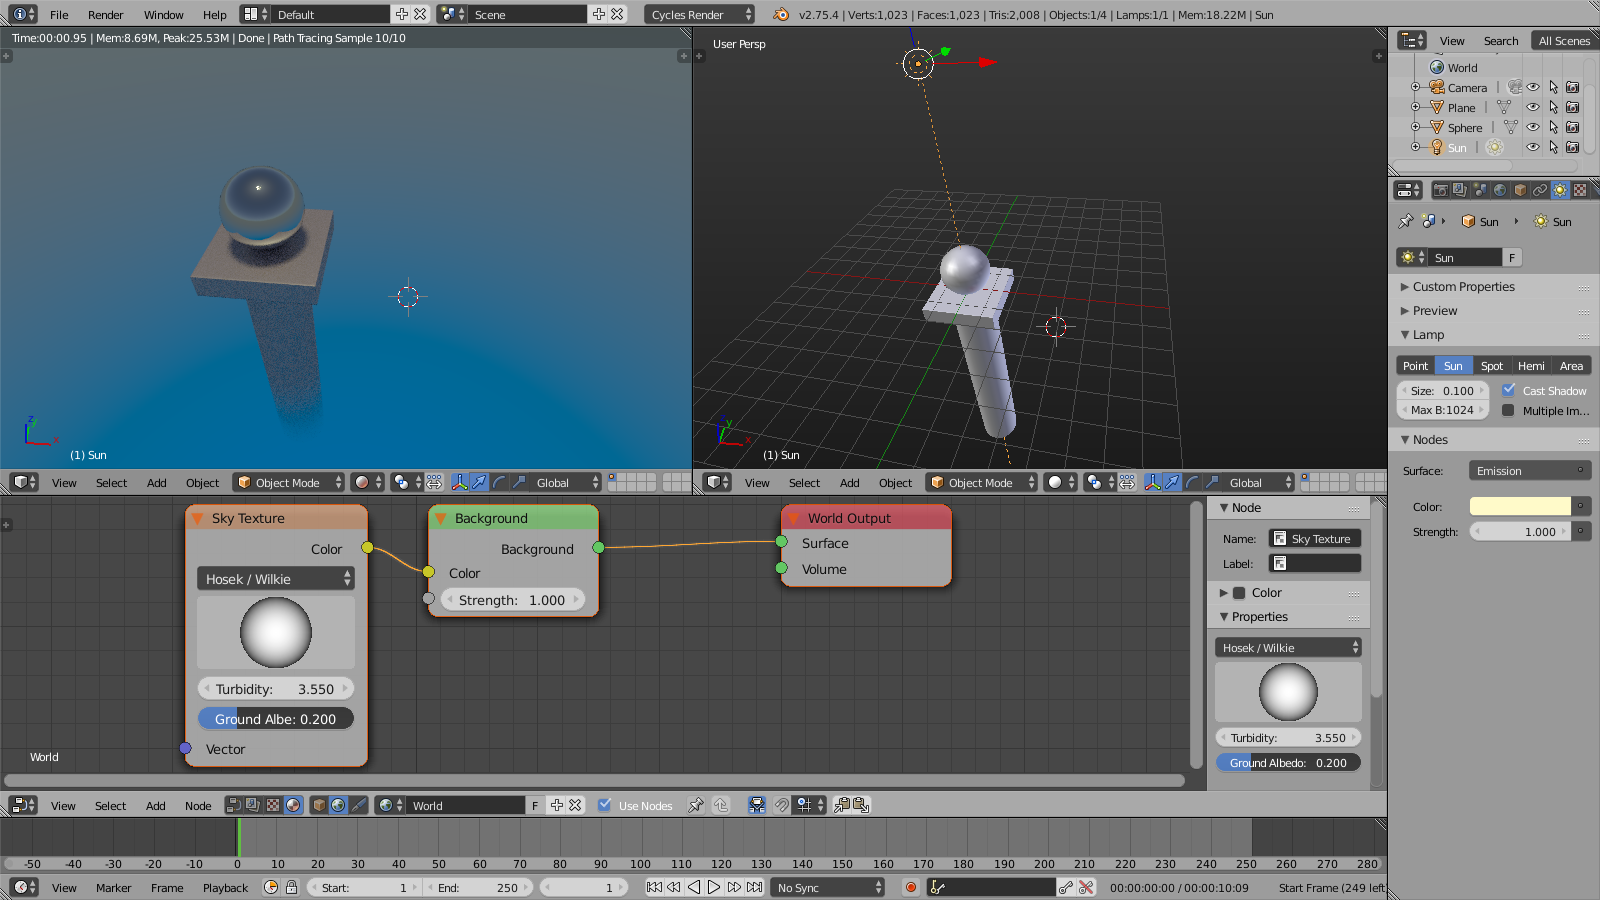
So that’s our raw setup that we’ll start from. It’s noon over the equator (I guess) and the sun is directly overhead. You’ll see that in this default state of both the Sky Texture and the Sun lamp (as seen in the chrome ball reflection) line up perfectly. It’s also one of the most boring lighting setups. Download the .blend file here.
Understanding how the Sky Texture node works (by hand):
We can rotate the sun lamp directly to change the angle of the sun. Unfortunately, this doesn’t automatically change the world background. We need to fiddle with the Sky Texture Sun Position widget to match the glow around the sun and the sky simulation with the actual lamp position.
The value you are tweaking when you play with the nice circular widget is a 3 value vector (x,y,z) of the Sun position in the sky. If you imagine a super huge spherical dome, with a radius normalized 1, then that vector is (0,0,1) when the sun is directly overhead. As the sun angle changes, that vector is rotated by that rotation, to match the position of the sun, intuitively:
Rotate the default (0,0,1) vector by the angle of the sun
Sadly, that’s easier said than done, as the widget doesn’t really help us orient north/south/east/west very easily with the viewport, and is not a very accurate input method.
Understanding how the sun lamp works:
The sun lamp is represented by a lamp and a line in the 3D view. Light from the sun is completely parallel with the same angle as the lamp, but the position of the lamp in the scene is totally ignored – only the rotation matters, and it represents the angle of the light. A rotation of 0,0,0 means the sun is beating down directly overhead (so the lamp points down by default):
The rotation of the lamp is the angle of the sun’s rays – The location of the lamp doesn’t matter.
For me the
Putting it together (Python):
Taking the above intuitively we have the following code snippet, assuming we’re using Euler rotations for the sun (for simplicity):
vec = Vector((0,0,1))Â # construct the default vector
vec.rotate(bpy.data.objects['Sun'].rotation_euler)Â # rotate it using the sun lamp rotation
bpy.context.scene.world.node_tree.nodes['Sky Texture'].sun_position = vec
This can be used in (at least) two ways:
 As an update handler: We can have this running every frame change, on file load, and before rendering. This is a pretty immediate way to get our code working in the file, but it does have a few downsides: It requires Python scripts to run in the file, which might not work if you have that setting disabled, and it only updates on a frame change – so if you rotate the sun, you’ll need to change frames to see the result, a bit clunky. We can fix some of this…
- By using the snippet as a driver: We can also put the formula into a driver namespace and drive the value directly, and have it return the x, y and z value. Then we need to press ‘D’ while hovering over the Sky Texture Sun Position Value (or right click and Add Driver) and then Edit the X, Y and Z values to get the x, y and z rotations of the sun and feed them as variables into a scripted
 expression. This will now update ‘live’ even during rendering. But it still requires that you have Python scripts autorunning, and there’s a slight chance that scripted expression Python drivers will cause crashes with multithreading. In addition, we now have the inconvenience of both writing Python and doing a fair amount of clicking and setup for this to work.

Putting it together (No Python!):
 There are some problems to our Python solutions, they might not work on some people’s Blenders, crash, not update, and they require some coding knowledge.
So we need another way. fortunately we can set up our formula in the 3D view with empties instead!
First we need the rotation of the sun. Since I don’t want to deal with it’s position, I’m going to create an empty at 0,0,0 and add a copy rotation constraint from the sun to the empty. Now the rotation of the Sun is captured perfectly by my empty, let’s call it sun_rotation
Now we need our default 0,0,1 vector. To do this:
- Disable the copy rotation constraint temporarily so the sun_rotation empty is not rotated any more (make sure you clear it’s rotation)
- Create a new Empty called sun_vector, and place it at location 0,0,1. This is now our 0,0,1 Vector.
- Make the sun_vector a child of sun_rotation.
- Re-enable the copy rotation constraint on the sun_rotation empty.
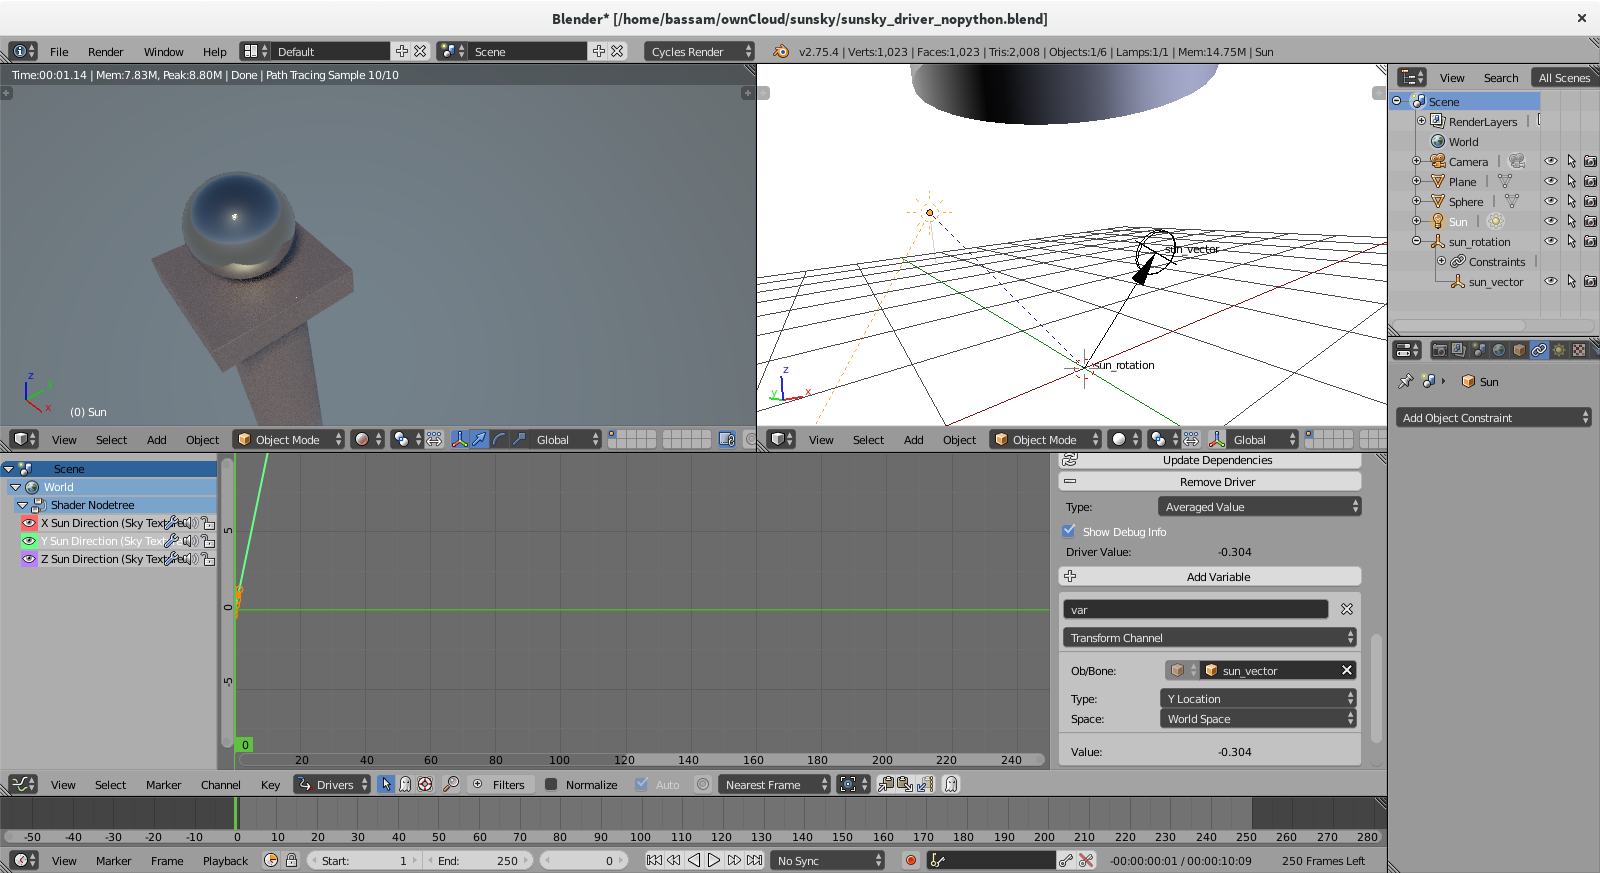
Now Create a driver on the sun position of the Sky Texture Node as you did before, by right clicking or pressing ‘d’, then:
For each X, Y and Z rotation in the driver panel, make the sun_vector the target object, and use it’s X, Y, and Z location corresponding to each rotation. Set the driver type to min, max, average or sum (it doesn’t matter since we only have one variable)
Now we are done! Our scene will update automatically on sun rotation, no need to wait for a frame change , and it does not depend on the user or renderfarm enabling python scripts. Example blend here.
Extra Credit: Visible Sun, Night Sky
For tube shots we wanted a bit more: a visible sun disk in the world (that doesn’t light the scene) and a nighttime mode with stars and horizon fog (maybe a moon for the future) so we did a bit more and rigged it with an armature. Feel free to examine the file.
Thx for this. The driver solution works perfect. I use sky texture a lot and this trick will be much used.