This year at Libreplanet I gave a small talk about Python in Blender. My primary goal behind was to talk about the ways that Blender, by exposing its Python API directly in the interface, there for users to discover, gives a new meaning to ‘free software’ not just in licensing or community (though these things […]
Python Tutorial: Mesh Addon in Blender
This year at Libreplanet I gave a small talk about Python in Blender. My primary goal behind was to talk about the ways that Blender, by exposing its Python API directly in the interface, there for users to discover, gives a new meaning to ‘free software’ not just in licensing or community (though these things are important) but also in the design of the program itself. How many programs do you know that have an ‘edit source’ button for each interface element?
One of the elements of the talk was a tutorial on how to use Blender’s Python API, and add a new primitive type into the Add Mesh menu. This is made very easy thanks to the template scripts included in Blender, that allow you to create your own with just a few edits, and by the fact that you can grab data from Blender, and pipe it into your script directly.
I’m not sure if the video from the conference will be available from the FSF; they are slowly putting talks up on the FSF mediagoblin site – I’ll post something if it does. In the meantime, I recorded a Python tutorial for just this part:
Going back and recording the tutorial actually made it better than what I presented at the conference. I used the Addon template, instead of the Operator template, which makes it even easier to share the code. Interestingly, during the presentation, I found a bug in the operator template, which I fixed after it was over. The fix is now in Blender 2.77, a nice way in which a presentation about a free software project leads directly to a contribution 😉
Hi there ! Last summer, while I was visiting the Urchin crew during my summer trip, I’ve spent a few days working on Tube in the nerdodrome. With Bassam, we had a discussion about cracks generation for the timelapse sequence. The environment for Wires for Empathy is mainly composed of concrete and we thought it […]
Moar Cracks !
Hi there !
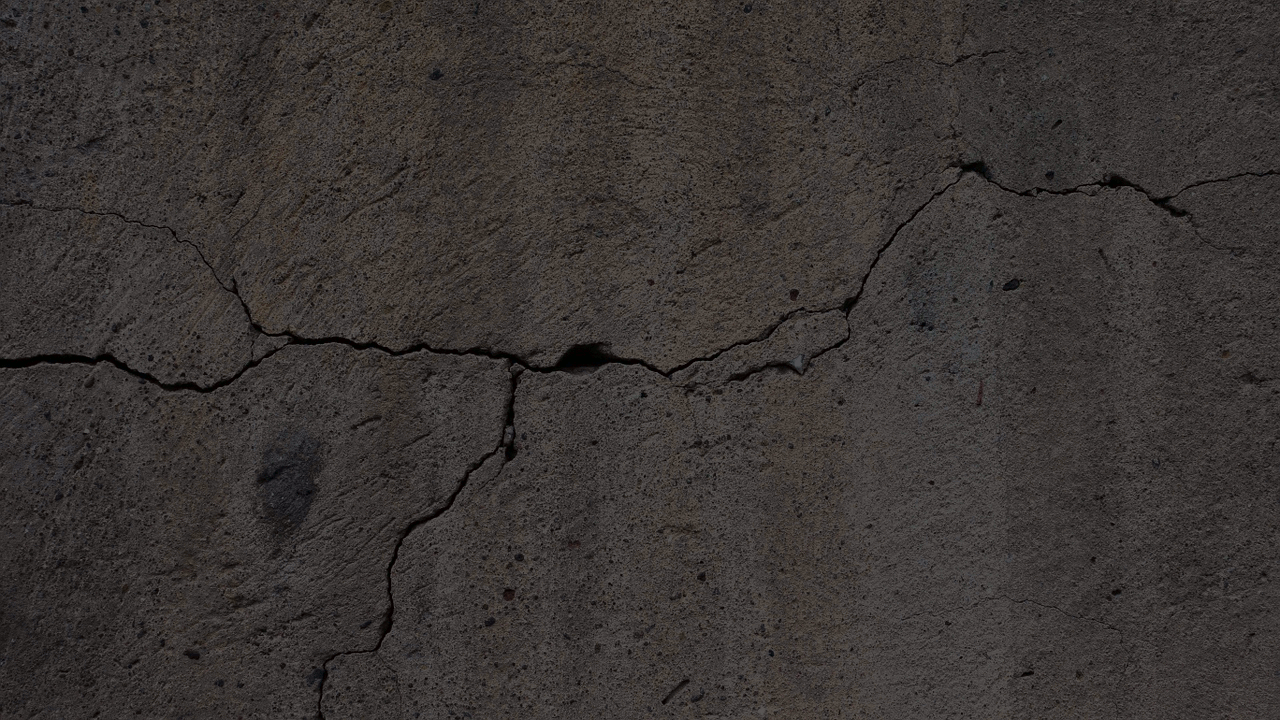
Last summer, while I was visiting the Urchin crew during my summer trip, I’ve spent a few days working on Tube in the nerdodrome. With Bassam, we had a discussion about cracks generation for the timelapse sequence. The environment for Wires for Empathy is mainly composed of concrete and we thought it would be kind of cool to have some nice cracks growing on the walls. Generating cracks is not that hard, we can do procedurally, with some great results. This tutorial explains how to do it fairly simply.
However, animating the cracks is a little bit harder and we cannot rely on the procedural method any more. We searched for examples and papers of people who already worked on this problem and found some great material. Unfortunately, most of the papers we found where based on heavy research and would include some serious C/C++ coding in order to have these tools inside Blender.
The python approach
Our first idea was to write an OSL shader that could generate cracks with some growing parameters that artists could use to control the speed and shapes of the cracks. Moreover, our rendering pipeline is entirely CPU based so using some OSL would be a problem. I’m sure it is doable in OSL, but I don’t know this language at all and even though I’m willing to learn this shading language, I would have spent a lot of time of time learning it, without being sure that I could achieve the result I wanted.
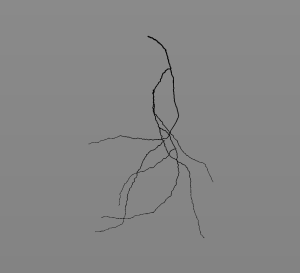
So I chose to use Python and to create a script that would manipulate Bezier curves to generate cracks in a procedural fashion. The generation algorithm is fairly simple and a based on a “branch” approach. Complex cracks can be splited into small simple “branch” that can be easily generated and manipulated. To do so, we have a very basic recursive algorithm that create a branch a determine the position of its children on it. We then repeat the branch generation on the children and determine its ow children and so on. The following image shows how a complex cracks can be seperated into those branches.
Branch Generation
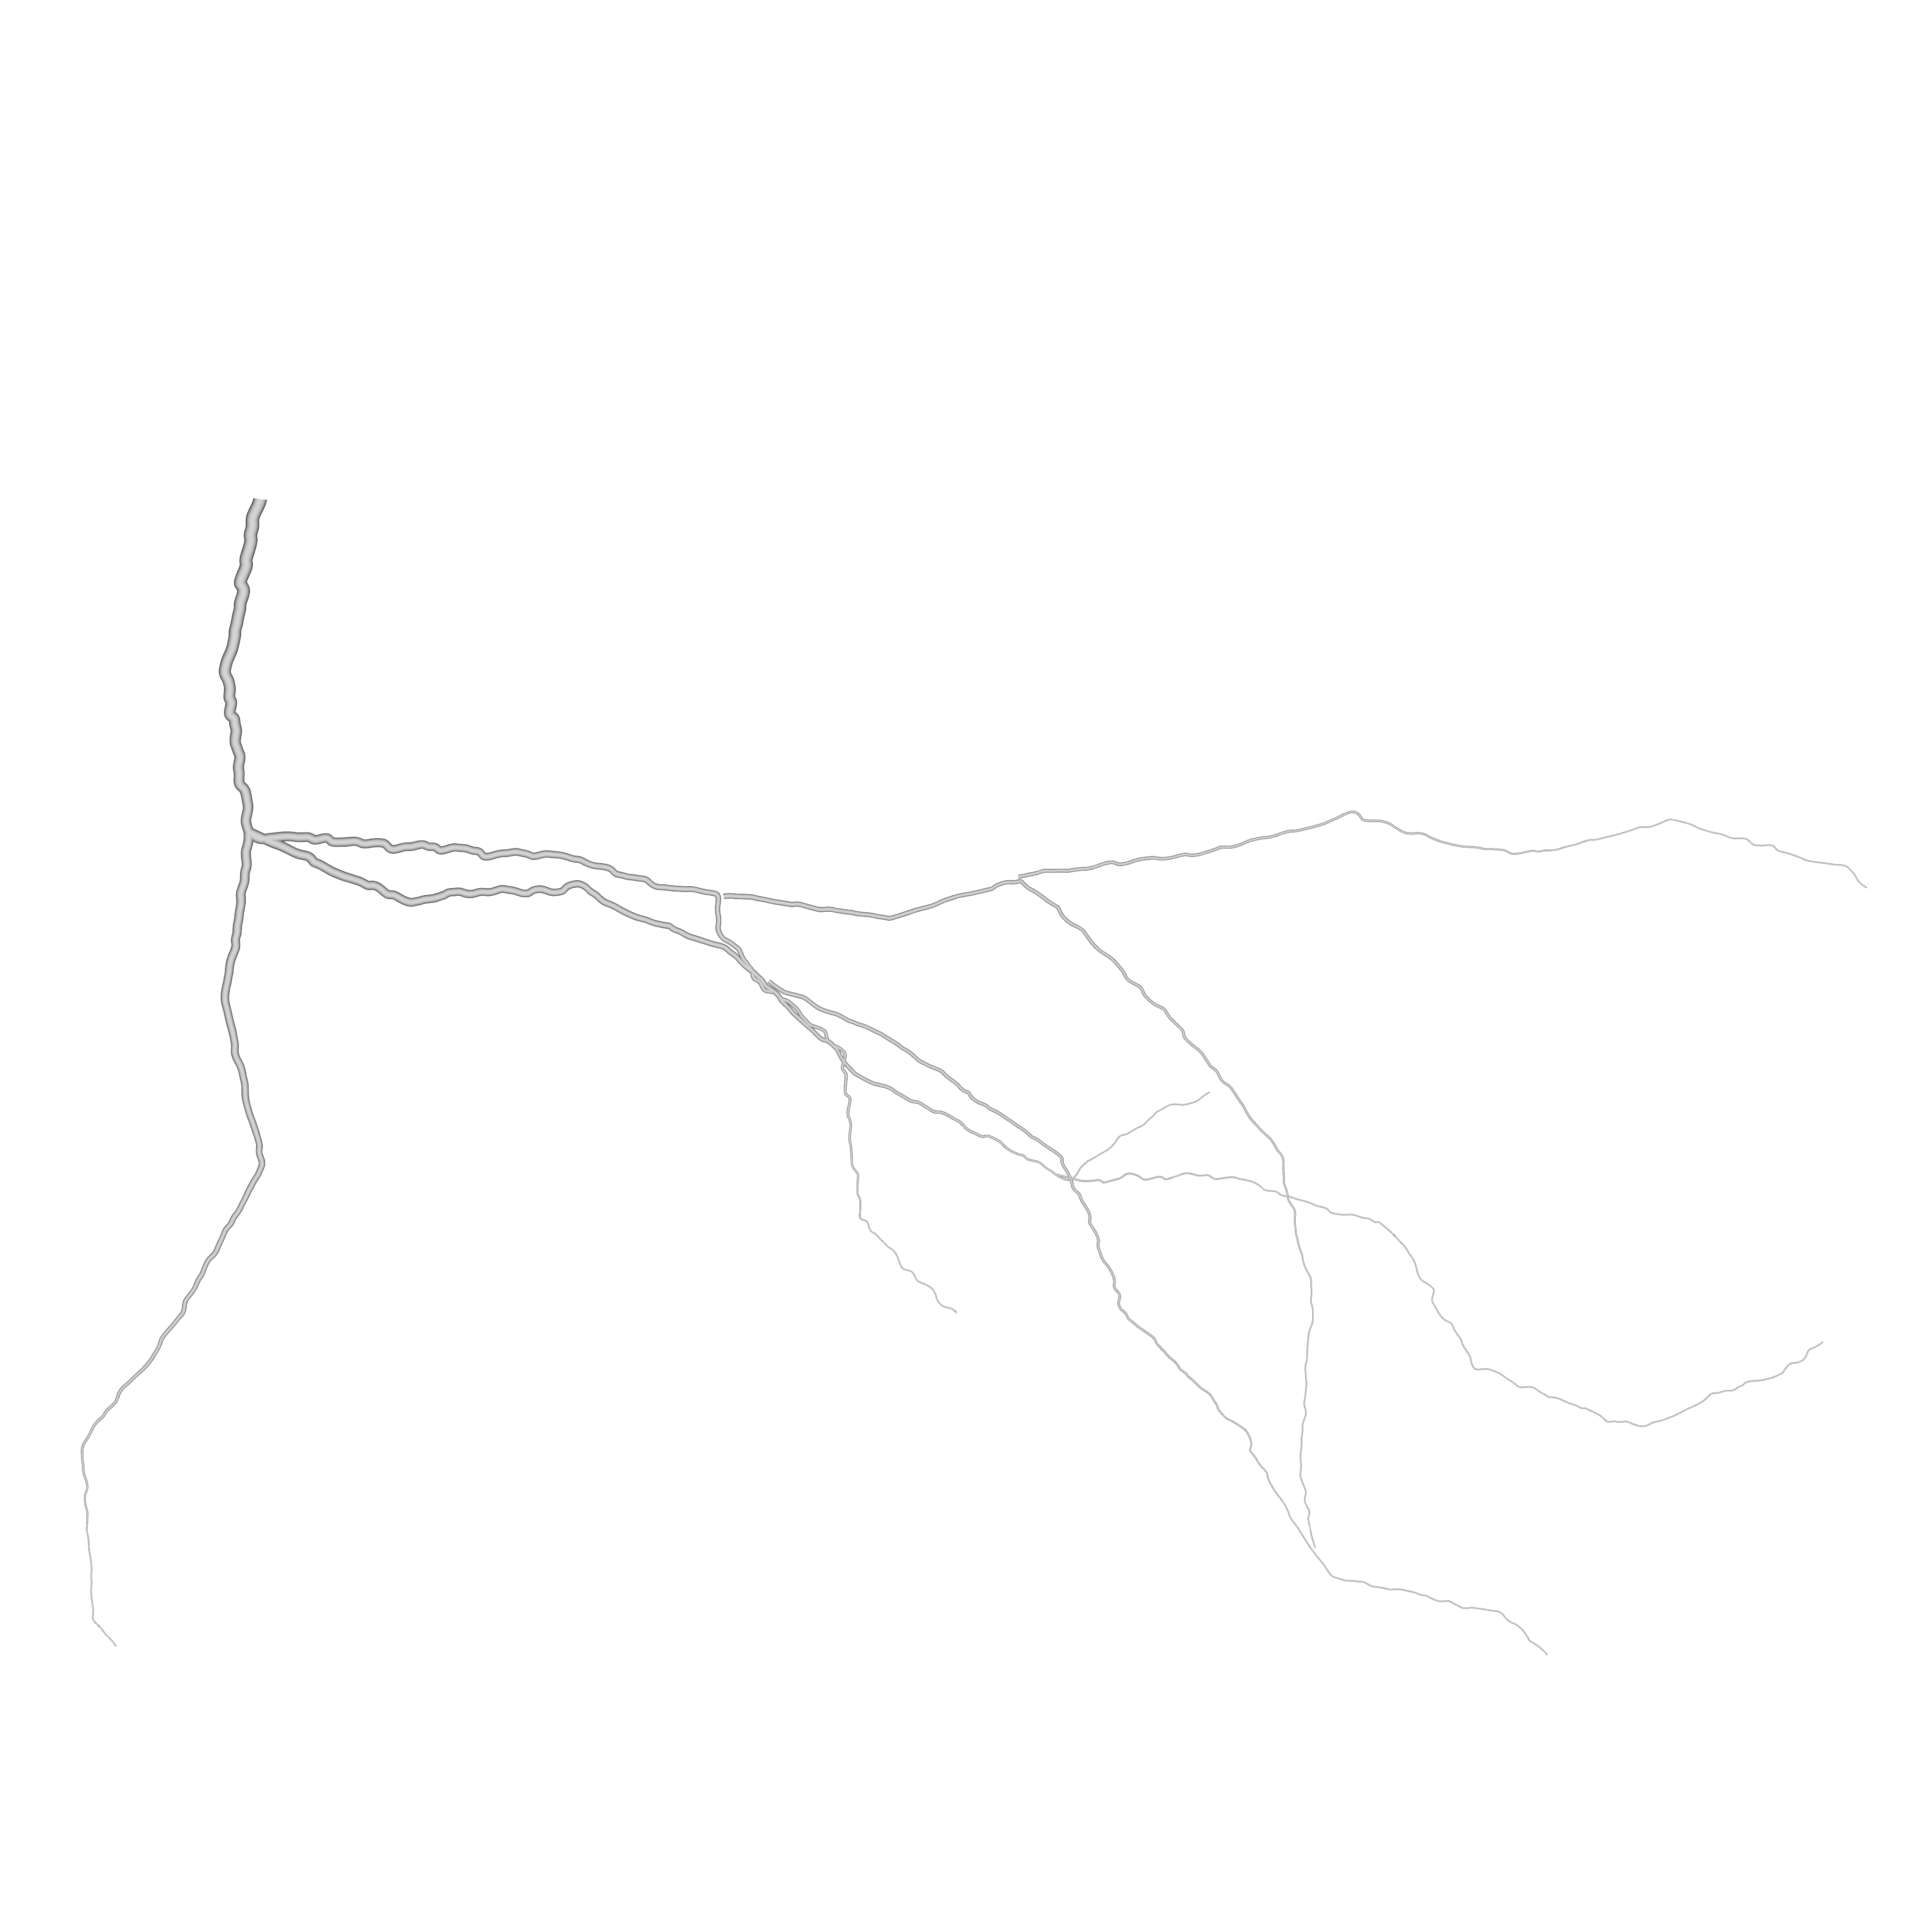
The following image explains our approach to approximate the shape of a crack. We can see that crack can be split into big segments (in blue) that can be split again into smaller segments (in red).
In Blender, we define a general direction for the branch, and generate points along it with small angle variations between each point. By default, every 5 points generated, we created a bigger angle variation (corresponding to the blue one in the image). We then convert theses points to a Curve Object.
Children Generation
When each point is generated, we generate a random value between 0 and 1 and look if this number is smaller than the Children Probability defined by the User. If it’s the case, we create a child branch at the point position and store it’s relative position on the master branch. For example, if the tenth point of a branch composed of forty points has a children branch, we create this new branch with a ‘relative position in the master branch’ of 25%. This will be very useful when dealing with the animation.
As the algorithm for branch generation is recursive, we need a way to stop it. To do so, we simply decrease the child probability at every generation, so each generation of children is ten times less likely to have children than its parents.
More displacement on cracks
The previous image shows how, even if we have generated cracks with big angle values, it still appears too smooth. We need to add more displacement on the cracks. To do so, we subdivide each curve several times, select randomly some points on it and move them using the proportional editing tool with a random falloff. After some test, we found out that we have much better result by repeating this operation with small values several times instead of doing it in one go.
The result is far more convincing with little displacement along the cracks. However, this step currently produce a small but annoying bug where some roots of some children branch get disconnected from their parent because they are displaced under the effect of the proportional editing tool. This bug is currently being fixed.
Animation
The animation system is fairly simple, we key the End Bevel Factor parameter to animate the growth of a branch. However, by doing such, the growth is very linear and robotic. So, we have added a parameter to control the speed of growth and make it randomly go faster and slower during its generation. We simply subdivide the F-Curve for animation and change the position of the keys in the Y axis as illustrated in the following image :
Results !
The result is visible is the following video :
The script is used to generate the cracks and their animation as you can see in the following video. We use custom attenuation and displacement on cracks to get a more believable result.
In order to make cracks interact with other object and surface, we need to export it as a sequence of images with transparent background. We will then be able to plug this sequence into a material or a modifier in the scene and generate cracks easily in the scene. On the left we have an example of one of these image. To render it, we simply do an OpenGL Render from the top view with an orthogonal camera. We also have applied a simple material with a black&white colorRamp so we can destroy the edge of the cracks later on.
The image sequence is then used in the scene file, as a factor for displacement modifier on a highly displaced plane and as a mix Factor on the concrete material. As we have loaded an image sequence, we only have to set the right number of frames to use and Blender will automatically refresh the image number to match the current frame and we have our animated crack !
Todos and limitations
Currently, the tool is very limited and could be largely improved by adding new features like cracks generation snapped directly on a 3D surface. This is doable as we first generate a point cloud, we could snap each point on the target surface as we generate them.
One of the biggest limitation is the fact that we don’t have access to all the modifiers we want as we manipulate curves. For example, we don’t have access to dynamic painting or boolean modifiers. Keep in mind that this a tool to generate background and secondary animation in some timelapse sequence. Our needs are quite limited and our plan is to generate a few different cracks that artists can then plug easily into their scene and add some details without spending days with painting cracks manually.
Download
The script can be download here. For now, it is only a script, so you’ll have to load the file in the blender text editor and run the script from here. Cracks Generator is added as a new tab in the tool-shelf of the 3D View.
Hi Folks! We’ll try to do a bi-weekly installement of Addons for Empathy (until we run out of addons). This one is a two-parter: Our main installment is about working with proxies in Blender, the second is about a bold new experiment in Rig UI. Proxy Workflow and Transparent Proxies Addons: Get the files from […]
Addons for Empathy 2: Proxies and a bonus!
Hi Folks!
We’ll try to do a bi-weekly installement of Addons for Empathy (until we run out of addons). This one is a two-parter: Our main installment is about working with proxies in Blender, the second is about a bold new experiment in Rig UI.
The video is about two addons, both making proxy editing in the sequencer more friendly to our project. A quick explanation:
Blender’s Video Sequence Editor or VSE for short has a feature called proxies. This basically allows an in-place replacement of strips by 25%, 50%, 75% or 100% versions, in a fast format (.jpg or motion jpg) This is especially useful when:
Editing Large format files that are too slow to be realtime – either in resolution (2K or 4K) or in type (.EXR!!!)
Editing over the network, especially files of the previous types
Working with complex and multiple effects that could be benefit from being cached
So Proxies in Blender work a bit like a combination of proxies and caches. I prefer them as the former, since it skips having to recalculate every single you change some timing – instead they only need to be recalculated when the sources change.
However, working with proxies in Blender can be painful by default, and this is where Proxy Workflow Addon comes in:
Editing Proxy settings must be done strip by strip: Proxy Workflow lets you set them for all selected strips at once
Default location is in the same folder as the originals, which is bad in the case of network shares; Proxy Workflow automatically sets them to a local directory “TProxy” that contains all the proxies for the edit, and can be moved around like a scratch disk
Sometimes Blender tries looking for the original files even when it is using proxies. If you are trying to use proxies to avoid using the network/internet, this becomes a problem. Proxy workflow allows ‘Offlining’ strips, and then ‘Onlining’ them again when you can reconnect to the network
Blender doesn’t know when the source files are ‘stale’ and need to be re-proxied – for instance if you rerender. Proxy workflow timestamps as it makes proxies, allowing you to select a bunch of strips and re-proxify only the changed ones.
Proxy workflow is designed to work with movies and image strips only for now, as I’m interested in true proxies, not caching effects.
A seperate addon is called ‘Transparent Proxies’ and does what it says on the tin (and no more): It allows making proxies of image sequences that preserve the alpha channel for alpha over effects. It does this by cheating: It uses Imagemagick on the commandline to make a .tga proxy, and just renames to .jpg to satisfy Blender. You need to install imagemagick first for it to work.
 Bonus: Rig UI Experiment:
Code is at gitorious
This brings us to the bonus round- the Rig Selection UI. I’m continuing my round of experimentation with BGL and modal addons, to make the kind of ‘typical’ rig ui where animators can select or act on a rig by clicking on an image. This ui is using an SVG file to define the hotspots, and a PNG to actually draw the image. It already works, though I’m still going to refine it and add more options/ easier rig customizability. The end goal is to be able to do Rig UIs without writing code, simply by drawing them in Inkscape and pressing a few buttons in Blender. Stay tuned!!!
Hello all, long time no post! As we’re getting closer and closer to releasing our files, I’m noticing that we have a huge (and I mean huge) trove of Python code that is largely undocumented. Some of it is pretty specific to this project, And other bits are useful in general. Even the specific stuff […]
Addons For Empathy – Floating Sliders
Hello all, long time no post!
As we’re getting closer and closer to releasing our files, I’m noticing that we have a huge (and I mean huge) trove of Python code that is largely undocumented. Some of it is pretty specific to this project, And other bits are useful in general. Even the specific stuff could be adapted, so it’s worth going over.
To address this we’ve thought of doing an ‘Addons for Empathy’ video series, quickly explaining what some of the addons do, in addition to more traditional docs. The first I’ll do in this way is the Floating Sliders Addon: In short, this pops up small, keyframable Open GL sliders for any Floating point Pose-bone properties. The code is on gitorious, and following is a simple video explanation of what it does and how to use it:
As always, the video is licensed CC-BY, while the addon itself is GPL.
You can also download this video as a high resolution .webm or .mp4 file, or watch it on youtube
The screencast itself was edited in Pitivi, with Inkscape titles. Video was captured via the Gnome screencast feature, and audio with Audacity
Big thanks to Campbell Barton for help getting min/max of custom properties, and explaining some of the finer points of keymaps, and to Dalai Felinto for showing a possible hack to make a popup menu (I ended up using a slightly different way)
The end of this week should see the initial rig in the hands of animators, and I need a quick intro video to show them what’s in store. I whipped up a quick screencap of (most) of what we have so far. The rig is far from complete – I won’t do fingers and face […]
Gilgamesh Rig Preview Video
The end of this week should see the initial rig in the hands of animators, and I need a quick intro video to show them what’s in store. I whipped up a quick screencap of (most) of what we have so far. The rig is far from complete – I won’t do fingers and face until the model is finaled, too much can change in those small details. The rig itself is quite ‘smart’ as Rigamarule has been ported by myself, Daf and Josh to Blender 2.5. As a result, moving a joint can auto-update the rig easily, and I can add bones and then ‘place’ them using rules rather than manual transforms. More on that later, onwards to the actual features for animators.
I’ve hopped on the 2.5 rig-ui-in-the-view3D-properties-region bandwagon so popular among Blender riggers these days, though more could be done there.
Nice things that 2.5 enabled is seamless Pivot switching (via Python, rather than the constraint), and not shown in this video, seamless IK/FK switching (without jumping), better drivers, and myriad small features. I’m still waffling on exactly how certain features will look/feel/work, so this is a work in progress, but it should stabilize by Wednesday (time for animation tests)
On to the video:
For a higher resolution version, download this file.


 In Blender, we define a general direction for the branch, and generate points along it with small angle variations between each point. By default, every 5 points generated, we created a bigger angle variation (corresponding to the blue one in the image). We then convert theses points to a Curve Object.
 When each point is generated, we generate a random value between 0 and 1 and look if this number is smaller than the Children Probability defined by the User. If it’s the case, we create a child branch at the point position and store it’s relative position on the master branch. For example, if the tenth point of a branch composed of forty points has a children branch, we create this new branch with a ‘relative position in the master branch’ of 25%. This will be very useful when dealing with the animation.