Hi there ! Last summer, while I was visiting the Urchin crew during my summer trip, I’ve spent a few days working on Tube in the nerdodrome. With Bassam, we had a discussion about cracks generation for the timelapse sequence. The environment for Wires for Empathy is mainly composed of concrete and we thought it […]
Moar Cracks !
Hi there !
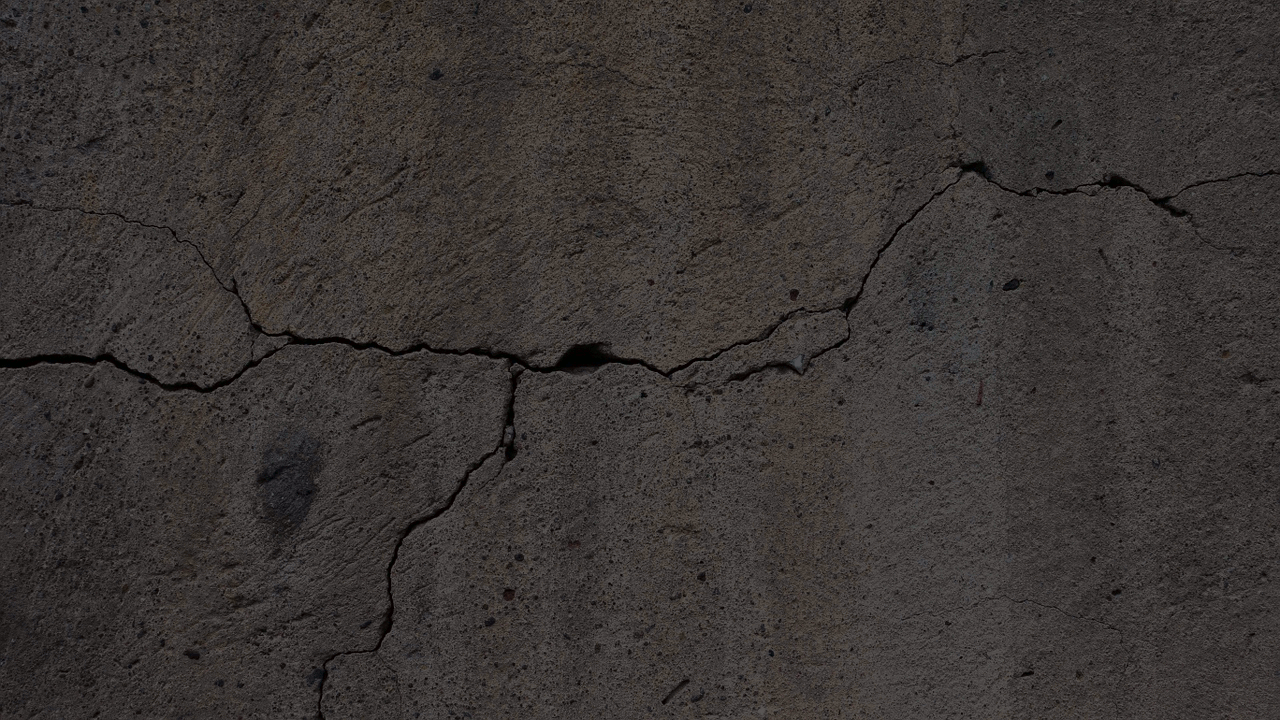
Last summer, while I was visiting the Urchin crew during my summer trip, I’ve spent a few days working on Tube in the nerdodrome. With Bassam, we had a discussion about cracks generation for the timelapse sequence. The environment for Wires for Empathy is mainly composed of concrete and we thought it would be kind of cool to have some nice cracks growing on the walls. Generating cracks is not that hard, we can do procedurally, with some great results. This tutorial explains how to do it fairly simply.
However, animating the cracks is a little bit harder and we cannot rely on the procedural method any more. We searched for examples and papers of people who already worked on this problem and found some great material. Unfortunately, most of the papers we found where based on heavy research and would include some serious C/C++ coding in order to have these tools inside Blender.
The python approach
Our first idea was to write an OSL shader that could generate cracks with some growing parameters that artists could use to control the speed and shapes of the cracks. Moreover, our rendering pipeline is entirely CPU based so using some OSL would be a problem. I’m sure it is doable in OSL, but I don’t know this language at all and even though I’m willing to learn this shading language, I would have spent a lot of time of time learning it, without being sure that I could achieve the result I wanted.
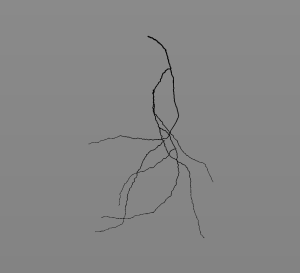
So I chose to use Python and to create a script that would manipulate Bezier curves to generate cracks in a procedural fashion. The generation algorithm is fairly simple and a based on a “branch” approach. Complex cracks can be splited into small simple “branch” that can be easily generated and manipulated. To do so, we have a very basic recursive algorithm that create a branch a determine the position of its children on it. We then repeat the branch generation on the children and determine its ow children and so on. The following image shows how a complex cracks can be seperated into those branches.
Branch Generation
The following image explains our approach to approximate the shape of a crack. We can see that crack can be split into big segments (in blue) that can be split again into smaller segments (in red).
In Blender, we define a general direction for the branch, and generate points along it with small angle variations between each point. By default, every 5 points generated, we created a bigger angle variation (corresponding to the blue one in the image). We then convert theses points to a Curve Object.
Children Generation
When each point is generated, we generate a random value between 0 and 1 and look if this number is smaller than the Children Probability defined by the User. If it’s the case, we create a child branch at the point position and store it’s relative position on the master branch. For example, if the tenth point of a branch composed of forty points has a children branch, we create this new branch with a ‘relative position in the master branch’ of 25%. This will be very useful when dealing with the animation.
As the algorithm for branch generation is recursive, we need a way to stop it. To do so, we simply decrease the child probability at every generation, so each generation of children is ten times less likely to have children than its parents.
More displacement on cracks
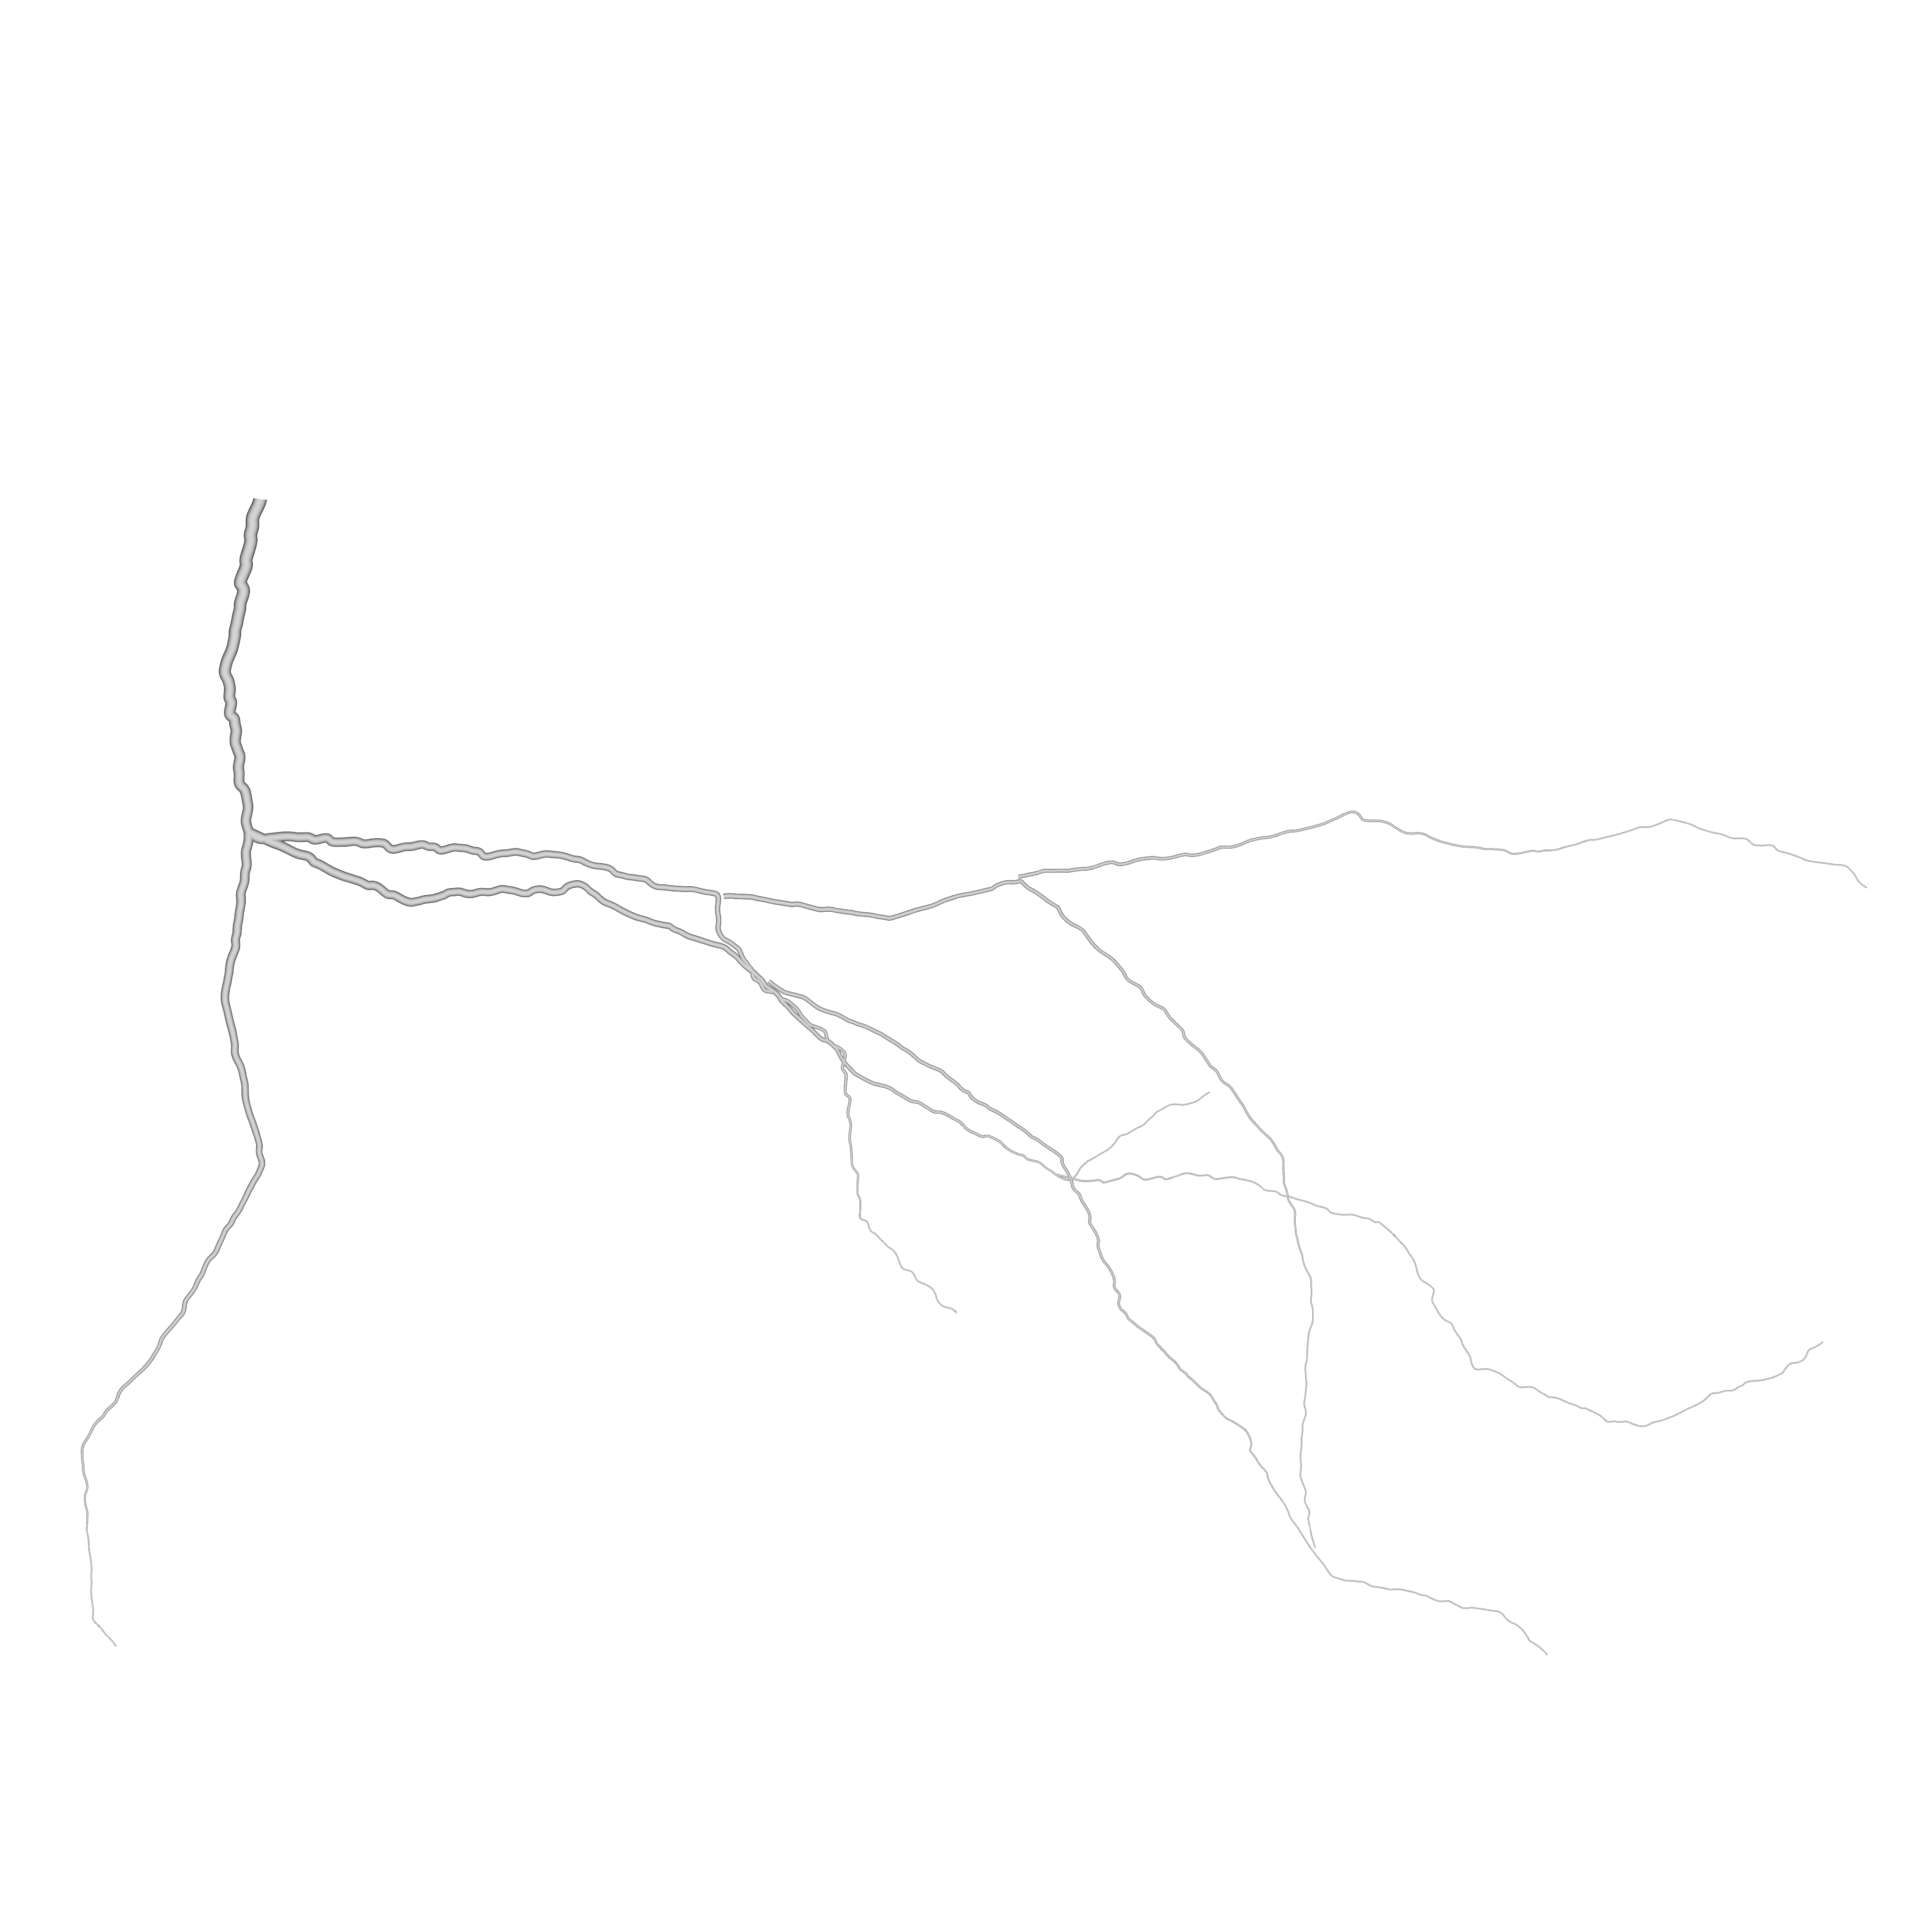
The previous image shows how, even if we have generated cracks with big angle values, it still appears too smooth. We need to add more displacement on the cracks. To do so, we subdivide each curve several times, select randomly some points on it and move them using the proportional editing tool with a random falloff. After some test, we found out that we have much better result by repeating this operation with small values several times instead of doing it in one go.
The result is far more convincing with little displacement along the cracks. However, this step currently produce a small but annoying bug where some roots of some children branch get disconnected from their parent because they are displaced under the effect of the proportional editing tool. This bug is currently being fixed.
Animation
The animation system is fairly simple, we key the End Bevel Factor parameter to animate the growth of a branch. However, by doing such, the growth is very linear and robotic. So, we have added a parameter to control the speed of growth and make it randomly go faster and slower during its generation. We simply subdivide the F-Curve for animation and change the position of the keys in the Y axis as illustrated in the following image :
Results !
The result is visible is the following video :
The script is used to generate the cracks and their animation as you can see in the following video. We use custom attenuation and displacement on cracks to get a more believable result.
In order to make cracks interact with other object and surface, we need to export it as a sequence of images with transparent background. We will then be able to plug this sequence into a material or a modifier in the scene and generate cracks easily in the scene. On the left we have an example of one of these image. To render it, we simply do an OpenGL Render from the top view with an orthogonal camera. We also have applied a simple material with a black&white colorRamp so we can destroy the edge of the cracks later on.
The image sequence is then used in the scene file, as a factor for displacement modifier on a highly displaced plane and as a mix Factor on the concrete material. As we have loaded an image sequence, we only have to set the right number of frames to use and Blender will automatically refresh the image number to match the current frame and we have our animated crack !
Todos and limitations
Currently, the tool is very limited and could be largely improved by adding new features like cracks generation snapped directly on a 3D surface. This is doable as we first generate a point cloud, we could snap each point on the target surface as we generate them.
One of the biggest limitation is the fact that we don’t have access to all the modifiers we want as we manipulate curves. For example, we don’t have access to dynamic painting or boolean modifiers. Keep in mind that this a tool to generate background and secondary animation in some timelapse sequence. Our needs are quite limited and our plan is to generate a few different cracks that artists can then plug easily into their scene and add some details without spending days with painting cracks manually.
Download
The script can be download here. For now, it is only a script, so you’ll have to load the file in the blender text editor and run the script from here. Cracks Generator is added as a new tab in the tool-shelf of the 3D View.
Wires for Empathy: an Overview of Current Progress
Hello everyone! We’re very sorry about the slow pace of updates in the past – we’re trying to do better with this and we’ve resolved to fix this in the new year. We really appreciate you patience and kindness in waiting for us and supporting us so far, and hope that the film will justify […]
Wires for Empathy: an Overview of Current Progress
Hello everyone! We’re very sorry about the slow pace of updates in the past – we’re trying to do better with this and we’ve resolved to fix this in the new year. We really appreciate you patience and kindness in waiting for us and supporting us so far, and hope that the film will justify your expectations and your support.
The fact that we’ve been slow on updates, doesn’t mean we haven’t been working on the film – we’re a tad resource constrained but making progress nonetheless, with a good sprint last summer and some steady work since then. A lot of this work is technical, but there’s a lot of art and results to show from it.
Last summer we had high occupancy in the Drome (2 local artists including myself, 3 students, and a visit from Henri who worked with us for 2 weeks) since then we’ve lost the students to their classes, but otherwise work has continued smoothly. We’ve been working on a wide variety of areas, including 2D art (for signs, posters, and miscelanous in the station) animation, lighting, and coding. And of course, much of the work has been done by artists working remotely.
It’s about time we show some of what we’re working on (It’ll be a in a mix of progress from begun to complete), and to show what’s left to do for the movie completion. In other words, it’s time for some pictures, videos and some stats 🙂
Character Animation
we have a total of 48 shots in the project. Of those, there are 4 that aren’t done (one of those currently being worked on) and 7 that currently need fixes – ranging from minor tweaks to reanimation. Incidentally, the 4 shots that are not done require some effects animation – they are highly technical in nature, and we pushed them later in the schedule so we could beef up our technical pipeline and make them more feasible. (more on this later) The following are examples of some of our animation fixes (after fixing): Animation fixes by Gianmichele Mariani, Chris Bishop, and Tal Hershkovitch, based on original animation by Virgillio Vasconcelos, Luciano Munoz and Jeenhye Kim.
Timelapse Animation
This is a very complex challenge, both artistic and technical. There are 18 timelapse shots in the film, of varying difficulties – 3 of them are done, (but do need a few tweaks), the rest not.
There’s a massive technical challenge to these shots, so we’ve been building our technical pipeline to make them work. These shots should go next.
As you’ll see from the next examples, these are being done wholesale: animation, lighting and rendering – due to the importance of surface detail during timelapse, we need to see their timing in connection with everything else. Here’s two examples a2s49, and a2s21 – the latter was tweaked over the summer, the former was started this summer only.
Crowd shots
There’s 8 of these in the film, with 3 left to do. We split this up a bit: some just require a bunch of animation using the built-in tools in blender. These are mostly shots that are ‘2D’ in motion: characters that walk in straight lines across the camera. For the more complex/ three dimensional shots, we’ve built a functional crowd system, that’s gotten constant revisions over the course of the project and reached it’s final phase during the summer. Here’s a little preview of what it can do on one of those 3 in progress shots (there’s still a bit of tweaking to do here):
missing in the above preview is the foreground and background character animation (both complete) – oh and by the way, the same crowd system works for any character rig, including humans.
Other animations
There’s a scattered mix of animation that doesn’t belong to any fixed category; we could call it background animation or object animation. It’s hard to tell what’s done here as a lot of it is optional – improving a shot rather than making it, while some is needed to make the shot work. The latter is planned and done in advance, while the former is done on an ad-hoc and as-needed basis over the course of the project – things like gravel crunching and moving underfoot, or bits of paper flying in the air, or a railing or window flexing as the character interacts with it. The following examples are some older shots we have showing those types of animations. There’s quite a few to do, most of them much more limited (but some complex ones that are a bit too spoilery to show 😉 )
 One neat example of this type of animation is the work Henri put in to animating the title sequence of the project:
Code and Shaders – Timelapse challenges
While there is still some character animation to finish, and we are not finished with texturing/materials/lighting and rendering, our current big push is to finish the timelapse animation. There are some interesting challenges to the timelapse animation that aren’t present in ‘normal’ character animation:
Instead of just ‘camera, characters, and props’ we have many shots (roughly a third of the film) where literally everything on camera is being animated.
Timelapse changes don’t just deform object, they change topology, or get replaced whole.
In a typical shot we don’t animate the surface materials, but those become the most critical part of a timelapse.
Because this is unusual animation, the built in tools of animation programs (like Blender) aren’t optimized or setup to make it really easy – compare to character animation that gets a lot of attention.
The following is a material test, showing how timelapse materials have to animate over time in interesting and believable ways:
So we attack the problem from general to specific and from specific to general. We work shot by shot, finding problems and solving them. But then we spend time analyzing our needs and developing tools and reusable assets that will work for many shots.
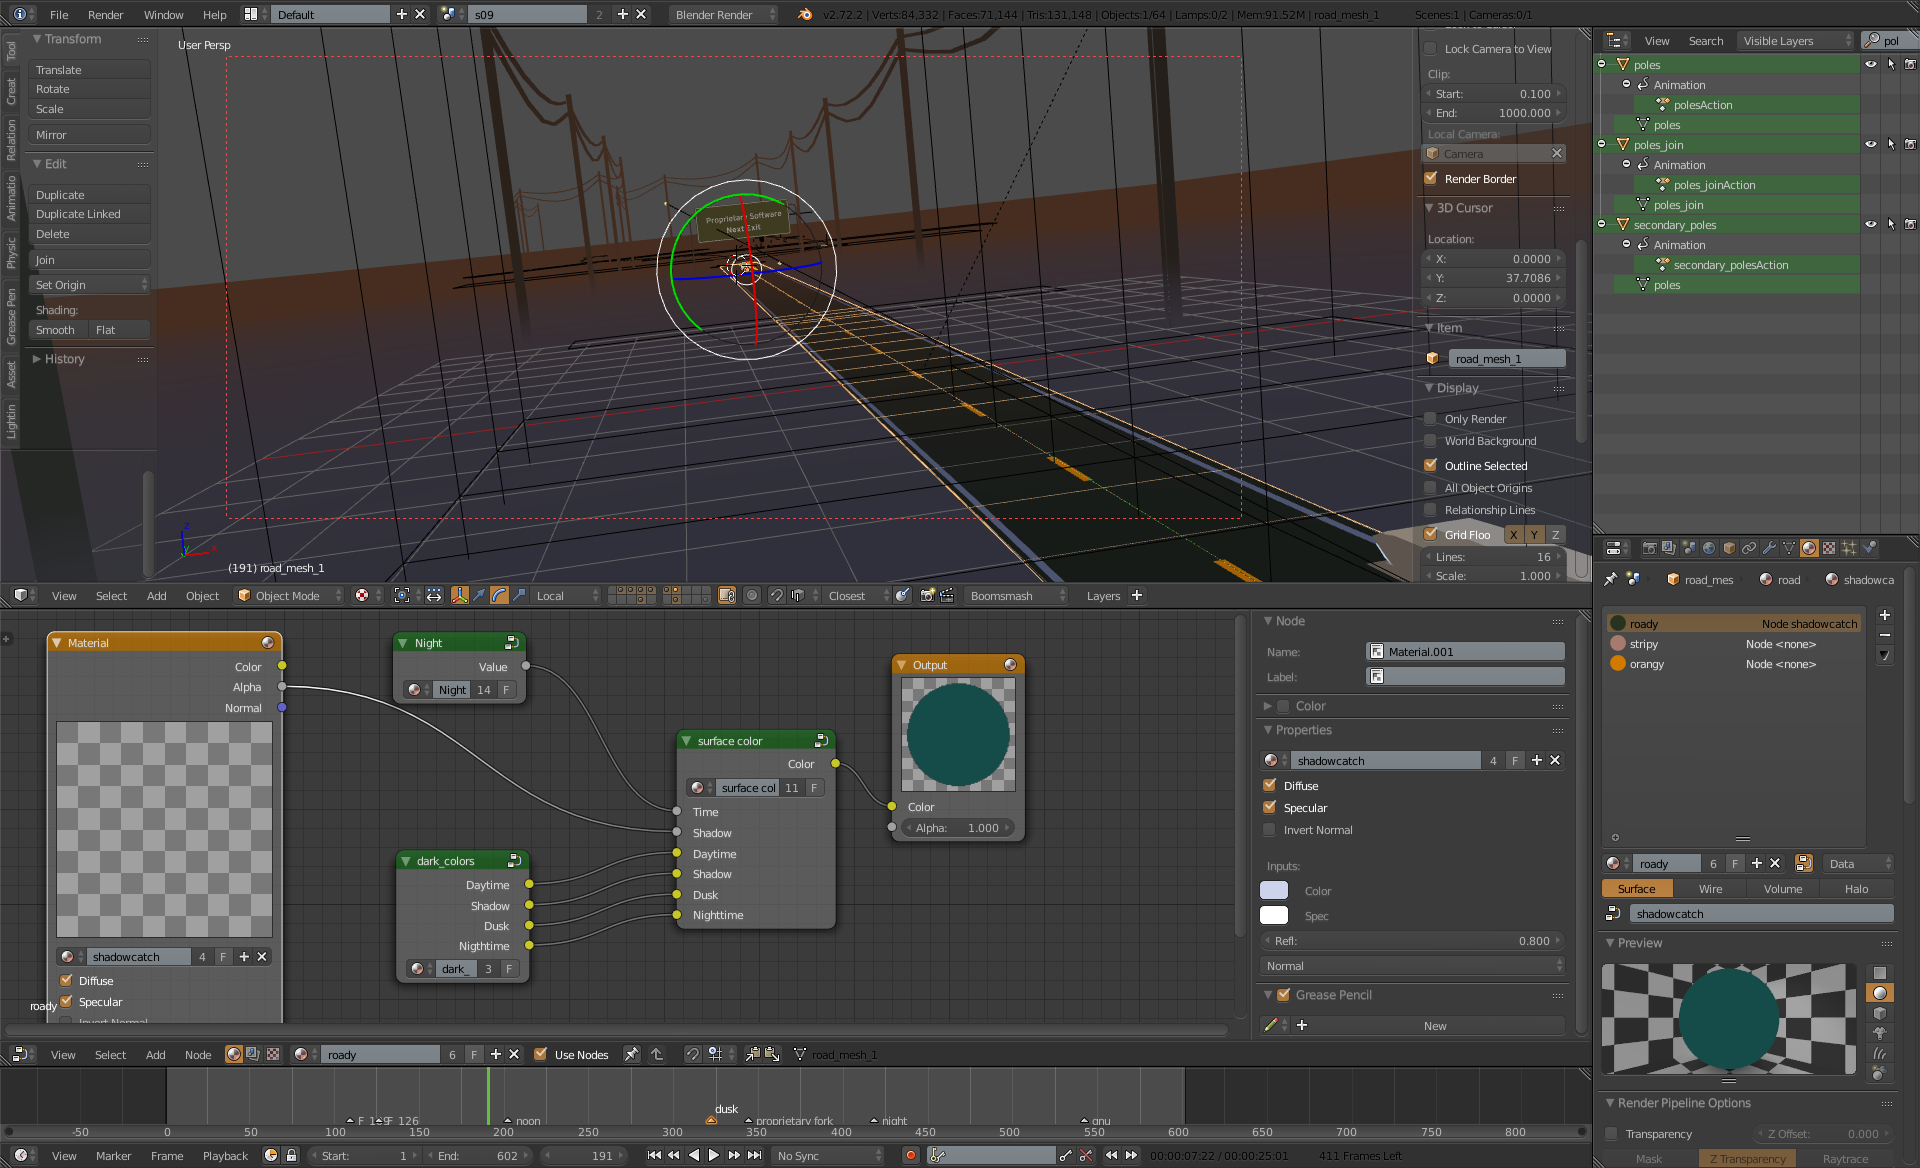
One such shot is a2s49 (shown earlier), a cut-away shot, and one of our tools is a blender plugin called timelapse toolbox that has many features we identify and add to it along the way. More elements that we know we’ll need, we can tackle on their own: Cracks growing, Aging materials and surfaces (think rusting metal, peeling paint, concrete, etc). All results from these are also assisted and lead to modifications and additions to the timelapse toolbox, in this case dealing with material animation, and also to a growing shader library that will be used across all shots.
Another really interesting plugin is the crack generator by Henri Hebeisen. It’s a fully procedural python program, that generates cracks that can evolve over time. Highly flexible as to shape, timing, and placement, it generates animated Blender Curve objects that can be rendered to textures, shown directly in the viewport, or used as brushes for dynamic paint or boolean operations.
Another important tool that was completed recently is our meshcacher – a tool designed to add features to Blender’s current limited caching capabilities. Since timelapse toolbox, the meshcacher and the crack generator are interesting technical topics, we’ll cover them in more detail in future updates.
Lighting and Rendering
With the focus on timelapse and animation fixes, we still found some time to light some of the non-timelapse shots. Here’s an example of lighting from Vincent Gires, on a1s16 (finishing up work by Christine Stuckart in an earlier phase of the project):
2D Art and textures:
Before the shots can have final renders, we need to produce many bits of 2D artwork, to be used as posters, advertisements, and so on the station walls – even signage and graffiti are important elements in the timelapse, and to add detail to the station. We also want the location of tube to be universal, not a specific country or place on earth, so instead of english, we’re designing a simple ‘font’ for an unknown language. The following is a quick preview of some of the posters. Art is by Astro Leon-Jhong, Michael Kalinin, myself and Anastasia Denos. Note all of this is in a mix of concept to approved art:
Planning and Organization
We found relying purely on Helga+spreadsheets to be sub-optimal for our planning needs; the high amount of interdependence between tasks was too much to plot, lending itself more to a network than a list. Luckily we already have a nice network editor: Blender’s node editor. So we wrote a simple plugin that creates ‘organization nodes’ and allows outputing into various spreadsheet formats. Here’s a screen shot of what we have to do:
So it looks daunting (and it is) but it is on a very high level of detail. the 3 columns represent the three acts of the film, so the bulk of our remaining tasks are in the second act.
In conclusion, thanks for your patience, and many apologies for the delays in the project and the long periods of time between updates. We’re resolved to do better in both regards, so we’ll have have more soon, showing technical milestones, new artwork, and project details.
Hi folks; a mini update in form of a tutorial! Two of our timelapse shots have the outdoor sky above; one just for the lighting and reflections, and the other – which is now scattered across half a dozen blendfiles – actually has some honest-to-goodness sky and clouds visible. There’s a bunch of interesting stuff […]
Sun and Sky mini Tutorial
Hi folks; a mini update in form of a tutorial!
Two of our timelapse shots have the outdoor sky above; one just for the lighting and reflections, and the other – which is now scattered across half a dozen blendfiles – actually has some honest-to-goodness sky and clouds visible. There’s a bunch of interesting stuff going on in these shots, but for now, I’ll focus on the humble World background.
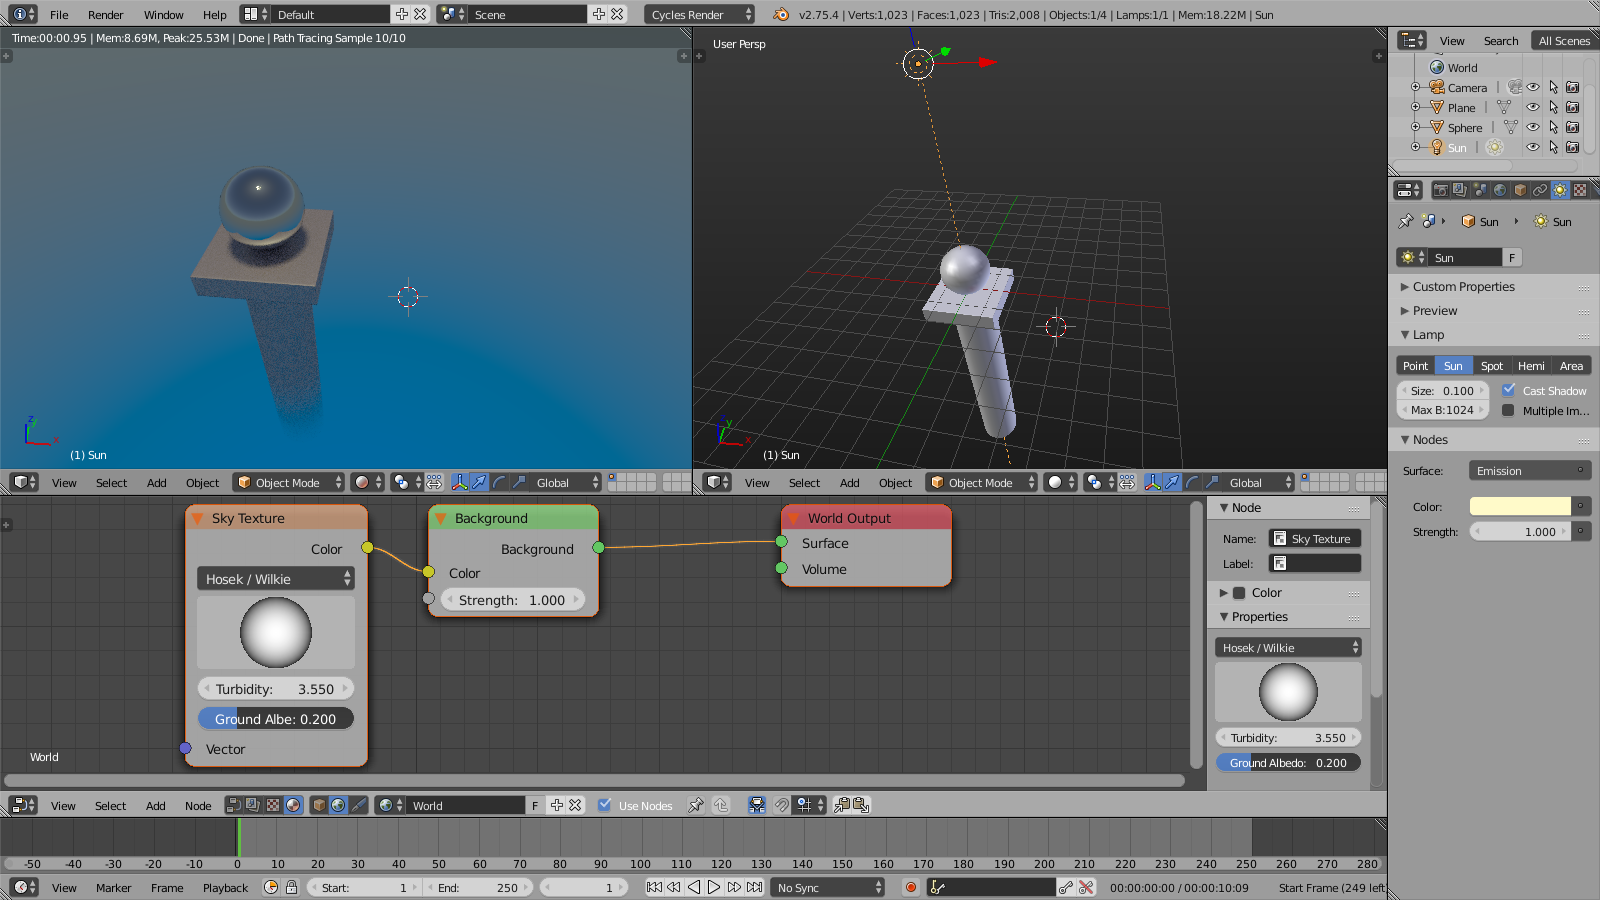
The World background in blender is like an infinite sphere around your scene; you can put an HDR image and light your scene (we use HDRs frequently for our interior shots- generating them from equirectangular renders of our sets) or you can use Blender’s Sky Texture node that simulates a cloudless sky with a sun positioned in it:
So that’s our raw setup that we’ll start from. It’s noon over the equator (I guess) and the sun is directly overhead. You’ll see that in this default state of both the Sky Texture and the Sun lamp (as seen in the chrome ball reflection) line up perfectly. It’s also one of the most boring lighting setups. Download the .blend file here.
Understanding how the Sky Texture node works (by hand):
We can rotate the sun lamp directly to change the angle of the sun. Unfortunately, this doesn’t automatically change the world background. We need to fiddle with the Sky Texture Sun Position widget to match the glow around the sun and the sky simulation with the actual lamp position.
The value you are tweaking when you play with the nice circular widget is a 3 value vector (x,y,z) of the Sun position in the sky. If you imagine a super huge spherical dome, with a radius normalized 1, then that vector is (0,0,1) when the sun is directly overhead. As the sun angle changes, that vector is rotated by that rotation, to match the position of the sun, intuitively:
Rotate the default (0,0,1) vector by the angle of the sun
Sadly, that’s easier said than done, as the widget doesn’t really help us orient north/south/east/west very easily with the viewport, and is not a very accurate input method.
Understanding how the sun lamp works:
The sun lamp is represented by a lamp and a line in the 3D view. Light from the sun is completely parallel with the same angle as the lamp, but the position of the lamp in the scene is totally ignored – only the rotation matters, and it represents the angle of the light. A rotation of 0,0,0 means the sun is beating down directly overhead (so the lamp points down by default):
The rotation of the lamp is the angle of the sun’s rays – The location of the lamp doesn’t matter.
For me the
Putting it together (Python):
Taking the above intuitively we have the following code snippet, assuming we’re using Euler rotations for the sun (for simplicity):
vec = Vector((0,0,1))Â # construct the default vector
vec.rotate(bpy.data.objects['Sun'].rotation_euler)Â # rotate it using the sun lamp rotation
As an update handler: We can have this running every frame change, on file load, and before rendering. This is a pretty immediate way to get our code working in the file, but it does have a few downsides: It requires Python scripts to run in the file, which might not work if you have that setting disabled, and it only updates on a frame change – so if you rotate the sun, you’ll need to change frames to see the result, a bit clunky. We can fix some of this…
By using the snippet as a driver: We can also put the formula into a driver namespace and drive the value directly, and have it return the x, y and z value. Then we need to press ‘D’ while hovering over the Sky Texture Sun Position Value (or right click and Add Driver) and then Edit the X, Y and Z values to get the x, y and z rotations of the sun and feed them as variables into a scripted expression. This will now update ‘live’ even during rendering. But it still requires that you have Python scripts autorunning, and there’s a slight chance that scripted expression Python drivers will cause crashes with multithreading. In addition, we now have the inconvenience of both writing Python and doing a fair amount of clicking and setup for this to work.
Putting it together (No Python!):
There are some problems to our Python solutions, they might not work on some people’s Blenders, crash, not update, and they require some coding knowledge.
So we need another way. fortunately we can set up our formula in the 3D view with empties instead!
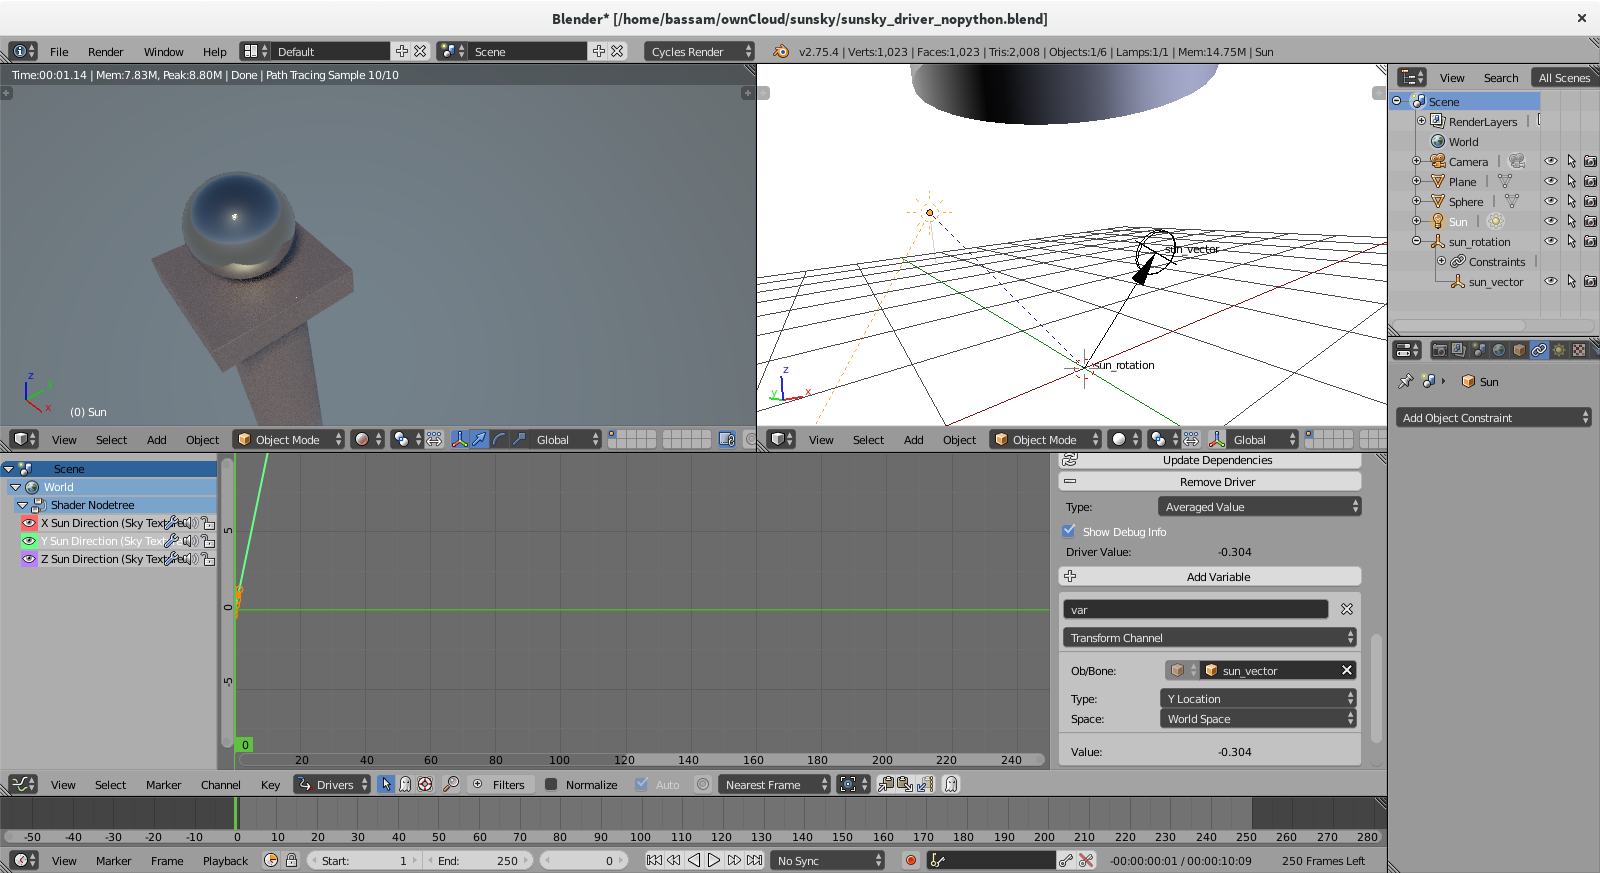
First we need the rotation of the sun. Since I don’t want to deal with it’s position, I’m going to create an empty at 0,0,0 and add a copy rotation constraint from the sun to the empty. Now the rotation of the Sun is captured perfectly by my empty, let’s call it sun_rotation
Now we need our default 0,0,1 vector. To do this:
Disable the copy rotation constraint temporarily so the sun_rotation empty is not rotated any more (make sure you clear it’s rotation)
Create a new Empty called sun_vector, and place it at location 0,0,1. This is now our 0,0,1 Vector.
Make the sun_vector a child of sun_rotation.
Re-enable the copy rotation constraint on the sun_rotation empty.
Now Create a driver on the sun position of the Sky Texture Node as you did before, by right clicking or pressing ‘d’, then:
For each X, Y and Z rotation in the driver panel, make the sun_vector the target object, and use it’s X, Y, and Z location corresponding to each rotation. Set the driver type to min, max, average or sum (it doesn’t matter since we only have one variable)
Now we are done! Our scene will update automatically on sun rotation, no need to wait for a frame change , and it does not depend on the user or renderfarm enabling python scripts. Example blend here.
Extra Credit: Visible Sun, Night Sky
For tube shots we wanted a bit more: a visible sun disk in the world (that doesn’t light the scene) and a nighttime mode with stars and horizon fog (maybe a moon for the future) so we did a bit more and rigged it with an armature. Feel free to examine the file.
Last October Libby Reinish from the Free Software Foundation commissioned Urchin to make a short film in celebration of the FSF’s 30th anniversary, to support their annual funding campaign. We were thrilled at the chance to work on messaging we care about, that’s so close to our own mission. The short deadline and limited budget […]
The Making of User Lib
Last October Libby Reinish from the Free Software Foundation commissioned Urchin to make a short film in celebration of the FSF’s 30th anniversary, to support their annual funding campaign. We were thrilled at the chance to work on messaging we care about, that’s so close to our own mission. The short deadline and limited budget made for some interesting challenges. And of course we would produce this film (like everything else we do) with Free Software, especially Blender. You can use the embed code from the FSF, or Urchin’s as follows: <iframe width="640" height="390" src="http://video.urchn.org/usrlib/" frameborder="0" allowfullscreen></iframe>
Script and Design
We started pre-production with only a target audience matrix related to technical knowledge and potential philosophical alignment. The FSF gave us a free hand to propose a script, so before starting to write, we took some time to consider and Fateh did a lot of interesting research. There were many more points we’d like to have included, but we had to be brutal in deciding what could be in the scope of this small project. We came away inspired to find ways of continuing the much needed work of free software messaging. (And actually, Fateh already has a very cool plan in development.)
The theme: User Lib!
One of the most important tenets of the FSF stood out: that this is predominantly a movement about people’s rights; it’s not just a programming methodology that favors openness and collaboration (though this is an awesome side-effect) or about writing better code — it is about making sure that users are in control of their computing, and not the other way around. A play on /usr/lib/ as ‘User Liberation’ that came out of our banter at Libre Planet provided the theme. (Side note: we are aware that /usr does not traditionally mean user, but punning logic prevails.)
Visual Pre-production
Once the bare bones of the script came into focus, I started working on on little tests in Krita and Blender, with the mantra to make cartoony motion, and flat shade all the things (no lights). Even light effects are done with materials at differing values and saturations.
I also started thinking about our main character. It’s tricky to design a character without race or gender when pressed for time, but that was our goal. We named it ‘Mo’ (short for anything from Maureen to Mohammad) and called it “they” (neutral pronouns).
The “Go” decision
Once Fateh got approval from the FSF we switched into production with her great script to work from. (software: Piratepad, Gedit, Textplay and Trelby)
Production
Boards
With very limited production time and a carefully prepared script it didn’t make sense to do elaborate boards and animatic: I’d rely on small thumbnails for the short, one per shot, and a very simple animatic with no animation. I used Krita to draw the boards, then cropped and exported into Blender for the animatic. Not much to say here except that I really like Krita- If it gains python scripting it’ll be perfect for me. When time permits in future preproductions, I might use the new grease pencil tools to animate on top of Krita Layers in Blender.
Scene Organization
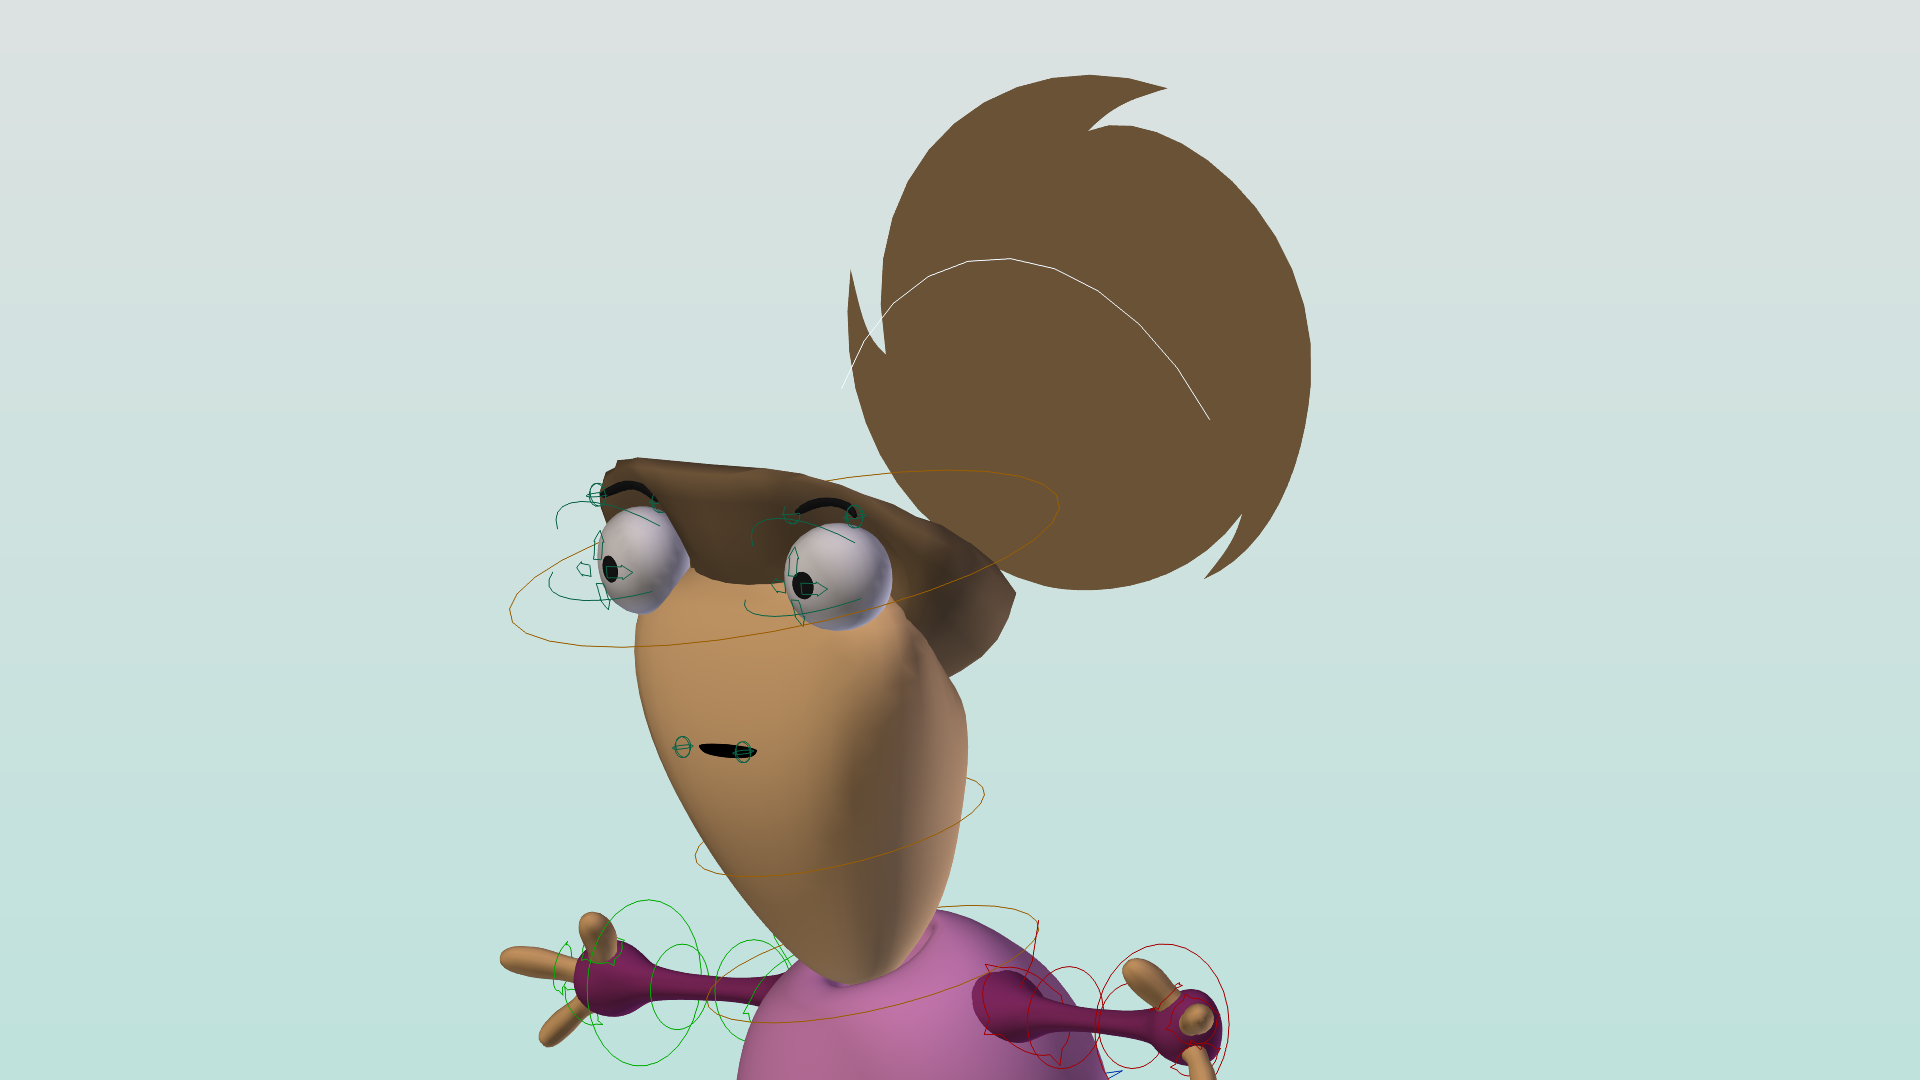
With my decision to do cartoony animation came a little bit of problem. Blender typically allows you to link (or for Maya-speakers, reference) characters into scenes. However, this comes at a bit of cost: every deformer and many decisions have to be rigged in the library file: you can’t just slap an ad-hoc lattice onto your character, or make a shapekey specific to a shot, or delete or replace a mesh simply while animating: All those things must be rigged-in, and, given my short production time, that just didn’t feel practical. As a result, most shots have Mo local (though the rig is perfectly capable of being linked). The short production and relatively few shots made me feel fairly OK about this (it would be murder on a Wires For Empathy level of complexity though)
Shrinkwrap, Dependency Graph and Workarounds
So, Mo is basically a hierarchy of Blobs and Limbs. You get the body-blob, with arms and legs and head sprouting off it, followed by (in the case of the arms) hand blobs, with little sausage fingers growing from them. There’s the minimum number of fingers, and every limb is supposed to move freely on the blob – an arm can be placed anywhere during the animation, so can a leg, and so can the finger on each hand. I compromised with the head and made it the only fixed element on the surface with the traditional chest-neck-head hierarchy.
Initially I wanted to shrinkwrap the arms to the surface, but this got me into Blender dependency graph limitations- You can’t break in and out of the armature dependency graph without creating an object-level cycle (sorry if this is greek). Luckily, Sergey is fixing this- but for now I used single bone IK chains to constrain the arms and legs to a sphere, and then added a movable bone so the animator could manually keep the arm on the surface. The mesh itself is shrinkwrapped, and the setup is far more forgiving than you’d think.Those cool yellow X-man logos on the body and the hands are actually what allows the limbs to travel around on their blobs…
Hair
I wanted Mos hair to be a recognizable shape of a sphere/circle with 3 swirls coming out of it. My initial approach was to model this in 3D, but the resulting silhouette was always awkward depending on the camera angle. Attempts to fix this with rigging and shapekeys were time consuming and unsatisfying, so I ended up using the flat shading to my advantage, ditching the 3D hair and splitting the hair into a 3D ‘junction’ with the skin and eyes and a flat shape (with shapekeys for animation) that I could just place relative to the camera to get the desired shape. It worked brilliantly and I only used 3D hair in one shot, where there were too many Mos to adjust manually. In this shot however, Mos hair is the same back to front – this Mo had no face.
Broken Rigging
I know what you’re thinking, but that’s not what I’m talking about. As I did my first test of Mo hammering I found that, as I moved the shoulders for the extreme cartoony poses, this would totally break the arcs of the arms and hands (and hammer). I could just compensate by either moving the (hidden) shoulder on an arc, or counter-animating in the arms and hands.. but yuck. A simple arc motion gets into lengthy tweakage. Luckily, I’ve been introduced to the concept of broken rigs by the folks at Anzovin Studios, some of the best 2.5d animators and riggers around. The idea is to get away from 3D character hierarchies and FK/IK complexities, and just make every joint a sibling in world space. Animating a character feels more like 2D, freely sculpting its pose, and the lack of inheritance means you can finesse every arc on every joint without having to compensate for what the hierarchy is doing. With little time to create a full broken rig I did the next best thing: I added a broken mode to Mo’s arms in addition to the FK and IK controls. Then I animated the hammer strike again. It took a fraction of the time and was uber smooth. I became an instant convert. As I got into the ‘sometimes hierarchies are nice for posing’ issue, I created a quick script that allowed copying poses between broken and FK controls, so I could pose in FK and then keyframe in broken mode. Mo’s arms are keyframed with broken IK in most shots, there may be only one exception (incidentally, the above shot illustrates that outside of camera view, most of my animations look terrible)
Orbiting Particles
This is a story about letting go. I wanted the first shot to start with particle systems orbiting Mo ‘surrounded by software’ like an atom or a solar system. Here the age of Blender’s particle systems started to show. The best way I found to create the orbit was using hair guides, but they have a fatal limitation: the particle can only traverse the guide once in its lifetime. So unless you want super slow orbits (I didn’t) you get particles popping in and out of existence at the end of the guide. I struggled to fix this by coiling the guides so they were more than one loop, but this introduced a new type of popping where particles would flip 180 degrees and that was even more jarring. In the end, I just ‘lived with it’. If you examine the first shot closely, you can see this happen. Also some of the particles go through Mo’s head 😉
Text Effects
Well, there’s lots of text in this short. And I wanted to have it typing, randomly animating, with a blinking cursor (sometimes) at the end. Luckily, much earlier, I had written a small addon for Jakub Steiner to do a ‘typewriter text’ effect. I much later built it into a bigger system of text effects called… well, TextFX. This allows you to stack different text segments into a single Blender Text Object, and then stack multiple Animations on each Segment (like typing, blinking, changing material or font, etc.).
I could then also use Blender’s own animation tools, like putting text on paths, animating spacing or size, for a variety of typography animation. For instance, using a lattice deform to wrap text around a hammer (the lattice is one dimensional, uses linear deform, and wraps multiple times around the hammer) I got into some small issues with Blender’s text though:
The fill (tesselation) algorithm for text is very fast but also very ugly: lots of long triangles that don’t deform well. I used remesh to give me a quad grid, but I had to solidify the text first, as remesh only works on volumes. Then I hit a bug, either in the font or in Blender: at certain sizes, the tesselator fails to give a closed surface, breaking the solidify/remesh. I ended up using scaling instead of font size to avoid this problem.
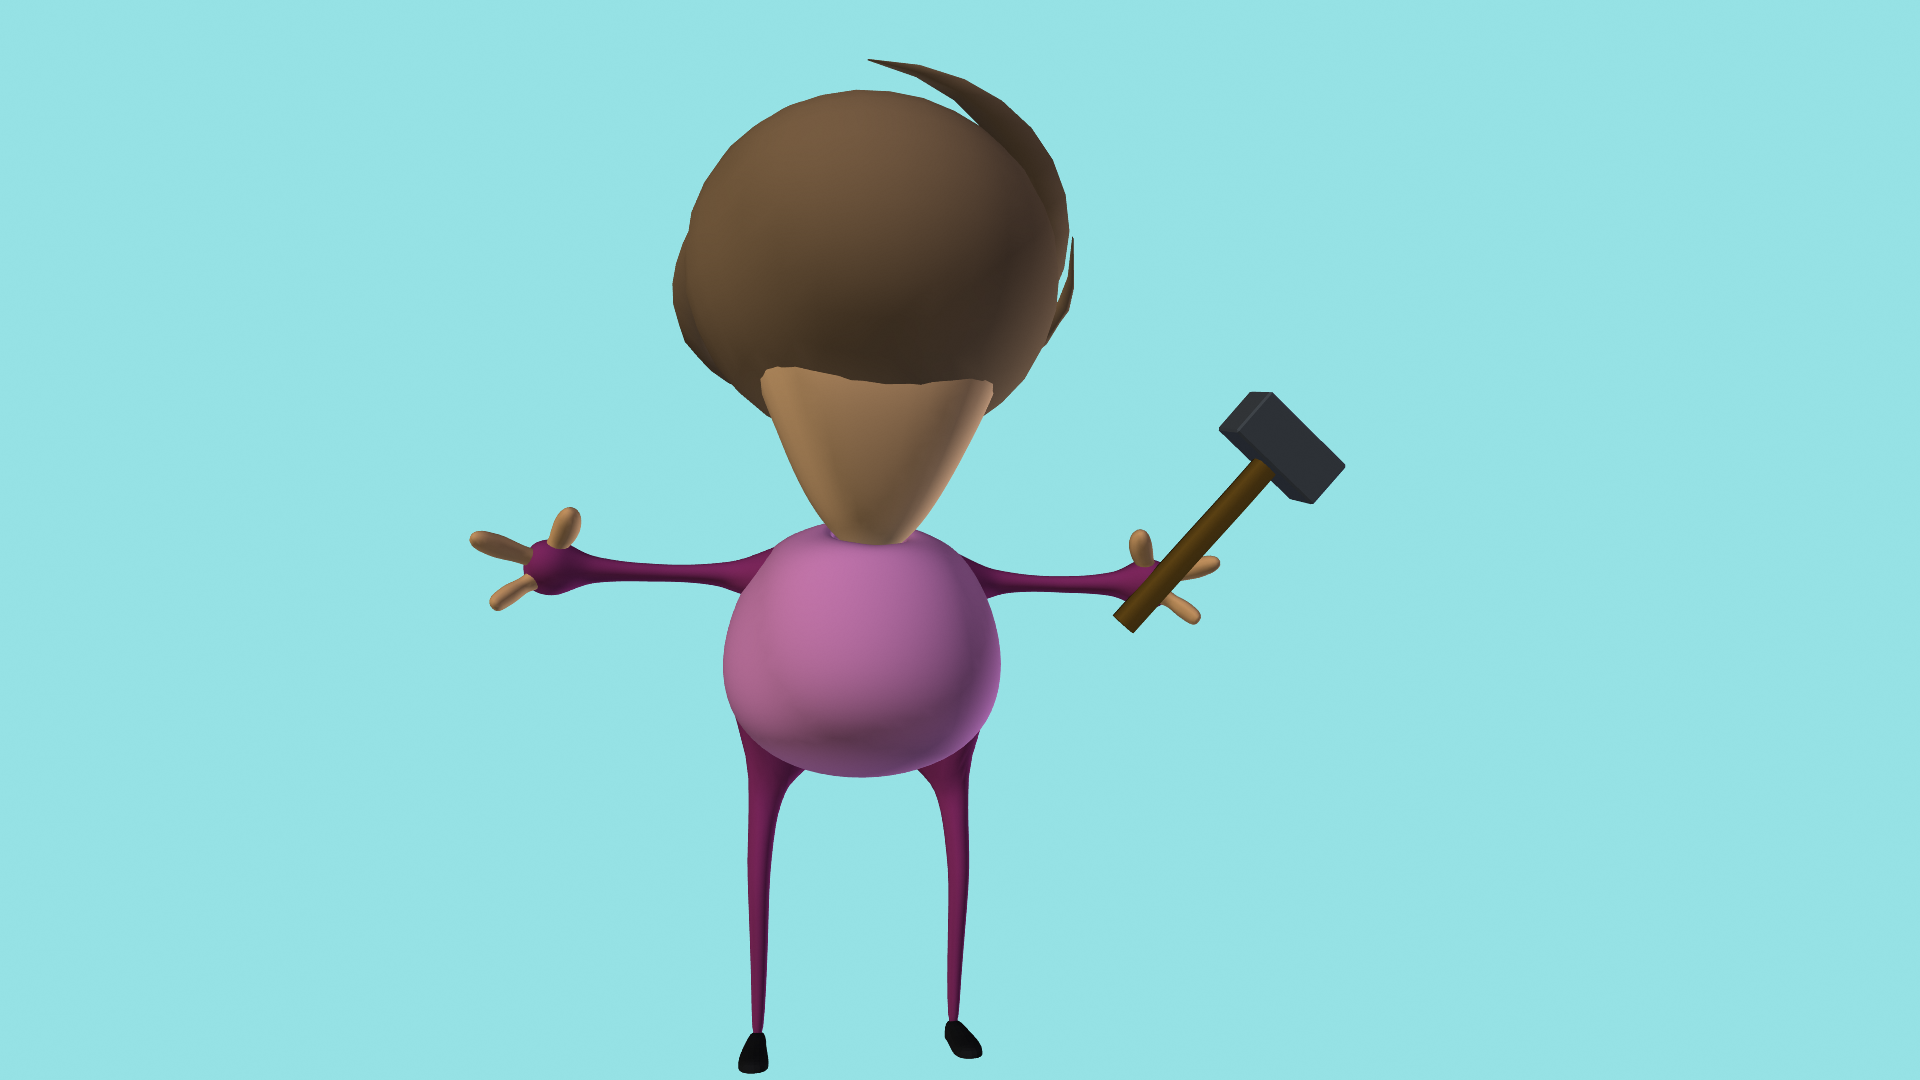
Pixel Hammer
This was a fun one that I wish I had just a little bit more time to refine: I wanted all the Mos to hammer out colored circles, which would change color with each strike. As we zoom out, the individual circles become large pixels of the next shot: the “Software Highway” that the Mos themselves are creating through collaboration and sharing work. So first I animated one Mo hammering (actually, I stole the animation from a previous shot and made it cyclic) then exported a bunch of mesh-caches. All the Mos you see animated are using the same animation and the mesh cache modifier, with curves to make them a bit offset. As we zoom out the rest of the field is covered with non-animated simple Mo Meshes, that are too far away to see clearly. The pattern of the hammering is synced during the zoom out with frames from the next shot render, using a simple python script called ‘pixel_mosaic’ which is unfortunately slow to run (it takes longer than the render of the shot!). The shot is not bad, but if I had a bit of time I would have refined it more to be even better. One of the issues with working at this scope is organization, and I would have gone fairly insane without a bunch of python scripts for arraying and duplication, renaming, and timing to the animation:
The Road
This one is fairly straightforward. I used Arrays and Curves to build the road and constrain the car motion. There is a certain design issue with curves deform: the bounds/fit options are on the curve rather than modifier. This means you need to duplicate the curve for the road in order to deform the cars, rather than use one curve for both. In practice, the hook modifiers I used to rig the road needed to be applied anyway or I got odd velocity changes on the cars.
One fun thing is having a lattice around the camera to simulate lens distortion, and scaling the cars as they pass the camera for a neat distorting motion-blur-like effect. At night the cars are just streaks of light, but in the daytime, the tailights have shapekeys that allow a real 3D motion blur effect.
I used Blender Internal in this (and most shots) but I got into a small issue: I wanted shadows from the sun on a shadeless material. As a result, most of the surfaces use nodes, with various nodegroups that blend colors with a shadow-only material. To simulate lighting changes, a node group called ‘day_night’ outputs a single value that mixes in each materials day/night/dusk and shadow colors. Animating the one nodegroup (and the angle of the sun, and the world colors) allows a global change in lighting over the entire scene.
Stock Tickers
Here I used my text FX script but I found that it was too cumbersome, so I added a new animation mode to the addon: increment or ‘add’ that adds a number to the original string (assumed to be a float number or you’ll get a python error). That way I could animate the stock prices with one segment and a single curve – If you want to be fancy you could grab real data from a stock exchange for the prices! for the little up and down arrows I used Blender’s “object font”, as well as for the grid behind the numbers.
Voice Recording- remember to turn the fridge back on!
We are not primarily a sound studio, but we have a nice Studio Projects Mic (thanks for the recommendation Jan), a USB sound interface (a mic port pro), and lots of bookshelves to provide sound dampening. And with Audacity running on my laptop, we switched off the fridge (ominous foreboding). Sound recording went almost without a hitch. Had we the time, we’d have experimented more with performance. But the biggest disaster was when two days later Urchin’s artist-in-residence tried to eat some beans.
Editing and Sound
I really wanted a chance to evaluate Pitivi or another editing program in a production environment. But I was so down to the wire that I had to use Blender’s proven VSE for the editing. Without time or budget to arrange for a sound designer (I literally had no window of locked timing to send somebody) I was forced to do ‘sound design’ myself in Blender. Our friend Jim (James P. McQuoid) kindly offered to make some guitar/bass music so we got together online and on the phone, and he sent me some recordings he made in his home studio with analog effects and Ardour for the recording late on the penultimate day, when I was oh so close to locking picture. On my end, I couldn’t get Ardour running! So I edited the sound in Blender as best as I could. Blender’s not really ideal for sound design: you can’t move sounds on subframes, there is no level meter, no sound plugins, and even the levels you hear while editing might not be exactly what you output, especially if they are animated levels. With no time to spare for foley, I downloaded a tonne of sounds from freesound.org, an amazing resource. Most are CC 0, some are CC BY. Here’s a list of credits:
With flat shaded materials most shots don’t have lights – Blender is actually very close to being able to render most these shots in OpenGL alone. However Blender Internal is quite fast especially with this setup. In the few cases where I wanted the appearance of lighting, I’d use separate materials with different brightness on the same object. The road shots were an exception with their ray traced shadows, but even those relied on animated colors instead of lighting.
For the shot with the planes I used cycles, but only so I could process the world sun/sky via nodes to produce a cartoony sun. Internal doesn’t give nodes to the world material as far as I know.
Flat Shading, Soft Gradients and Banding
A small note about using subtle gradients and washes: they are highly susceptible to banding when rendered into 8 bit formats. This was an issue in multiple ways. Blender has a ‘Dither’ option in post processing that shuffles the pixels around and prevents banding in the 8bit png outputs. Inkscape does not; I ended up recreating .svg images within Blender to avoid the banding – making inkscape more of a mockup tool (for this project) than a production pipeline tool. The above picture uses the posterize filter in Krita to illustrate the effect of banding on the right side of the image.
Finally compression to video format further reduces the chroma information in the image and increases the banding even more. Here I resorted to adding a subtle grain to the images (you can find 35 mm grain videos online) on overlay at 30% just before compressing. This also adds a subtle grain which can be a nice detail. Those files are not free to reshare, it would be nice to have either full CC licensed grain files for use with open movies, or a grain node in Blender / grain effect in Pitivi for procedural grain.
Compression
I have a working knowledge of what containers and codecs are out there, as well as their relative free/non free status- but I am not an expert by any means, especially at the end of an 80 hour week/ 28 hour single ‘day’ marathon. So I opted to use Transmageddon to produce .webm files for the web. Initially I used Blender’s .ogv output for a test, but then used the lossless h264 mode to make a master.
A scheduled power outage forced me onto my laptop. Where Transmageddon/Gstreamer in Fedora 21 suddenly lost the ability to play h264 streams, due to a bug in Gstreamer, packagekit, or both. So I re-rendered my master in huffyuv (nicely avoiding h264 altogether), and went back to Transmageddon… which just didn’t work – no errors, it would just sit there, consuming 0% CPU. Finally I fired up Pitivi, dropped the huffyuv track into the timeline, and outputed multiple resolution .webm files from there.
Production Files
BLAM! An open movie is born. We’re sharing all the production files — feel free to use them under a CC BY SA license, while all scripts with the project are under the GNU GPL (2 or later). You can use these to produce language localizations, look at how shots were made, or make your own new work. Download HERE.
If you want to make an (audio) localization of the movie, we’ve made a sfx/music track available for you to use with new dialog as a short-cut. You can download it HERE.
In Summation
Overall this project was a positive experience, with only a few things I’d change. There are some small glitches/ non-ideal details in some shots that I could fix, nothing huge (a dissolve here, timing change here, background change there), and some overall pacing I could tighten (the road shots, stock tickers and internet shot could be a bit shorter/ feel faster). Given some extra time, I’d have a professional sound engineer do the mixing and mastering, experiment with different deliveries of the V.O., and probably drop in a bit more music.
Bugs I should be filing:
Tesselator for fonts fails for certain font/ size combinations in Blender
h264 not working in gstreamer in Fedora 21: This is tricky as it has to do with multiple pieces of software: Gstreamer, PackageKit and RPMFusion (since h264 is non-free/ patent encumbered and not shipped by default in Fedora)
Transmageddon failing weirdly in Fedora 21
Some list of wants in no particular order:
Better Dependency and File-linking capability in Blender: probably coming by the end of 2015! This would allow a more fluid and cartoony Mo rig, and the ability to both link the character in and do custom deformers right in your animation files.
Better Particle system, tessellation options for text in Blender: This isn’t really needed due to either workarounds or compromises for this project, but it would be useful for either speeding up workflow or enabling more elaborate effects.
Out of the box working ‘pro’ sound in Fedora: I’d love to see Ardour3 actually work out of the box. I think sound on linux is ‘fixed’ for consumer uses thanks to pulseaudio, but the whole Jack/ Realtime kernel integration feels over-engineered and fiddly. even Audacity, which supposedly works with Pulse, required me to run it with pasuspender or it would crash.
What seems like an oxymoron: ‘pro’ compression for dummies: a compressor/transcoder that is bullet proof, with constraints or presets for different devices/ presets, and perhaps quality preview for output – and the ability to save a batch script for multiple output targets and resolutions. What we have right now is either consumer oriented and limited (Transmageddon, Handbrake) or you get to fiddle with low-level codec knobs and break the output.. not fun.
Support for .png and other image sequences in Pitivi for work with transparencies, masks, etc.
Funnily enough, Firefox’s new h264 support crashes the browser on my computer. For now, I’ve avoided this by placing the .webm sources for video first, but this might break safari…
That’s all for now, I hope you found this post informative!
There’s been some radio silence while I dealt with a death in the family, so I’m excited to begin catching up on Tube Project news! We have a tendency to post unheralded micro-updates and releases in various corners of the internet — on Twitter, G+, Youtube, and at conferences as well as here on our […]
Greetings, earthlings
There’s been some radio silence while I dealt with a death in the family, so I’m excited to begin catching up on Tube Project news!
We have a tendency to post unheralded micro-updates and releases in various corners of the internet — on Twitter, G+, Youtube, and at conferences as well as here on our production blog. Bassam has begun video-documentation of custom tools built for Tube in his ‘Add-ons for Empathy’ series (Floating Sliders, Proxies and a Bonus). We’ve hesitated to release our tools until the film is done, when we’ll have more time to maintain them and create supporting materials — but for the adventurous and Blender-interested among you, we are releasing a selection of them as free/open source software.
Playing to his creature strengths, Tal Hershkovich recently finished animation on one of the most challenging shots of the movie — a roach fight!
We’re also happy to have Henri Hebeisen back with us, doing great work using particle systems to develop the title animation.
In October the project had reached nearly 30,000 lines of code — and the same weekend we noticed it, Bassam wrote 500 more to facilitate the timelapse animation. He’s also written a wiki entry explaining it, http://wiki.urchn.org/wiki/Timelapse_tools.
So, onward! Most importantly, we’ve developed a funding plan for seeing the production all the way to the finish. Thanks to everyone for their support and kind wishes =)


 In Blender, we define a general direction for the branch, and generate points along it with small angle variations between each point. By default, every 5 points generated, we created a bigger angle variation (corresponding to the blue one in the image). We then convert theses points to a Curve Object.
 When each point is generated, we generate a random value between 0 and 1 and look if this number is smaller than the Children Probability defined by the User. If it’s the case, we create a child branch at the point position and store it’s relative position on the master branch. For example, if the tenth point of a branch composed of forty points has a children branch, we create this new branch with a ‘relative position in the master branch’ of 25%. This will be very useful when dealing with the animation.