Addons for Empathy 2: Proxies and a bonus!

Hi Folks! We’ll try to do a bi-weekly installement of Addons for Empathy (until we run out of addons). This one is a two-parter: Our main installment is about working with proxies in Blender, the second is about a bold new experiment in Rig UI. Proxy Workflow and Transparent Proxies Addons: Get the files from […]

Hi Folks!
We’ll try to do a bi-weekly installement of Addons for Empathy (until we run out of addons). This one is a two-parter: Our main installment is about working with proxies in Blender, the second is about a bold new experiment in Rig UI.

Proxy Workflow and Transparent Proxies Addons:

Get the files from my gitorious

The video is about two addons, both making proxy editing in the sequencer more friendly to our project. A quick explanation:

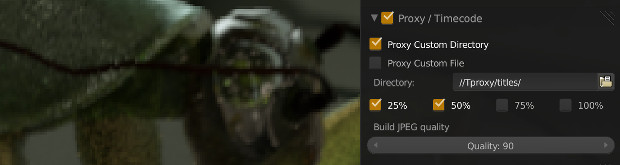
Blender’s Video Sequence Editor or VSE for short has a feature called proxies. This basically allows an in-place replacement of strips by 25%, 50%, 75% or 100% versions, in a fast format (.jpg or motion jpg) This is especially useful when:

  1. Editing Large format files that are too slow to be realtime – either in resolution (2K or 4K) or in type (.EXR!!!)
  2. Editing over the network, especially files of the previous types
  3. Working with complex and multiple effects that could be benefit from being cached

So Proxies in Blender work a bit like a combination of proxies and caches. I prefer them as the former, since it skips having to recalculate every single you change some timing – instead they only need to be recalculated when the sources change.

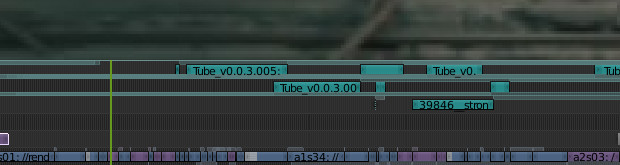
However, working with proxies in Blender can be painful by default, and this is where Proxy Workflow Addon comes in:

  1. Editing Proxy settings must be done strip by strip: Proxy Workflow lets you set them for all selected strips at once
  2. Default location is in the same folder as the originals, which is bad in the case of network shares; Proxy Workflow automatically sets them to a local directory “TProxy” that contains all the proxies for the edit, and can be moved around like a scratch disk
  3. Sometimes Blender tries looking for the original files even when it is using proxies. If you are trying to use proxies to avoid using the network/internet, this becomes a problem. Proxy workflow allows ‘Offlining’ strips, and then ‘Onlining’ them again when you can reconnect to the network
  4. Blender doesn’t know when the source files are ‘stale’ and need to be re-proxied – for instance if you rerender. Proxy workflow timestamps as it makes proxies, allowing you to select a bunch of strips and re-proxify only the changed ones.
  5. Proxy workflow is designed to work with movies and image strips only for now, as I’m interested in true proxies, not caching effects.

A seperate addon is called ‘Transparent Proxies’ and does what it says on the tin (and no more): It allows making proxies of image sequences that preserve the alpha channel for alpha over effects. It does this by cheating: It uses Imagemagick on the commandline to make a .tga proxy, and just renames to .jpg to satisfy Blender. You need to install imagemagick first for it to work.

 Bonus: Rig UI Experiment:

Code is at gitorious
This brings us to the bonus round- the Rig Selection UI. I’m continuing my round of experimentation with BGL and modal addons, to make the kind of ‘typical’ rig ui where animators can select or act on a rig by clicking on an image. This ui is using an SVG file to define the hotspots, and a PNG to actually draw the image. It already works, though I’m still going to refine it and add more options/ easier rig customizability. The end goal is to be able to do Rig UIs without writing code, simply by drawing them in Inkscape and pressing a few buttons in Blender. Stay tuned!!!


Adventures in Blender’s Video Sequence Editor

Blender’s Video Sequence Editor (or VSE for short) is a small non-linear video editor cozily tucked in to Blender, with the purpose of quickly editing Blender renders. It is ideal for working with rendered output (makes sense) and I’ve used it on many an animation project with confidence. Tube is being edited with VSE, as […]

sequencer

Blender’s Video Sequence Editor (or VSE for short) is a small non-linear video editor cozily tucked in to Blender, with the purpose of quickly editing Blender renders. It is ideal for working with rendered output (makes sense) and I’ve used it on many an animation project with confidence. Tube is being edited with VSE, as a 12 minute ‘live’ edit that gets updated with new versions of each shot and render.  I’ve been trying out the Python API to streamline the process even further. So… what are the advantages of the Video Sequence Editor. Other than being Free Software, and right there, it turns out there are quite a few:

  1. familiar interface for blender users: follows the same interface conventions for selecting, scrubbing, moving, etc. Makes it very easy to use for even beginning to intermediate users.
  2. tracks are super nice: there are a lot of them, and they are *not* restricted: you can put audio, effects, transitions, videos or images on any track. Way to go Blender for not copying the skeuomorphic conventions that makes so many video editors a nightmare in usability.
  3. Since Blender splits selection and action, scrubbing vs. selection is never a problem, you scrub with one mouse button, select with the other, and there is never a problem of having to scrub in a tiny target, or selecting when you want to scrub. I’ve never had this ease of use in any other editor.
  4. simple ui, not super cluttered with options
  5. covers most of the basics of what you would need from a video editor: cutting, transitions, simple grading, transformations, sound, some effects, alpha over, blending modes, etc.
  6. has surprisingly advanced features buried in there too: Speed control, Multicam editing, Proxies for offline editing, histograms and waveform views, ‘meta sequences’ which are basically groups of anything (movies , images, transitions , etc) bundled together in one editable strip on the timeline.
  7. as in the rest of Blender, everything is keyframable.
  8. you can add 3D Scenes as clips (blender calls them strips) making Blender into a ‘live’ title / effects generator for the editor. They can be previewed in openGL, and render out according to the scene settings.
  9. it treats image sequences as first class citizens, a must!!!
  10. Python scriptable!!!! big feature IMO. (uses the same api as the rest of Blender)

proxysettings

Disadvantages are also present, I should mention a few:

  1. UI is blender centric! so if you are not a blender user, it does not resemble $FAVORITEVIDEOEDITOR at all. Also, you have to expose it in the UI (only a drop down away, but most people don’t even realize it is there)
  2. no ‘bin’ of clips, no thumbnail previews on the video files, though waveform previewing is supported.
  3. lacks some UI niceties for really fast editing, though that can be fixed with python operators, and also is getting improvements over time.
  4. could be faster: we lost frame prefetching in the 2.5 transition, however, it is not much slower than some other editors I’ve used.
  5. not a huge amount of codec support: Since Blender is primarily not a video editor, supporting a bajillion codecs is not really a goal. I believe this differs slightly cross platform.
  6. bad codec support unfortunately means not only that some codecs don’t work, but that some of the codecs work imperfectly.
  7. needs more import/export features (EDL is supported, but afk only one way)
  8. some features could use a bit of polish. This is hampered by the fact that this is old code, a bit messy, and not many developers like to work with it.

Needless to say this is all ‘at the time of writing’. Things may improve, or the whole thing gets thrown into the canal 😉

So what have I been up to with Blender’s video editor? Quite a bit! Some of it may end up not-so-useful in the end, but experimentation could yield some refinements. The really good thing about using Python, is that I can ‘rip up’ complex things and rearrange / redo them. So the experiments don’t result in a huge waste. Lets have a peak.

News + MediaGoblin is Rad

We are getting really excited to show all the incredible animation and amazing render tests coming off the farm. And even though we don’t want to let *too* much slip before time, I know Bassam is planning an update with some teaser images and production notes pretty soon. Today I’m happy to share news of […]

We are getting really excited to show all the incredible animation and amazing render tests coming off the farm. And even though we don’t want to let *too* much slip before time, I know Bassam is planning an update with some teaser images and production notes pretty soon.

Today I’m happy to share news of MediaGoblin, a libre software “publishing system” for images, video, audio and more that friends of Bassam’s and mine are building. It’s a single replacement for Flickr, YouTube, SoundCloud, and similar that anyone can run (like WordPress), but federated to keep files under user control. It’s very extensible, with support just added for 3D models now suggesting an alternative to Thingiverse. But I’m especially excited about MediaGoblin because it will establish the core functionality we can use to implement a lot of cool ideas we’ve had during Tube production for a collaborative platform that also fills the huge need for a solid asset management pipeline, a kind of super-Helga with some interesting properties. We’ve been talking to a bunch of developers about putting together a free software project after Tube, in which there’s been a lot of interest, and I have a thought that we could get studios to pool resources instead of each rolling their own and occasionally making a dead-end free software release.

A few weeks ago at the Blender Conference, we were talking with the renderfarm.fi developers about how, together with their distributed rendering, and these fairly near-future pipeline/collab possibilities, it seems like a lot of big pieces falling into place. MediaGoblin is worthy in its primary goals, but of especial interest for providing much of the functionality we’d need, plus perks like federation that we’ve dreamed about. Coding with Will Kahn-Greene, formerly of the Participatory Culture Foundation, the project lead is Chris Webber, until recently a developer at Creative Commons, and also a Blender user who did the anim in the excellent Patent Absurdity doc. And as part of the Tube Open Movie, Chris helped build pipeline scripts as well as our Reference Desk tool, one of the programs inspiring the new asset branch in Blender.

bassam_bconf2012_sebastiankoenig

Today MediaGoblin has a nice write-up at Libre Graphics World, concluding:

If you are concerned about having full control over images, videos and audio records that you put online, you have just a few days left to support development of MediaGoblin — an awesome free software project that decentralizes media storage.

If you are a VFX or animation studio, or even a 3D printing company, you have even more reasons to support the project. With initial support for 3D models (STL and OBJ) MediaGoblin has a great chance to grow into a scalable digital asset management solution that is free to use and modify.

Finally, if you are a developer who’s good at Python, MediaGoblin could do with your contributions.

** Donations are tax-deductible in the US and also support the Free Software Foundation, which hosts the campaign.

And thanks for anything you can do to help this awesome project by passing the word!

Drinking the Blenderaid

I’m a huge fan of Blenderaid, a great way to manage your blender projects. You run a small server that is capable of crunching through your project, finding all objects, dependencies, etc., then point your browser to it and get a graphical overview. You can look at individual files, see the names of objects/materials/etc., rename […]

I’m a huge fan of Blenderaid, a great way to manage your blender projects. You run a small server that is capable of crunching through your project, finding all objects, dependencies, etc., then point your browser to it and get a graphical overview. You can look at individual files, see the names of objects/materials/etc., rename them, view dependencies, fix broken links, and now check and update SVN status etc. etc., all from the comfort of your browser window. I’m using the Python 3 version, which for me necessitated installing PySVN from source, since the Ubuntu modules are Python 2 only. Other than that, I had a smooth install; I’m looking forward to continuing to use this version and further goodies in the future.

Some cool things you can do with it:

  • Find errors in your project globally without having to check each file one by one in blender- and fix them (could benefit from batch tools so you can do multiple at a time)
  • Create ‘bundles’ of files, e.g. to send to an off-site animator who doesn’t have SVN access, by quickly seeing all the dependencies of a given scene file. This can be done by hand right now, but I’m pretty sure it could be scripted fairly easily.
  • Make sure your files are up to date, track problems with SVN visually
  • Rename models/assets, find out where they get used, etc.
  • Probably a lot more 🙂

Blenderaid could change the way we work with SVN for projects – instead of checking out several gigabytes of production data, each artist need only check out exactly what they need– saving time, local disk space, bandwidth. We could use it also to have versions of assets and switch (optionally) some scenes to use newer versions or to continue working with the old.

I’m hoping to have time after tube to experiment with blenderaid in conjunction with helga, or alone, and to have server-side installation as well as the local one. This could be the key for large-scale projects in blender, big thanks to Jeroen and Monique for writing it, and I look forward to seeing how it evolves.

Quick note from Jeroen: the python2 version saves time by removing the need for additional compiling, and should work without any problem. (I was under the mistaken notion that Blenderaid’s python version had to match Blender’s).

Modeling the Train, with Automatic Baking

In between bouts of python coding I’ve been working on the model for the train and carriages. The model is asymmetric and modular so in theory loads of variations could be created by combining bits from the two models shown below.  The two ends of each train are different, as are the pantographs and all […]

In between bouts of python coding I’ve been working on the model for the train and carriages. The model is asymmetric and modular so in theory loads of variations could be created by combining bits from the two models shown below.  The two ends of each train are different, as are the pantographs and all of the side panels.  The design is based on a mix of old NYC subway cars and Soviet-era Eastern European engines.  I built the model on top of an early design for the undercarriage which had been modeled by Jean-Sébastien Guillemette and Jarred de Beer.

The model for the train is currently very high poly as it will probably be used in a few close-up shots (these renders are all geometry – no texture normal/bump maps!).  There’s a bit of work still left to do (naming 3000 objects and parenting them in a nice ordered heirarchy for one!) and making a low poly version, not to mention further tweaking of the design and rigging the moving parts!  To make the low poly version lots of the objects can simply be moved to a hidden layer (or excluded from the ‘HI’ group – we use group instances to bring models into scene files), but many of the meshes need to be split up into smaller parts so that the smaller parts can be excluded from the low poly renders – for example we need to move the rivets out of the body panel meshes as they will be so small in many of the long shots they won’t be noticeable – even at 2K!

For continuity’s sake we need to make sure the rivets are in the same place in the high and low poly versions.  To save the texture painters some time later down the pipeline I’ve written a script which goes through every object in the mesh and separates the details from the main lower poly mesh component (I can define these using vertex groups etc) and then bakes the details’ AO ‘shadow’ onto the lower poly part of the mesh and saves the texture in a maps file.  The script also intelligently names all of these textures in case links get broken up as the SVN gets reorganized over time.  For example if the script finds an object called ‘side_door’ it will split the object into ‘LOW0001side_door’ (for low poly) and ‘DET0001side_door’ (for details) and then bake out the AO to an image called ‘IMG0001side_door’ while making sure that all the meshes stay linked to save memory (rendering without any textures is already taking up over 2GB of memory).

Unlike the normal P-key behaviour, the script makes sure that separating meshes affects all the linked duplicates, not just one of them.  The numerical prefix helps identify one specific detail mesh with its corresponding specific lower poly mesh.  For example if there are 5 duplicates of ‘side_door’ (‘side_door.001’,’side_door.002’…), the first will be renamed ‘LOW0001side_door’ with its details saved in ‘DET0001side_door’, the second will be renamed ‘LOW0002side_door’ and its details saved in ‘DET0002side_door’ and so on, so future ‘tubers’ to work on the model won’t have to spend hours searching the outliner list to find the right object!  The reason the number is at the start and not the end of the name is to stop blender messing with the numbers, and to help sorting in an alphabetized list!

Fingers crossed there won’t be any surprising bugs in the script, as baking out 1000 unique meshes is likely to take some time and we haven’t written a resume function for the script yet!

©URCHIN 2015